How to Access Your Home Server or Raspberry Pi When Your ISP Uses CGNAT
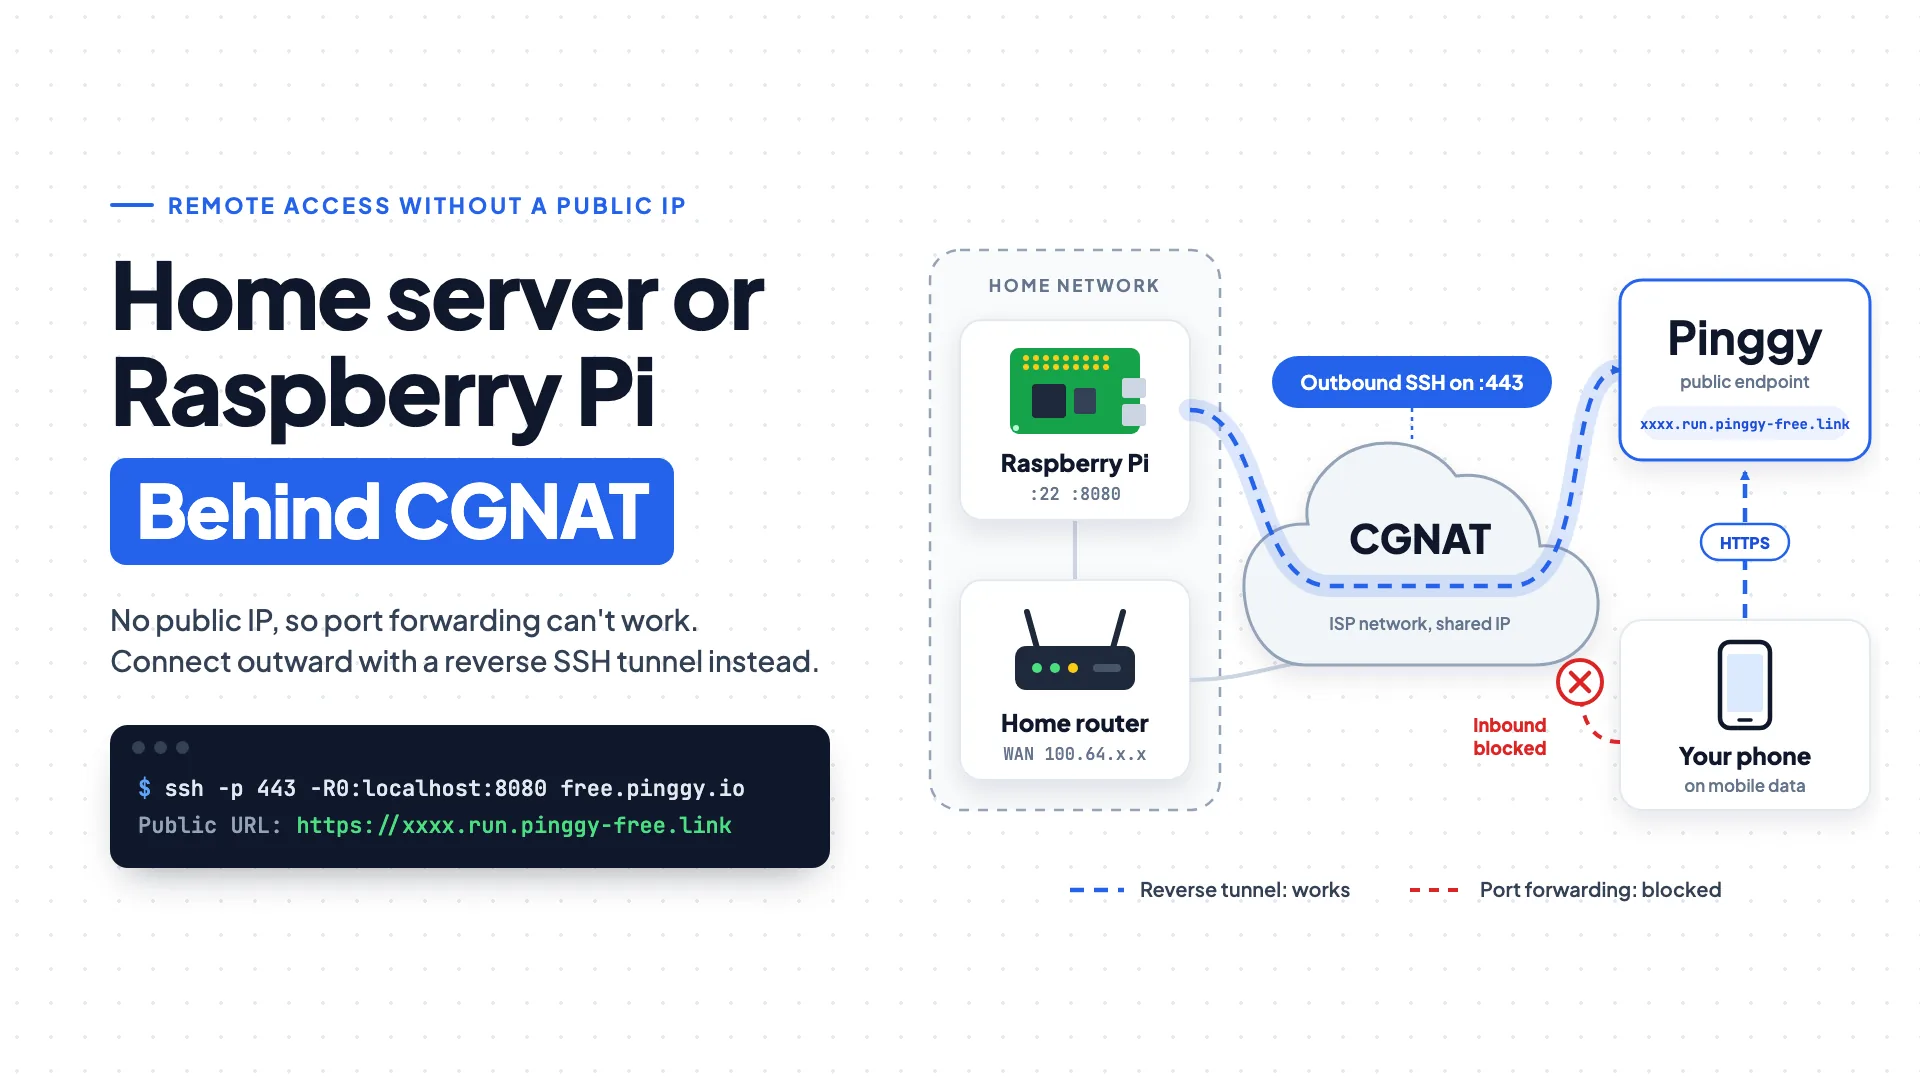
You set up a home server or a Raspberry Pi, opened a port on your router, and tested it from your phone’s mobile data. Nothing loads. You double-check the router rule, the firewall and the service itself, and everything looks correct. The problem may not be on your side at all.
If your internet provider uses Carrier-Grade NAT (CGNAT), your router never receives a public IP address that the internet can reach. No router setting can fix that. This guide explains what CGNAT is, how to confirm you’re behind it, and how to reach your home server or Raspberry Pi anyway.
Summary
If your router’s WAN IP doesn’t match the public IP that a “what is my IP” search shows, or it sits in 100.64.0.0/10, your ISP uses CGNAT and no port forwarding rule will ever see traffic. The way around it is an outbound tunnel: run ssh -p 443 -R0:localhost:8080 free.pinggy.io on the Pi for a public HTTPS URL, or ssh -p 443 -R0:localhost:22 tcp@free.pinggy.io to reach its SSH port. Run it as a systemd service so it survives reboots, and lock down SSH before you expose anything.
What is CGNAT and why does it break home hosting?
Your home router normally uses NAT (Network Address Translation) to let all your devices share one public IPv4 address. IPv4 addresses are scarce, so many ISPs, especially mobile, satellite and fixed-wireless providers, now add a second NAT layer inside their own network. That is CGNAT.
With CGNAT, hundreds of customers share a single public IP address. Your router gets a private address from the ISP, and the ISP translates it on the way out. This works for browsing and streaming because your devices always start the connection. It fails for hosting because inbound connections have no way to find your router. The public IP belongs to the ISP, and the ISP has no rule that says “send traffic for port 8080 to this customer.”
In practice, CGNAT causes:
- Self-hosted websites, dashboards and home automation panels that can’t be reached from outside
- SSH access to a Raspberry Pi that only works on your local network
- Game servers, media servers and security cameras that can’t be accessed remotely
- Webhooks that can’t reach a service running at home
How to check whether you’re behind CGNAT
You can confirm it in about two minutes.
- Find your router’s WAN IP. Log in to your router’s admin page (often
192.168.1.1or192.168.0.1) and look for the “WAN” or “Internet” IP address on the status page. - Find your public IP. Search “what is my IP” from any device on your network.
- Compare the two. If they match, you have a real public IP and ordinary port forwarding should work. If they differ, you’re almost certainly behind CGNAT.
A WAN address in the 100.64.0.0 to 100.127.255.255 range (100.64.0.0/10, the shared address space reserved for carrier NAT) is a strong sign. Addresses starting with 10., 172.16. through 172.31., or 192.168. on the WAN side also point to an extra NAT layer.
Why traditional port forwarding fails under CGNAT
The usual approach is to open a port on your router and point it at your server. A common variant is SSH port forwarding, where you route traffic through an SSH connection to reach a service on another machine. Both share one requirement: somewhere in the path there has to be a publicly reachable address that can accept incoming connections.
Under CGNAT, you don’t control that address. Your router can’t open a port on an IP it doesn’t own, so the rule you created never sees any traffic.
Your options for reaching a server behind CGNAT
There are several ways around the problem:
- Ask your ISP for a public IP. Some providers will assign one, often for a monthly fee. It’s worth a support call, but it’s not always available.
- Use IPv6. If your ISP and the connecting device both support it, IPv6 needs no NAT at all. Many home networks still lack IPv6 end to end, though.
- Rent a VPS and build a reverse tunnel. You keep full control, but you have to provision, secure and maintain the server yourself.
- Use an overlay networking tool. Tools like Tailscale work well for private access between your own devices, but they aren’t designed for giving the public a URL.
- Use a managed tunneling service such as Pinggy. Your server connects outward to a public endpoint, and traffic flows back through that connection. There is nothing to rent or maintain.
The last option works because CGNAT only blocks inbound connections. Outbound connections work fine, so a tunnel that starts from inside your network passes straight through.
How reverse tunneling gets around CGNAT
A reverse tunnel flips the direction of the connection. Instead of the internet trying to reach your Pi, your Pi opens an outbound SSH connection to a server that has a public address. That server then relays incoming requests back through the same connection.
Because the connection starts from inside your network, CGNAT treats it like any other outbound traffic. Pinggy is built on this mechanism. It runs the public-facing side, so you don’t have to run your own server. For a deeper look at how it works, read Pinggy’s guide to SSH reverse tunneling.
Step-by-step: access your Raspberry Pi with Pinggy
Every modern Linux, macOS and Windows system includes an OpenSSH client, so there is nothing to install. These steps use a Raspberry Pi, but they work for any Linux home server.
Step 1: Enable SSH on your Pi
On the Pi itself (with a keyboard and screen, or over your local network), enable SSH:
sudo raspi-config
# Interface Options → SSH → Enable
Before exposing anything, disable password logins and use key-based authentication. Copy your public key to the Pi first (ssh-copy-id does it in one command), or you’ll lock yourself out. Then edit /etc/ssh/sshd_config, set PasswordAuthentication no, and restart the service:
sudo systemctl restart sshStep 2: Tunnel a web service (HTTP)
If your Pi runs a web app, dashboard or API, run this on the Pi, replacing 8080 with the port your service uses:
ssh -p 443 -R0:localhost:8080 free.pinggy.ioPinggy prints a public HTTPS URL, something like https://xxxx.run.pinggy-free.link. Open it from any network, including your phone on mobile data, and you’ll see your service. No router changes are needed. The Pinggy documentation walks through the same flow for different setups, and the Raspberry Pi tunnel tutorial covers more Pi-specific services.
Step 3: Reach the Pi over SSH (TCP tunnel)
To log in to the Pi remotely, create a TCP tunnel to its SSH port (22):
ssh -p 443 -R0:localhost:22 tcp@free.pinggy.ioPinggy returns a hostname and a port. From your laptop, connect with:
ssh -p <PORT> pi@<HOSTNAME>Replace pi with your Pi’s username and use the hostname and port from Pinggy’s output. This is the same approach described in the Pinggy guide to accessing an IoT device over SSH from anywhere, which also covers other single-board computers such as Orange Pi, Banana Pi and Jetson Nano.
Step 4 (optional): Use the Pinggy CLI
If you prefer a purpose-built client to typing SSH flags, the Pinggy CLI lets you set the tunnel type (http, tcp, tls or udp), the local port and the web debugger port with descriptive options. The SSH tunnel from step 3, for example, becomes pinggy --type tcp -l 22.
Keeping the tunnel alive
A tunnel started in a terminal dies when the session closes, and the free plan has a 60-minute time limit per tunnel. Free tunnels also get a new URL each time. For a home server you want to rely on, plan for two things:
- Auto-restart. Run the tunnel as a systemd service with
Restart=always, so it reconnects after network drops or a reboot. UseServerAliveInterval=30in your SSH options to keep the connection healthy. - A stable address. Persistent URLs and custom domains are part of the Pro plan, so check the current plans on Pinggy if you need a permanent address.
A minimal service file looks like this. Use the exact command that works in your terminal:
[Unit]
Description=Pinggy tunnel to local SSH
After=network-online.target
Wants=network-online.target

[Service]
User=pi
ExecStart=/usr/bin/ssh -p 443 -R0:localhost:22 -o ServerAliveInterval=30 -o ExitOnForwardFailure=yes YOUR_TOKEN+tcp@free.pinggy.io
Restart=always
RestartSec=10

[Install]
WantedBy=multi-user.target
Save it as /etc/systemd/system/pinggy-tunnel.service and start it with sudo systemctl enable --now pinggy-tunnel.
Security checklist for anything you expose
Making a device reachable from anywhere also makes it a target. Before you rely on a tunnel:
- Use SSH keys, not passwords, and disable root login.
- Add authentication to web services. Put basic auth or a login in front of dashboards and admin panels. Pinggy can add basic auth at the tunnel itself by appending
-- b:user:passto the command. - Use TLS tunnels when privacy matters. Pinggy notes that its web debugger reads HTTP traffic to work. TLS tunnels keep the traffic end-to-end encrypted so Pinggy can’t read it.
- Keep software updated. Run
sudo apt update && sudo apt upgraderegularly on the Pi. - Expose only what you need. Tunnel one service at a time and close the tunnel when you’re done.
- Watch the traffic. Pinggy’s web debugger shows every request. The traffic inspection guide explains how to use it to spot unexpected requests.
Troubleshooting
- “Connection refused” on the tunnel: Make sure the local service is actually running and listening on the port you specified (
ss -tlnpshows listening ports). - Tunnel won’t start on Windows: Use
127.0.0.1instead oflocalhostin the command. - Connection drops repeatedly: Add
-o ServerAliveInterval=30and run the tunnel under systemd so it restarts on failure. - Blocked on port 22: Pinggy connects over port 443, which most networks allow. Behind a strict proxy, the SSH reverse tunneling guide above shows how to route through an HTTP proxy.
- Still unreachable: Check the tunnel type. A web app needs an HTTP tunnel, while SSH, databases and most game servers need TCP (or UDP, for games like Minecraft Bedrock).
Final thoughts
CGNAT is a limitation of your ISP’s network, not a mistake in your setup, and no amount of router tweaking will fix it. Once you understand that, the fix is simple: stop waiting for the internet to reach you and connect outward instead. A reverse tunnel gives your Raspberry Pi or home server a public address without a static IP, a VPS or any changes to your router.
To try it, start a free tunnel from the Pinggy homepage and expose one local service to see how it works.