SSH lets you forward ports in both directions. The less-obvious direction - reverse tunneling - is what you reach for when the machine running your service can’t be reached directly: it’s behind a corporate firewall, sitting on a private network, or assigned a dynamic IP with no inbound access. Rather than punching holes in a firewall or configuring port forwarding on a router you may not control, you initiate a connection outward from the restricted machine, and the remote server routes traffic back through that tunnel.
Pinggy is built on exactly this mechanic - it handles the public-facing server side so you don’t have to run your own.
Summary
SSH reverse tunneling allows you to expose local services to the internet, bypassing firewalls and NAT restrictions.
Basic Commands:
Create a basic reverse tunnel:
ssh -R 8080:localhost:3000 user@remote-server.comCreate a persistent tunnel with autossh:
autossh -M 0 -R 8080:localhost:3000 user@remote-server.comQuick tunneling with Pinggy:
ssh -p 443 -R0:localhost:3000 free.pinggy.io
What is SSH Reverse Tunneling?
SSH (Secure Shell) reverse tunneling allows an external machine to connect to a local machine, even if that local machine is behind a firewall or doesn’t have a public-facing IP address. Unlike typical SSH port forwarding, where traffic to a port in the local system is forwarded outward to a remote system, reverse tunneling sends traffic from the remote system back to your local machine.
This technique is especially useful for:
- Forwarding traffic from a remote system to a local system which is behind a NAT
- Bypassing firewall restrictions
- Accessing services on a local machine from a remote location
- Enabling remote debugging or testing of applications
- Managing IoT devices, servers, or databases from anywhere
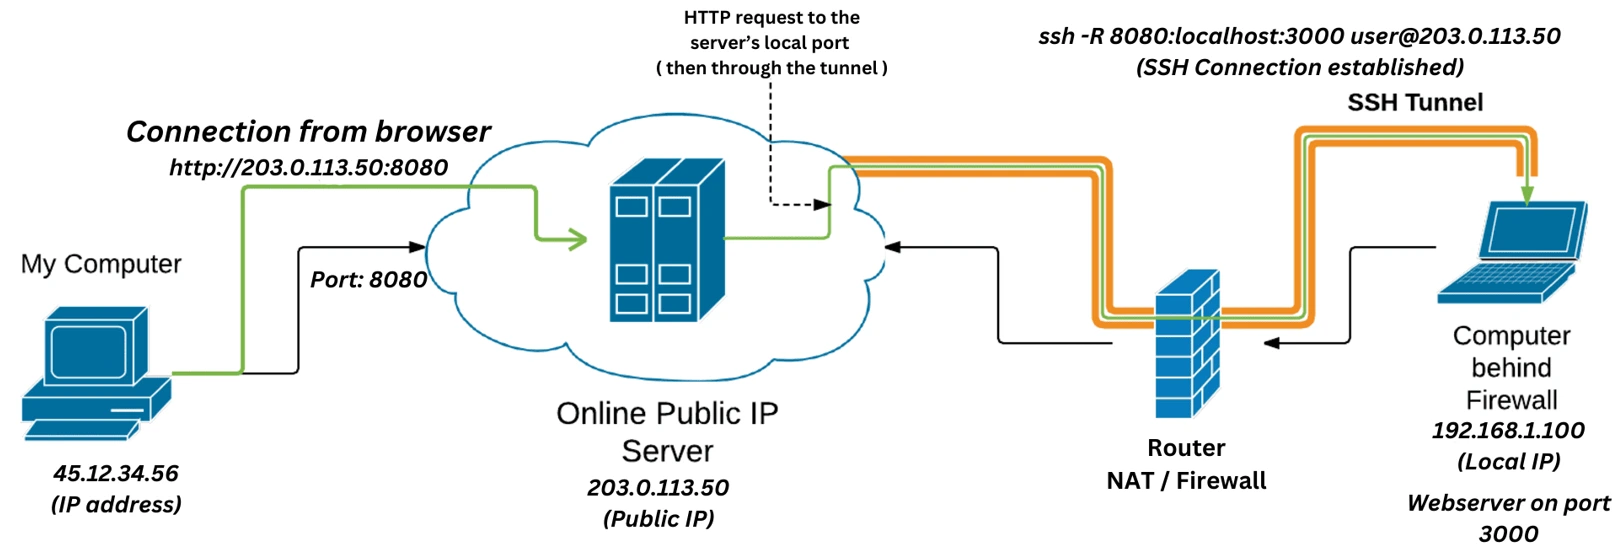
How SSH Reverse Tunneling Works?
The basic principle of reverse SSH tunneling is to create a connection from a remote machine (which could be a server in the cloud) to your local machine using SSH, forwarding a port from the remote system back to a service running on your local system.
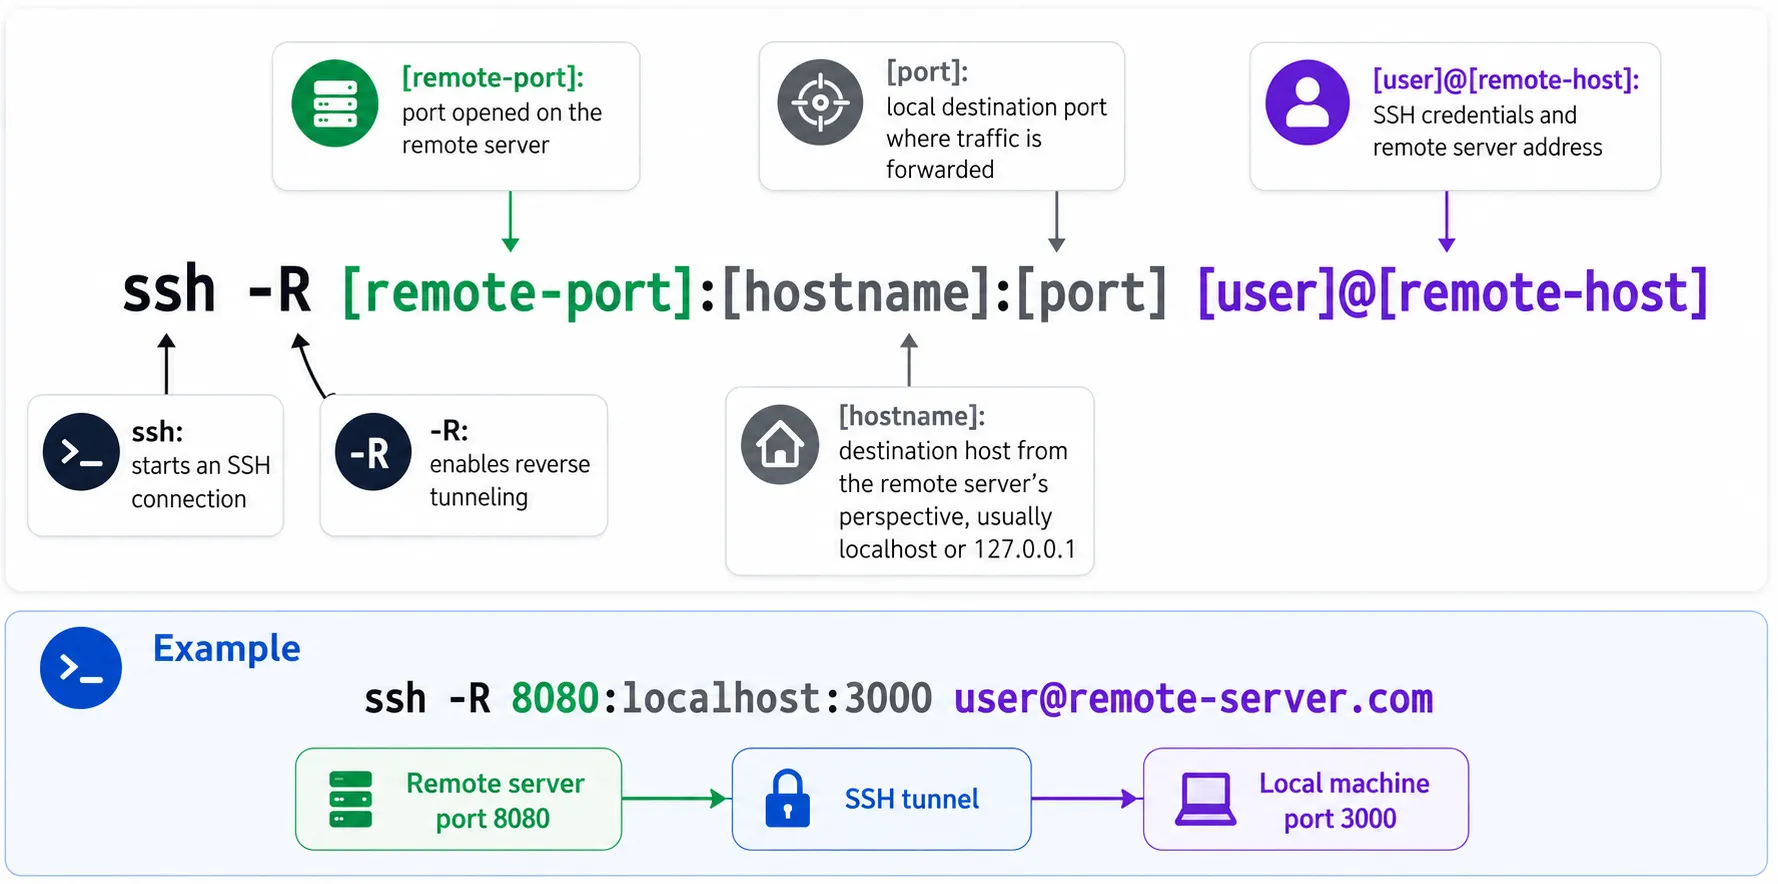
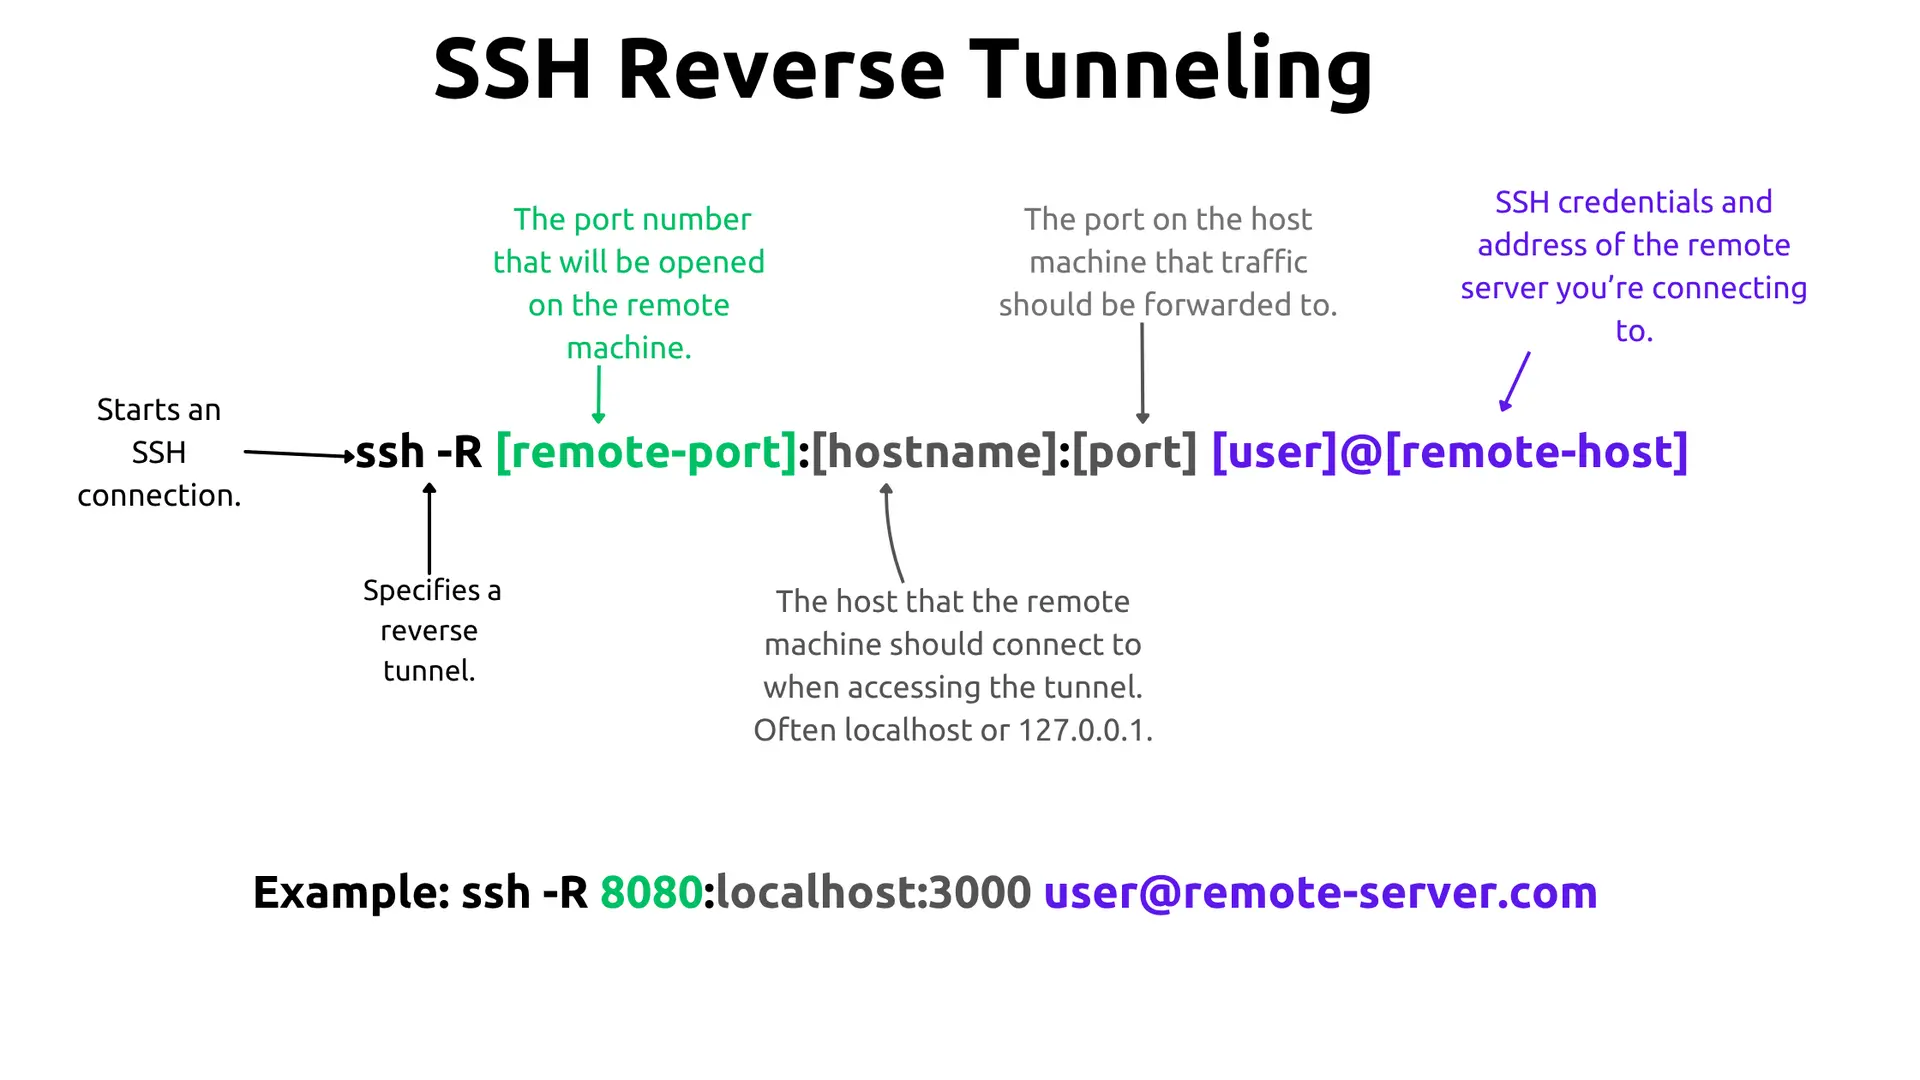
Command Syntax:
ssh -R [remote-port]:[hostname]:[port] [user]@[remote-host]-R: Defines the reverse tunnel[remote-port]: The port on the remote machine that forwards traffic[hostname]:[port]: The host and port where the local machine will forward the traffic to. Herehostnamecan simply belocalhostto forward the traffic to a service running in this local system itself.[user]@[remote-host]: Remote SSH server credentials
For example:
ssh -R 8080:localhost:3000 user@remote-server.comIn this example, any traffic to remote-server.com:8080 will be forwarded to port 3000 on your local machine, allowing a user to connect to the remote server to access your locally hosted service.
How to Set Up SSH Reverse Tunneling
Setting up SSH reverse tunneling allows you to securely forward traffic from a remote server back to your local machine. The steps may vary depending on your operating system. Here’s a guide for Linux, macOS, and Windows.
For Linux
Step 1: Ensure SSH is Installed
Most Linux distributions come with SSH pre-installed. If it’s not installed, you can add it using the following commands:
For Ubuntu/Debian:
sudo apt update
sudo apt install openssh-client
Step 2: Set Up SSH on the Remote Server
Ensure that SSH is installed and configured to allow reverse tunneling on the remote server. You’ll need to edit the SSH configuration file to allow this feature:
Open the SSH configuration file on the remote server:
sudo nano /etc/ssh/sshd_configFind the line that says
GatewayPortsand set it toyes:GatewayPorts yesRestart the SSH service to apply changes:
sudo systemctl restart sshd
Step 3: Run the SSH Reverse Tunnel Command:
To create a reverse tunnel, use the following command:
ssh -R [remote-port]:localhost:[local-port] [user]@[remote-host][remote-port]: The port on the remote server you want to forward.[local-port]: The port on your local machine that receives the forwarded traffic.[user]@[remote-host]: Your SSH credentials.
Example:
ssh -R 8080:localhost:3000 user@remote-server.comThis will forward traffic from 8080 on the remote server to port 3000 on your local machine.
For macOS
Step 1: Ensure SSH is Installed
macOS typically comes with SSH pre-installed. However, if it’s missing, you can install it using Homebrew:
brew install opensshStep 2: Set Up SSH on the Remote Server
Follow the same steps as in the Linux section to configure SSH on the remote server:
- Edit
/etc/ssh/sshd_configto allow reverse tunneling:
sudo nano /etc/ssh/sshd_config- Set
GatewayPortstoyesand restart the SSH service:
sudo systemctl restart sshdStep 3: Run the SSH Reverse Tunnel Command
The same SSH reverse tunneling command applies to macOS:
ssh -R [remote-port]:localhost:[local-port] [user]@[remote-host]For example, if you want to forward port 8080 on the remote server to port 3000 on your local machine:
ssh -R 8080:localhost:3000 user@remote-server.comFor Windows
You can set up SSH reverse tunneling on Windows using either OpenSSH (included in Windows 10 and later) or PuTTY.
Option 1: Using OpenSSH (Windows 10 and Later)
Step 1: Install OpenSSH (if not already installed)
To check if OpenSSH is installed, open PowerShell and run:
sshIf OpenSSH is missing, install it from Settings > Apps > Optional Features > Add a Feature, then search for OpenSSH Client.
Step 2: Set Up SSH on the Remote Server
Configure SSH on the remote server by editing the /etc/ssh/sshd_config file as shown in the Linux section, enabling GatewayPorts.
Step 3: Run the SSH Reverse Tunnel Command
Once OpenSSH is ready, you can use the same SSH command as on Linux and macOS:
ssh -R [remote-port]:localhost:[local-port] [user]@[remote-host]Example:
ssh -R 8080:localhost:3000 user@remote-server.comOption 2: Using PuTTY
If you prefer a graphical interface, use PuTTY for setting up the reverse tunnel.
Step 1: Download and Install PuTTY
You can download PuTTY from the official site: PuTTY Download.
Step 2: Configure Reverse Tunneling in PuTTY
- Open PuTTY and enter the remote server’s IP in the Host Name field.
- Navigate to Connection > SSH > Tunnels.
- Under Source Port, enter the remote port you want to forward (e.g.,
8080). - Under Destination, enter
localhost:[local-port](e.g.,localhost:3000). - Select Remote.
- Click Add, then Open to establish the connection.
Step 4: Access the Tunnel (All Platforms)
Once the reverse tunnel is set up, any traffic directed to the remote server (e.g., remote-server.com:8080) will be forwarded to your local machine’s port (e.g., localhost:3000).
Optional Step: Persistent Tunnels
If you want the reverse tunnel to persist across SSH session drops or server reboots, use tools like autossh or add the reverse tunnel command to a startup script.
Common Use Cases for SSH Reverse Tunneling
1. Remote IoT Device Control
Say you have a Raspberry Pi at home controlling sensors or cameras. The Pi isn’t reachable from the internet - it’s behind your home router’s NAT. From the Pi, open a reverse tunnel to a server you do control:
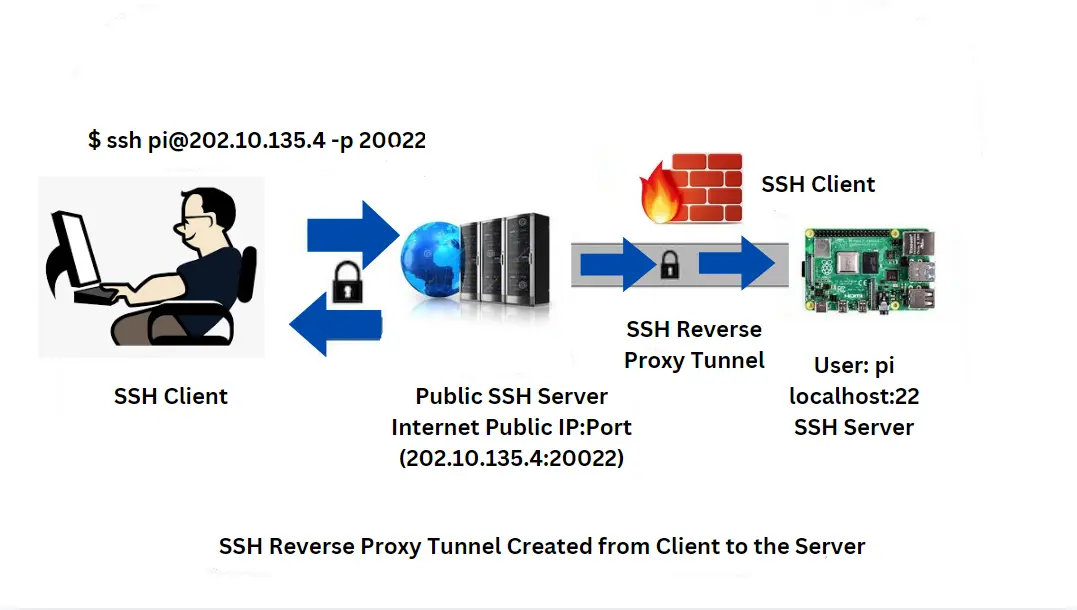
ssh -R 9000:localhost:22 user@remote-server.comPort 9000 on the remote server now routes to port 22 on the Pi. From anywhere, ssh -p 9000 user@remote-server.com drops you into the Pi’s shell as if it were directly public-facing.
2. Remote Database Access
A MySQL instance on a dev machine behind a firewall doesn’t need to be exposed publicly for a colleague to query it. Tunnel the port out through a shared server:
ssh -R 3307:localhost:3306 user@remote-server.comAfter that, mysql -h remote-server.com -P 3307 connects to the local database as if it were running on the remote server itself. No VPN required, no firewall rules changed.
3. Game Hosting Behind NAT
Some multiplayer games require open inbound ports to host sessions, which home NATs typically block. If a game server runs on localhost:25565, a reverse tunnel lets friends connect without router configuration:
ssh -R 4000:localhost:25565 user@remote-server.comOthers can join via remote-server.com:4000. The tunnel acts as a relay, so your home IP stays out of the picture entirely.
Troubleshooting Common Issues
A few problems come up regularly with reverse tunnels. If the connection fails outright, the first thing to check is whether the remote server has GatewayPorts yes in /etc/ssh/sshd_config - without it, the tunnel binds only to 127.0.0.1 on the remote side, not to the public interface.
Authentication errors usually mean the SSH key isn’t loaded into the agent. Run ssh-add to load the default key, or pass -i ~/.ssh/your_key explicitly in the tunnel command.
Port conflicts on the remote side are easy to miss. If the port you specified is already in use, SSH silently continues but the tunnel won’t work as expected. Check with lsof -i :<port> or ss -tlnp | grep <port> on the remote server, and choose a different port if needed.
Security Best Practices for SSH Reverse Tunneling
While SSH reverse tunneling is secure, it’s important to follow best practices to prevent unauthorized access:
Use SSH keys: Disable password-based authentication on your SSH server and only allow access through public/private key pairs for better security.
PasswordAuthentication noin thesshd_configfile.Passphrase-Protected Keys: Always protect your private keys with a passphrase to avoid them being compromised in the case of theft.
Restrict Access: Limit which users and IP addresses can access the reverse tunnel by using firewall rules or specifying allowed users in
sshd_config:AllowUsers user@ip-addressMonitoring: Regularly audit SSH connections and logs to ensure that only authorized users are accessing the tunnel.
Alternatives to SSH Reverse Tunneling
While SSH reverse tunneling is a powerful tool, there are alternatives that might be more suitable in some situations:
VPN (Virtual Private Network): A VPN creates a secure tunnel for all network traffic between your machine and a remote network. This can be more scalable and easier to manage if you need access to multiple services or machines on a remote network.
Tunneling tools: Tools such Pinggy, Tailscale, etc., are specialized for sharing services such as web applications, games, etc., allowing you to expose local servers to the internet with a public URL.
Each method has its trade-offs depending on your needs, but SSH reverse tunneling excels in providing secure, flexible access to individual services.
How Pinggy Uses SSH Reverse Tunneling
Pinggy runs the public-facing SSH server so you don’t have to. Instead of provisioning a VPS and maintaining sshd_config, you point a single command at a.pinggy.io and get a public URL back immediately:
ssh -p 443 -R0:localhost:3000 free.pinggy.ioThe -p 443 keeps the connection alive on networks that block port 22. The R0 tells the server to assign a port dynamically. Pinggy responds with a URL like https://yourapp.a.pinggy.link that routes directly to localhost:3000 on your machine. Share that URL and any request to it transits back through the tunnel to your local service.
If your network runs traffic through an HTTP proxy, you can route the SSH connection through it using ncat:
ssh -p443 -R0:localhost:4000 -o ProxyCommand="ncat --proxy-type http --proxy 192.168.2.2:3128 %h %p" free.pinggy.ioFor networks where even that is blocked, the Pinggy App can establish the tunnel over SSL without a separate SSH client.
Conclusion
SSH reverse tunneling works reliably in situations where most remote access techniques fall flat: no public IP, no inbound ports open, no control over the network edge. The tradeoff is that you need a reachable server on the other end to anchor the tunnel - which is exactly what Pinggy handles.
Whether you’re testing a webhook, debugging a mobile app against a local API, or reaching a device in a remote facility, the pattern stays the same: initiate outward from the restricted machine and let the tunnel route traffic back. Once you’ve internalised that mental model, the -R flag stops feeling obscure and starts feeling like the obvious move.