
A TLS tunnel (also called an SSL tunnel) is basically a secure, encrypted pathway between two endpoints. Think of it as a private, locked channel where your data travels safely from point A to point B, protected from anyone trying to snoop or tamper with it along the way.
The magic happens through the TLS protocol, which creates an encrypted connection between a client and server. This end-to-end encryption is what keeps your data confidential and intact as it moves across the internet. It shields sensitive information from prying eyes whether that’s malicious hackers or even your internet service provider.
In this guide, we’ll break down how TLS tunnels actually work and show you how to create one for free using
Pinggy, a developer-friendly tool that makes setting up secure TLS tunnels to localhost super straightforward.
Summary
TLS Tunnel - Quick Overview:
- Creates a secure, encrypted channel between client and server using the TLS protocol.
- Provides end-to-end encryption no third party (including tunnel providers or ISPs) can decrypt your traffic.
- Uses Server Name Indication (SNI) to route traffic to the correct tunnel.
Quick Setup with Pinggy:
Create a free TLS tunnel to your localhost HTTPS server:
ssh -p 443 -R0:localhost:443 tls@free.pinggy.io
What is TLS
Transport Layer Security (TLS) and its predecessor, Secure Sockets Layer (SSL), represent pivotal milestones in secure communication protocols. SSL, introduced by Netscape Communications in the early 1990s, was succeeded by TLS 1.0 in 1999. The TLS protocol operates at the transport layer, and TLS over TCP begins with a handshake process.
During the handshake, the client and server go through a series of steps to establish an agreement on encryption algorithms, exchange digital certificates, and generate session keys (typically symmetric keys). The subsequent transmission of data is encrypted using these session keys, ensuring that the exchanged information remains confidential and resistant to eavesdropping or tampering.
To delve deeper into the specifics of TLS, you can refer to the Wikipedia page on Transport Layer Security
here.
TLS handshake
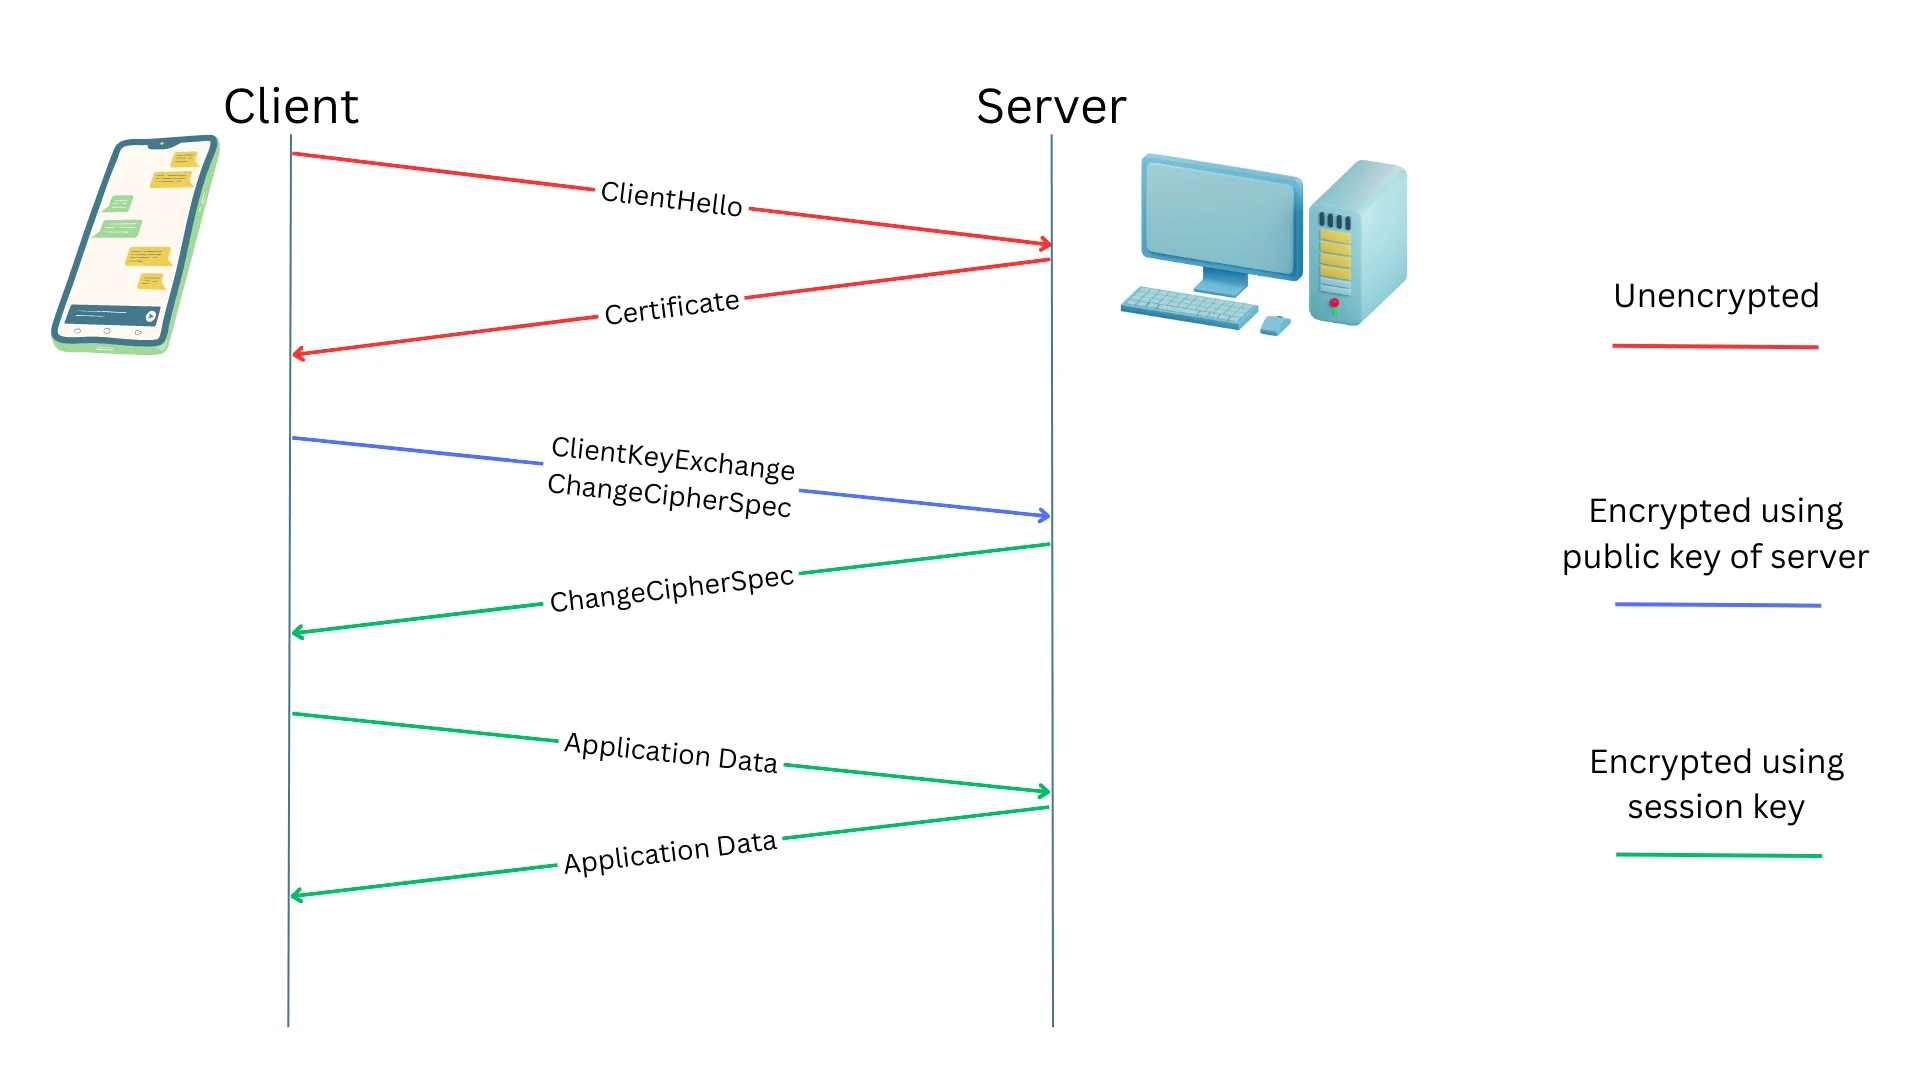
At a high-level overview, the TLS handshake process orchestrates a series of steps to establish a secure and encrypted channel between the client and server, ensuring the confidentiality, integrity, and authenticity of the exchanged data.
Here are the key phases in this process, with each message transmitted through transport layer protocols such as TCP:
ClientHello: The client initiates the TLS handshake by sending the ClientHello message, indicating supported encryption methods and preferences.
Certificate: In response, the server sends its digital certificate to the client, verifying its identity and enabling the establishment of a secure connection.
ClientKeyExchange: The client generates a pre-master secret and encrypts it using the server’s public key, facilitating the exchange of secret keys necessary for encryption.
ChangeCipherSpec: Both parties exchange ChangeCipherSpec messages to signal the transition to encrypted communication, activating the negotiated encryption algorithms.
ApplicationData: After the handshake is completed, encrypted ApplicationData messages are exchanged, containing the actual data transmitted securely between the client and server.
For a more in-depth understanding of TLS, please refer to the
RFC.
What is a TLS Tunnel
In networking, a tunnel refers to a method of encapsulating one type of network traffic within another network protocol. A TLS tunnel specifically involves encrypting the network traffic using the TLS protocol.
Tunnels are commonly used to establish connectivity around NATs and firewalls. For instance, your home network may lack a public IP address, with devices situated behind a NAT-enabled router. In such cases, we can utilize a tunnel to enable remote access to devices within your private network, allowing you to securely access resources from outside your local network.
End-to-end encryption
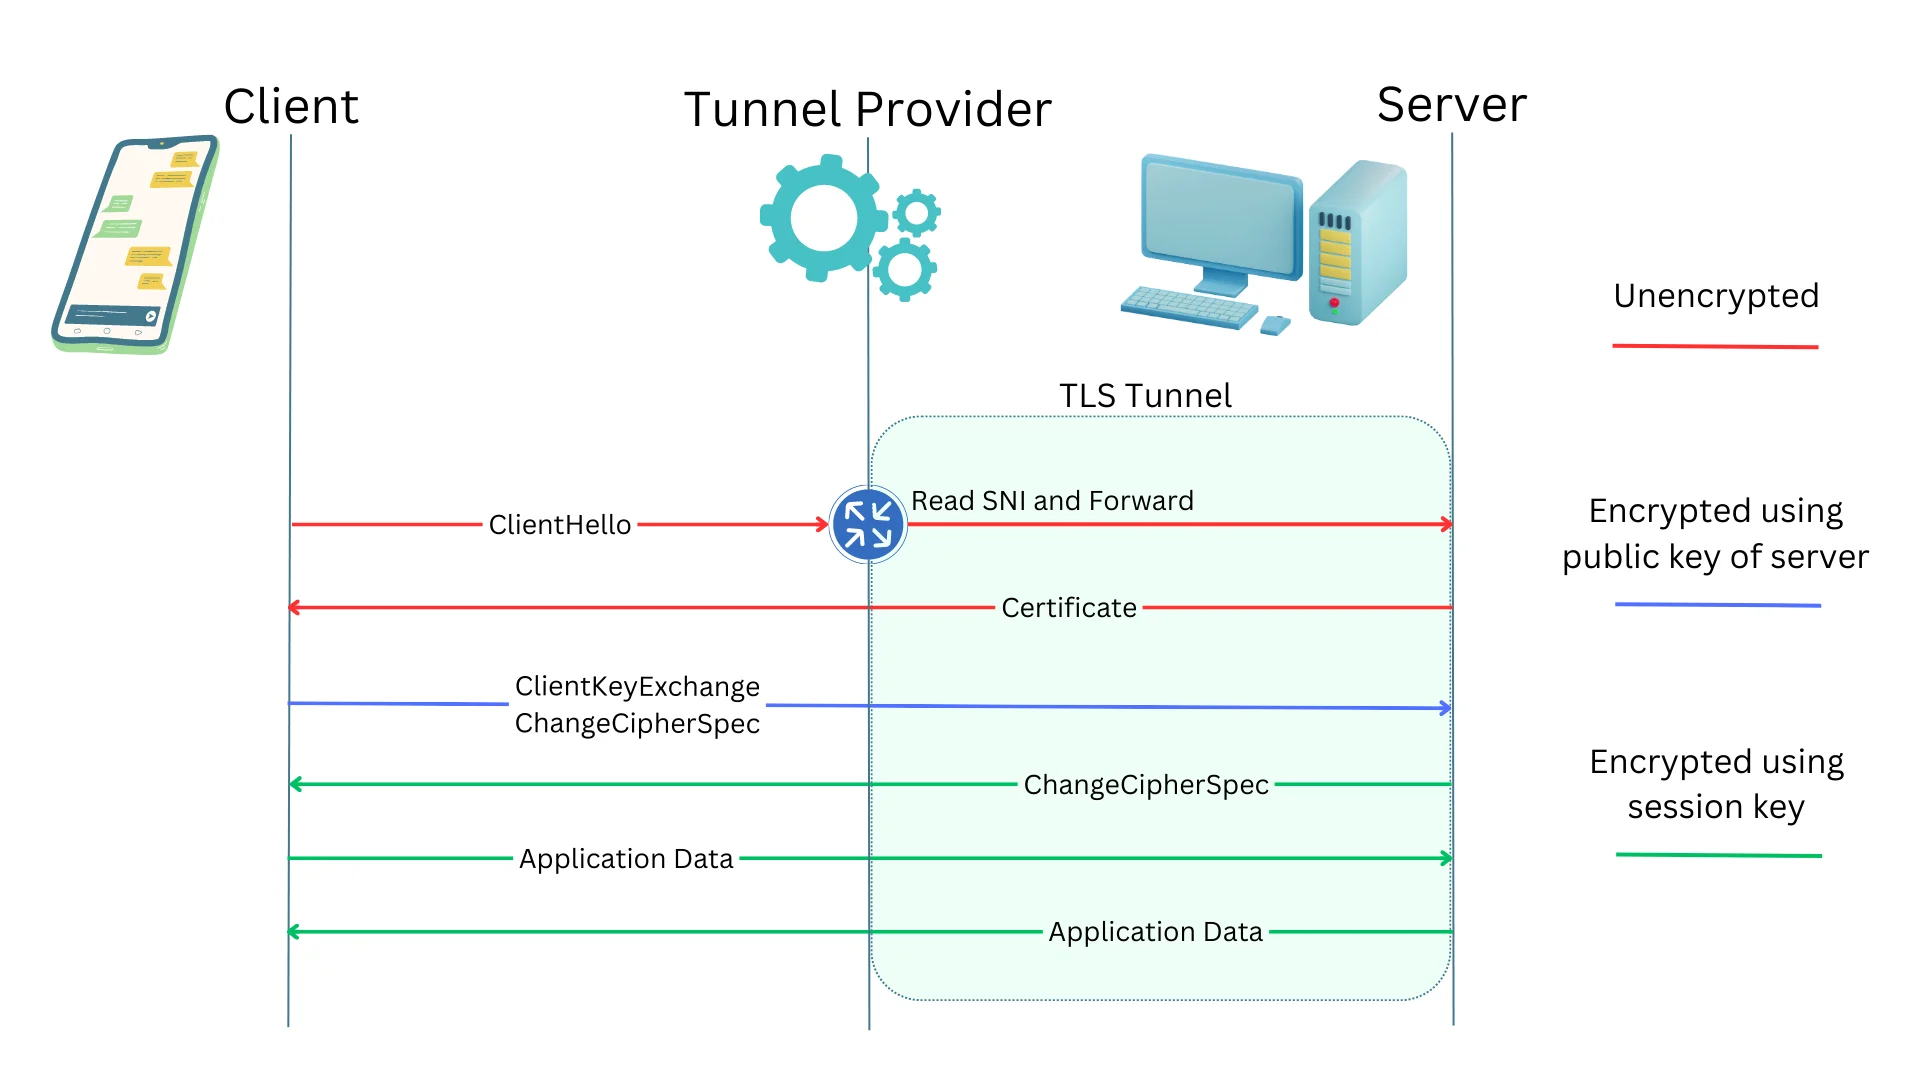
A TLS tunnel distinguishes itself from other tunneling methods, primarily through end-to-end encryption. The client and server negotiate a session key, encrypting all traffic. This ensures that no third party, including the tunnel provider or ISPs, can eavesdrop on the tunnel’s traffic.
In services like Pinggy or Ngrok, TLS tunnel traffic terminates at the application servers, not at the tunnel provider’s servers. This means that the tunnel provider cannot decrypt the traffic, ensuring the privacy and security of the transmitted data.
Prerequisite for TLS tunnels
For effective TLS tunneling, the end server, such as an HTTPS server, must possess the necessary TLS key and certificate for traffic termination on the specific domain or subdomain used to establish the tunnel. For instance, if the tunnel is accessed via the domain tls.tunnel.com, the server must be equipped with the relevant domain certificate to handle TLS connections effectively.
How TLS tunnels work?
TLS tunnels rely on the Server Name Indication (SNI), an extension in the TLS protocol that includes the hostname or domain name requested by the client. This information is sent as part of the initial TLS handshake to the server, allowing the tunnel server to determine the appropriate tunnel for forwarding traffic. SNI is contained in the ClientHello message, and none of the encrypted messages that follow can be decrypted by the tunnel provider.
Is it Possible to Create a TLS Tunnel for Free?
To establish a TLS tunnel that forwards traffic to a local HTTPS server running on port 443, simply execute the following command in your terminal on Mac, Windows, or Linux:
ssh -p 443 -R0:localhost:443 tls@free.pinggy.io
You can customize the command here:
Keep in mind that your HTTPS server must have the necessary certificates to terminate the TLS tunnel. To associate your custom domain with the tunnel, sign in to
Pinggy and obtain a custom domain.
Step 1 - Open Terminal
For Mac:
- Open the
Terminal application located in Applications > Utilities. - Alternatively, use Spotlight search by pressing
Command + Space and typing Terminal.
For Windows:
- Open the
Command Prompt or PowerShell application. Press the Windows key, type cmd or powershell, and press Enter.
For Linux:
- Open the terminal. You can usually find it in the Applications menu or by using the keyboard shortcut
Ctrl + Alt + T.
Step 2 - Paste the TLS Tunnel Command
Copy the provided command:
ssh -p 443 -R0:localhost:443 tls@free.pinggy.io
Paste the command into the terminal and press Enter. If prompted, enter a blank password and press Enter.
Step 3 - Using the tunnel
By following these steps, you’ll create a TLS tunnel, and the command will output a public URL like ran-atX986aa.a.pinggy.link. Access your localhost HTTPS server using this public URL.
Step 4 - Configuring domain and certificates
To ensure your HTTPS server effectively handles TLS connections, it’s essential to configure certificates for your domain.
Begin by obtaining a free trial or subscribing to
Pinggy Pro. Then, associate your domain with the Pinggy tunnel by signing in to the
Pinggy dashboard.
Then you can use
Let's Encrypt to obtain a certificate.
Follow these steps if you want to configure Nginx with Let’s Encrypt:
Install Nginx: Install Nginx on your server using your distribution’s package manager (e.g., apt for Ubuntu, yum for CentOS).
Install Certbot: Utilize Certbot, the Let’s Encrypt client, to manage SSL certificates. Execute appropriate commands based on your operating system (e.g., apt install certbot for Ubuntu, yum install certbot for CentOS).
Configure Nginx: Create an Nginx server block (virtual host) configuration for your website. Define the server’s domain name, root directory, and other settings.
Obtain and Install SSL Certificate: Execute Certbot to obtain and install the SSL certificate. Utilize the certbot command followed by the --nginx flag to automatically configure Nginx, enabling it to use the certificate and support HTTPS.
Refer to the
Let's Encrypt documentation for detailed instructions.
After completing these steps, Nginx will be properly configured with a Let’s Encrypt SSL certificate, ensuring secure and encrypted communication for your website visitors.
Advantages of a TLS Tunnel
A TLS tunnel enhances data security and reliability through:
- End-to-End Encryption: Keeps all transmitted data secure and unreadable to outsiders.
- Secure Remote Access: Enables safe access to private networks behind firewalls or NATs.
- Protection from Eavesdropping: Prevents interception of sensitive information.
- Data Integrity: Detects tampering and ensures authenticity.
- Trusted Communication: Establishes verified, reliable connections.
- Protocol Compatibility: Works with existing network protocols seamlessly.
- Platform Independence: Supports multiple operating systems and devices.
Overall, TLS tunnels strengthen network security and ensure safe, consistent communication.
Conclusion
TLS tunnels play a crucial role in securing modern internet communication by providing end-to-end encryption, ensuring data integrity, and enabling safe remote access through firewalls or NATs. Whether you’re protecting sensitive data or exposing a localhost server securely, TLS tunnels offer a simple yet powerful solution.
With tools like
Pinggy, setting up a TLS tunnel takes just a single command - giving developers an effortless way to create encrypted, trusted connections without complex configurations. In short, TLS tunneling is an essential step toward building a safer and more private web experience.