Intercom starts at $74/month for two seats and that price climbs the moment you need automation, AI, or more than a handful of agents. Zendesk is similar. For an indie hacker running a small SaaS, paying $900/year just to let customers type questions at you is a rough tradeoff.
Chatwoot (30.7k GitHub stars, MIT license) is the self-hosted answer. It runs as a Docker Compose stack on any machine you own, handles live chat, email, WhatsApp, Telegram, and a dozen other channels from a single dashboard, and as of v4.14.2 - released June 10, 2026 - ships a built-in AI agent called Captain that handles routine queries automatically.
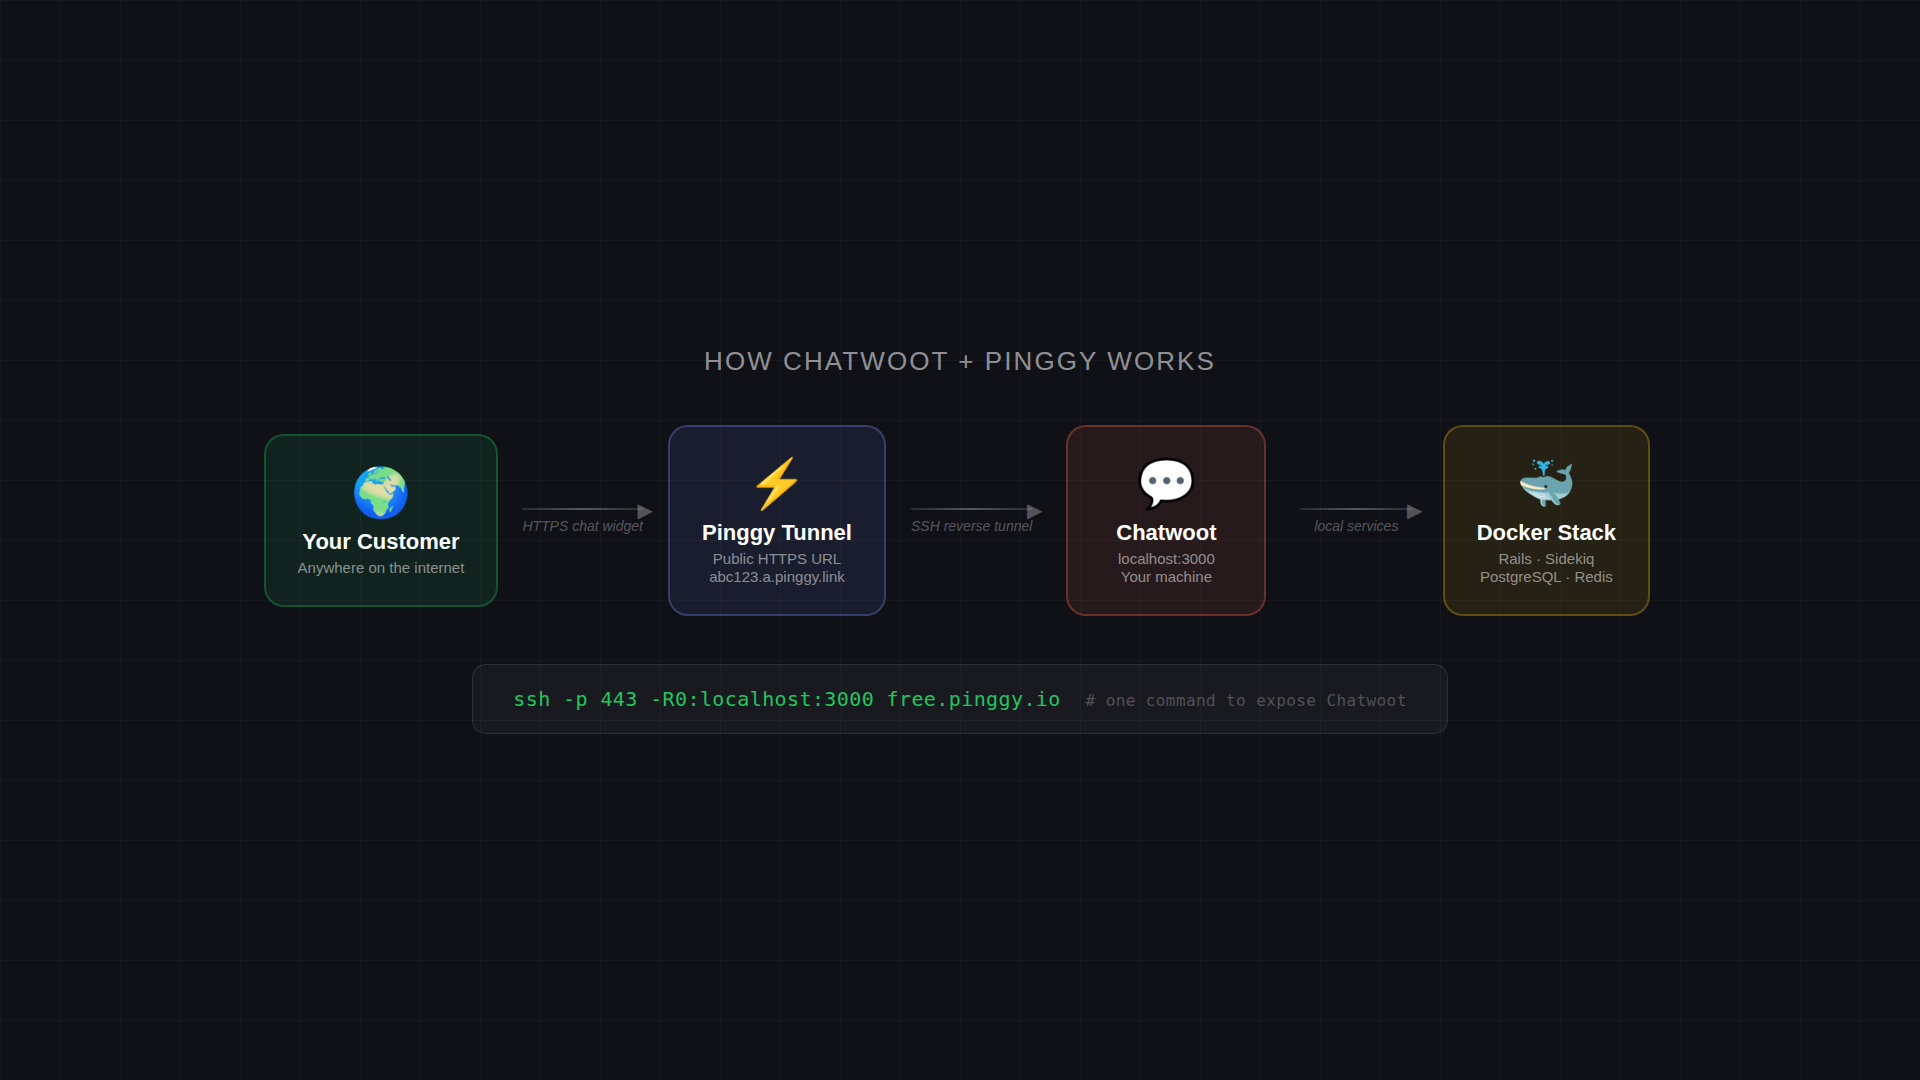
The one catch with running it locally: Docker Compose binds everything to 127.0.0.1, so your customers can’t reach it. Pinggy solves that with one command.
Summary
- Download config:
wget -O .env https://raw.githubusercontent.com/chatwoot/chatwoot/develop/.env.example - Edit .env: set
SECRET_KEY_BASE,POSTGRES_PASSWORD,REDIS_PASSWORD, andFRONTEND_URL - Init DB:
docker compose run --no-deps rails bundle exec rails db:chatwoot_prepare - Start:
docker compose up -d- Chatwoot runs athttp://localhost:3000 - Expose:
ssh -p 443 -R0:localhost:3000 free.pinggy.io - Update: set
FRONTEND_URLto the Pinggy URL, thendocker compose restart rails sidekiq
What Chatwoot actually does
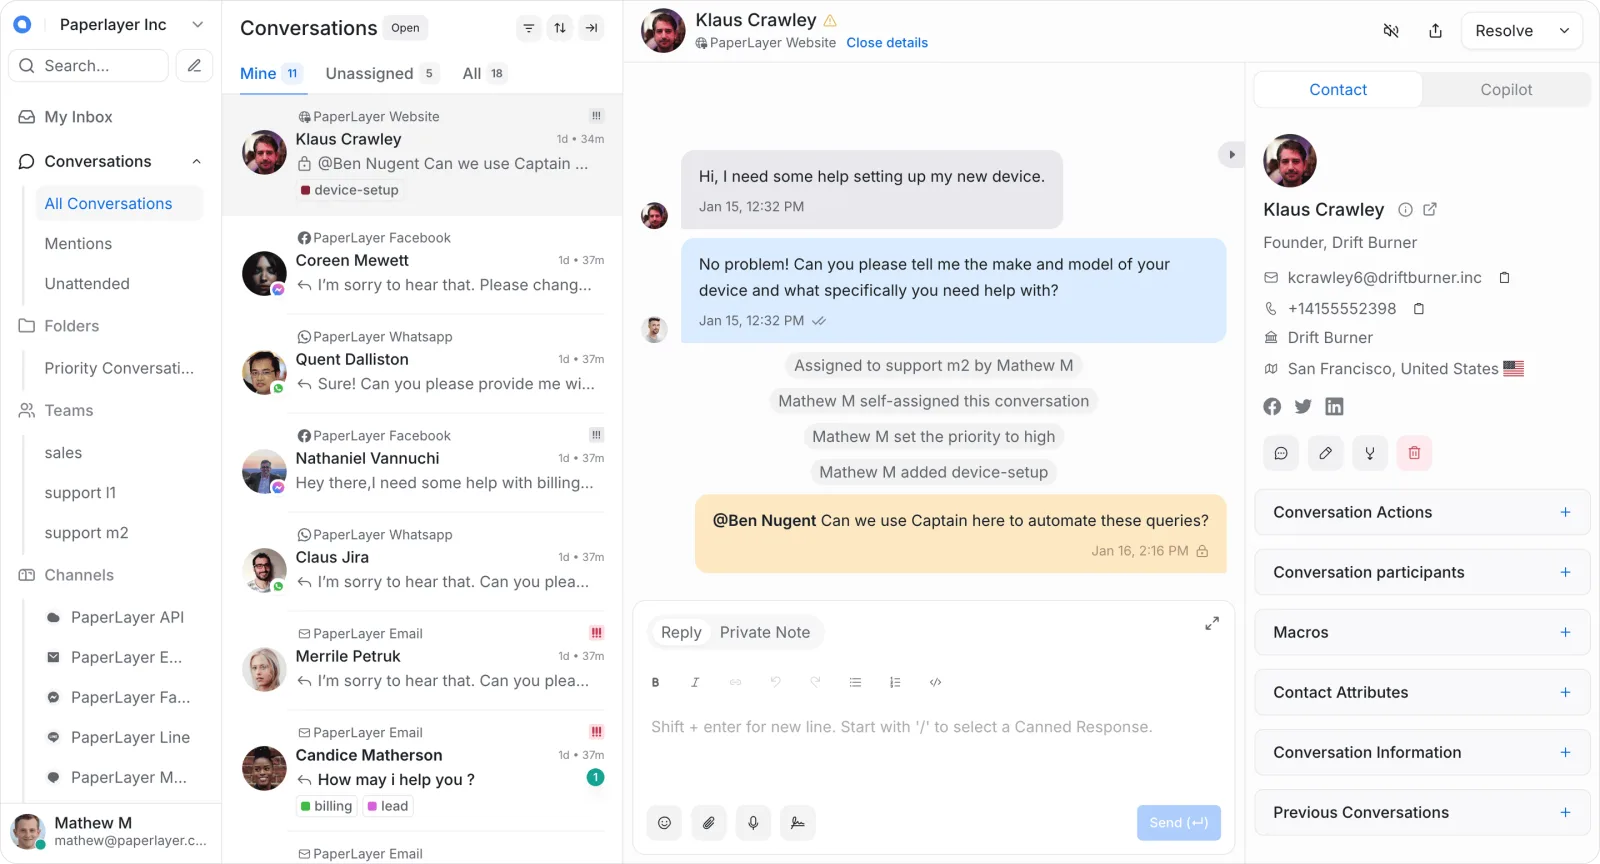
At its core, Chatwoot is an omnichannel inbox. Every message that comes in - from your website chat widget, from a connected email address, from WhatsApp or Telegram - lands in the same queue. Your agents see them all, can respond, assign conversations, leave private notes, and look up customer history without switching tabs.
The feature set is mature. Canned responses for common questions, keyboard shortcuts throughout, auto-assignment rules, custom contact attributes, conversation labels, and a live view so you can see who’s browsing your site before they write in. It also ships a customer-facing help center you can publish articles to.
Captain AI (v4.14, May 2026 onward) adds four components:
- Captain Assistant - A customer-facing bot that drafts responses from your help center articles and past conversations. Handles first contact while you’re asleep or busy.
- Captain Co-pilot - Shows agents suggested replies inside the reply editor. You review and send rather than type from scratch.
- Captain FAQs - Detects questions coming in that your knowledge base doesn’t answer, so you know what articles to write next.
- Captain Memories - Logs things customers mention (company size, plan, recurring issues) to their contact record so agents have context on return visits.
Captain requires connecting an LLM API key (OpenAI or compatible). It’s not free, but the hosting isn’t the cost center - the model calls are, and those are the same whether you self-host or pay for Intercom.
The networking problem Pinggy solves
When you run docker compose up, the Chatwoot Rails server listens on 127.0.0.1:3000. That’s intentional - the Docker Compose file binds ports to localhost only for security.
But a live chat widget embedded on your website makes requests to the Chatwoot backend. Those requests come from your visitors’ browsers, not from your machine. They need a real, routable URL.
The traditional options are: rent a VPS and deploy there (works, but now you’re managing a server), set up port forwarding on your router (fragile, exposes your home IP, requires a static IP), or use a tunnel.
Pinggy creates an SSH reverse tunnel: your machine connects out to Pinggy’s servers, and Pinggy forwards inbound HTTPS traffic back through that connection to your local port 3000. No inbound firewall changes, no static IP, no server to manage.
Setup walkthrough
You need Docker and Docker Compose installed. These instructions work on macOS, Linux, or Windows with WSL2.
Step 1 - Get the config files
mkdir chatwoot && cd chatwoot
wget -O .env https://raw.githubusercontent.com/chatwoot/chatwoot/develop/.env.example
wget -O docker-compose.yaml https://raw.githubusercontent.com/chatwoot/chatwoot/develop/docker-compose.production.yaml
Step 2 - Configure .env
Open .env and set at minimum:
# Generate this with: openssl rand -hex 64
SECRET_KEY_BASE=your_64_char_hex_string_here

# Strong passwords for your database and cache
POSTGRES_PASSWORD=changeme_strong_password
REDIS_PASSWORD=changeme_redis_password

# This will change once you have the Pinggy URL
FRONTEND_URL=http://localhost:3000
The FRONTEND_URL matters a lot - Chatwoot uses it to build links in emails and to tell the chat widget where to connect. We’ll update it in a moment.
Step 3 - Initialize the database
Chatwoot needs its PostgreSQL schema set up before the first boot:
docker compose run --no-deps rails bundle exec rails db:chatwoot_prepareThis takes a minute. At the end, it prompts you to create the first admin account - give it an email and password you’ll remember.
Step 4 - Start the stack
docker compose up -dThis starts four containers: the Rails web server, Sidekiq for background jobs, PostgreSQL (using the pgvector image for vector search), and Redis. Give it about 30 seconds for the Rails server to finish booting, then open http://localhost:3000 to confirm you see the Chatwoot login screen.
Exposing Chatwoot with Pinggy
Open a second terminal and run:
ssh -p 443 -R0:localhost:3000 free.pinggy.ioPinggy will print output like:
You are not logged in. You will get a temporary URL.
...
http://abc123.a.pinggy.link
https://abc123.a.pinggy.link
Copy the https:// URL. Now update your .env:
FRONTEND_URL=https://abc123.a.pinggy.linkThen restart the services that cache this value:
docker compose restart rails sidekiqOpen https://abc123.a.pinggy.link in your browser. You should see the Chatwoot login screen over HTTPS, from a public URL anyone on the internet can reach.
Persistent URLs
The free Pinggy URL changes each time you reconnect. For production use, a Pinggy paid plan gives you a fixed subdomain - set FRONTEND_URL once and never touch it again. You can also use Pinggy’s tunnel token to automate reconnection.
Setting up your first inbox
Log into Chatwoot at the Pinggy URL. Go to Settings → Inboxes → New Inbox, then choose Website. Give it a name, set the domain to your actual product’s domain (or just a placeholder), and click through.
Chatwoot generates a JavaScript snippet:
<script>
  (function(d,t) {
    var BASE_URL="https://abc123.a.pinggy.link";
    var g=d.createElement(t),s=d.getElementsByTagName(t)[0];
    g.src=BASE_URL+"/packs/js/sdk.js";
    g.defer = true;
    g.async = true;
    s.parentNode.insertBefore(g,s);
    g.onload=function(){
      window.chatwootSDK.run({
        websiteToken: 'your_token_here',
        baseUrl: BASE_URL
      })
    }
  })(document,"script");
</script>
Paste this before the </body> tag on any page where you want the chat widget. That’s it - customers on that page will see the chat bubble and can write to you.
What Captain AI looks like in practice
To enable Captain, go to Settings → Integrations → Captain. You’ll add your OpenAI API key (or an OpenAI-compatible endpoint like a local Ollama instance) and point it at an inbox.
Once configured, Captain appears in the reply editor. When a conversation comes in, Captain drafts a suggested reply based on your help center articles and previous conversations. You click to accept or edit before sending. For after-hours traffic, you can enable the Assistant mode - Captain responds automatically and hands off to a human when it gets stuck.
The FAQ detection runs quietly in the background. After a week of traffic, check Settings → Captain → FAQs to see what questions are surfacing without good answers. That list is genuinely useful for figuring out where your docs are thin.
Tradeoffs to know
No Compose-style orchestration built in. Chatwoot does not have a built-in way to restart containers if they crash. If you’re running this on a machine that reboots, set restart: always in your docker-compose file (it’s already there in the production template).
Email needs SMTP. The out-of-the-box .env has SMTP variables commented out. Without them, Chatwoot can’t send email notifications or handle email conversations. For a quick SMTP setup, a free Resend or Brevo account works.
Captain AI is paid at the LLM layer. Chatwoot itself is free. Captain needs an API key that bills per token. For a small product with a few conversations per day, this is negligible - a few dollars a month. For high-volume support, it adds up.
Free Pinggy URL isn’t persistent. For anything more than testing, use a paid plan to get a fixed URL, then set it as FRONTEND_URL once. Alternatively, run Chatwoot on a cheap VPS ($5-6/month on DigitalOcean or Hetzner) and you own the domain.
Resource requirements. The Docker stack uses about 600-700 MB RAM at idle with a light database. Chatwoot’s docs suggest 2 GB RAM minimum for a comfortable experience. A Raspberry Pi 5 or any reasonably modern laptop handles it without trouble.
The cost comparison
Intercom’s starter tier is $74/month (2 seats, no AI features). With AI features it’s $300-900/month depending on conversation volume. Zendesk Suite runs $55-115/agent/month.
Chatwoot self-hosted is $0 for the software. Add $5/month for a VPS if you want persistence, and LLM API costs for Captain if you use it. For an indie product doing 50-200 conversations a month, you’re looking at under $10/month all-in versus hundreds with a SaaS tool.
The tradeoff is maintenance - you own the stack. Upgrades are manual (docker compose pull && docker compose up -d). Backups are your problem. If that sounds like work, it is. But it’s an afternoon of setup for years of saving.
Wrapping up
Chatwoot handles the full customer support lifecycle - live chat, email, social channels, AI responses, agent collaboration - from a single dashboard you run on hardware you control. v4.14.2 shipped three days ago with Captain as a first-class feature, and the June release cycle lands next week with more fixes.
The local setup is solid. The only missing piece is a public URL, and Pinggy covers that without any infrastructure changes - one ssh command and your Chatwoot instance is reachable from anywhere.