In this article
You delete a folder from a NAS share, point a recovery app at Z:\, and it finds nothing, even though the NAS itself is working fine.
Search for “recover deleted files NAS” and you’ll mostly find recovery utilities, but scanning should come later. Check the NAS recycle bin, snapshots and backups first. If none of them has the file, recovery straight from the storage may still be possible. Here are five methods, ordered from simplest to most involved.
Summary
- Stop new writes. Pause sync jobs, downloads, containers and anything else that could overwrite deleted data.
- Check the recycle bin. Synology and QNAP keep deleted files, but only if the feature was enabled for that share before the deletion.
- Look for snapshots. Btrfs snapshots on Synology, QNAP storage-pool snapshots and ZFS on TrueNAS may hold an earlier version of the folder.
- Check backups. Hyper Backup, HBS 3 or an off-device copy may still have the files.
- Scan the storage. If the NAS works but no saved copy exists, supported recovery software can reach the underlying volumes over SSH.
- Treat failed hardware separately. An inaccessible NAS or damaged RAID needs disk images and careful reconstruction, not a scan of a network share.
Stop new writes to the NAS before you start
Deleting a file usually just marks its space as free. New writes can overwrite that space, and metadata changes make recovery harder still. Indexing, cameras, containers, antivirus jobs and system logs keep writing even when nobody is using the NAS.
- Pause desktop sync clients, scheduled transfers, downloads, virtual machines and surveillance recording on the affected volume.
- Avoid uploads, updates, disk optimization, file-system repairs, formatting and RAID rebuilds. None of these recover deleted files, and all of them write.
- Write down the NAS model, operating system, file system, RAID layout and drive-bay order. If the missing files are critical and you have no independent copy, consider a controlled shutdown and professional imaging before you try a live scan.
Check the existing copies first, but keep in mind that even logging in generates some writes. Don’t experiment on drives that are already unstable.
Match the recovery method to what went wrong
Before picking a method, work out whether you’re dealing with a deletion or a storage failure.
| Situation | Try first | Important limitation |
|---|---|---|
| File deleted from a shared folder | NAS recycle bin | Must have been enabled before the deletion |
| Need an older version or a deleted folder | Snapshot or Previous Versions | The snapshot must predate the loss |
| Backup jobs were configured | Restore from backup | Check the date and retention policy |
| NAS works, but no copy exists | SSH-based volume scan | Needs a supported file system and access |
| NAS won’t boot or the array is inaccessible | Offline recovery from drive images | The RAID layout may need reconstruction |
| A drive clicks, disconnects or reports serious errors | Professional recovery | More access can worsen physical damage |
Method 1: Recover deleted files from the NAS recycle bin
The recycle bin is the first place to look, if it was enabled. Below are the steps for Synology and QNAP, two of the most common NAS brands. Other models may have a similar feature under a different name.
On Synology NAS
Sign in to DiskStation Manager (DSM) and open File Station.
Open the shared folder the file was in, then open
#recycle.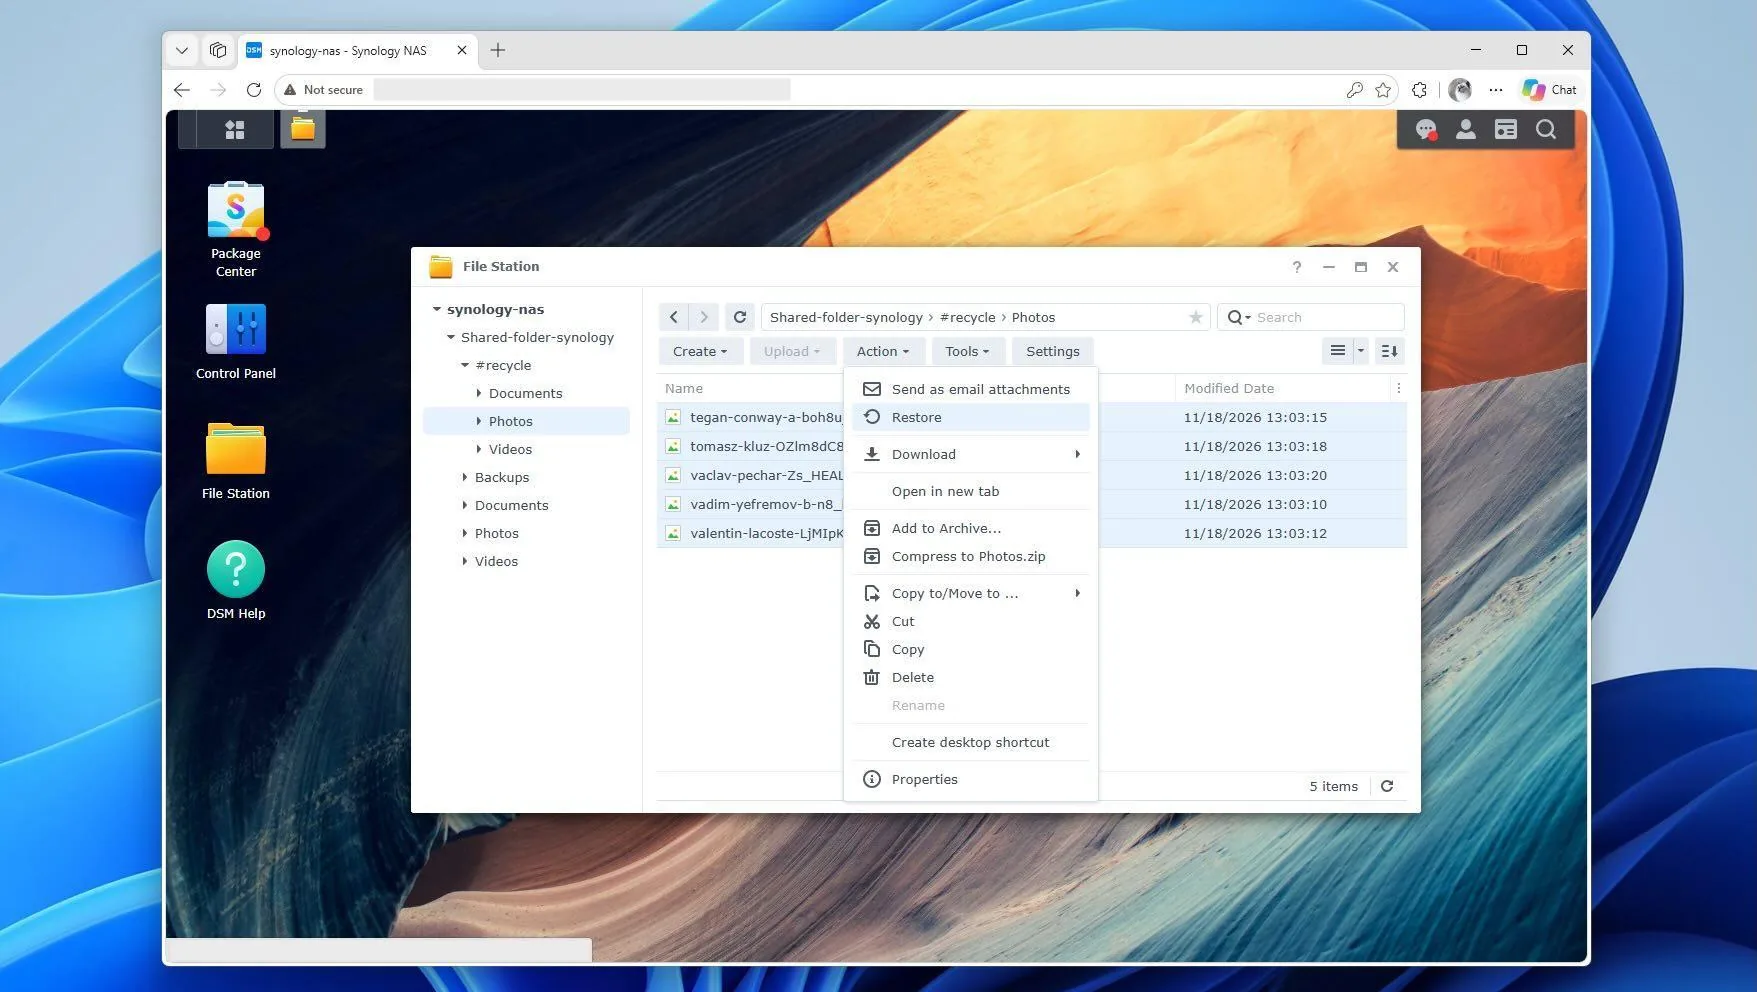
Find the deleted file or folder and right-click it.
On DSM 7.1 or later, choose Restore to put it back in its original location. On DSM 7.0 or earlier, use Copy to/Move to… > Move to… and pick the destination.
If #recycle is missing, check Control Panel > Shared Folder > Edit > Enable Recycle Bin. Access to the recycle bin may be limited to adminstrators. Turning it on now won’t bring back files deleted earlier.
If the files were managed through Synology Drive, also check the Recycle Bin in the Synology Drive web portal. An administrator may find deleted items under Synology Drive Admin Console > Team Folder > Version Explorer > Show deleted files, depending on versioning and retention settings.
On QNAP NAS
- Open File Station in QTS.
- Select Recycle Bin in the sidebar.
- Find the file, right-click it and choose Recover.
- Confirm the recovery. Older interfaces may show deleted content in an
@Recyclefolder instead.
QNAP keeps deleted files for 180 days by default, but administrators can change that, empty the bin, or exclude certain file extensions. The setting lives under Control Panel > Network & File Services > Recycle Bin. The shared folder also needs its own recycle bin turned on, so ask the NAS administrator if the folder doesn’t show up.
Not every deletion goes through the bin. QNAP covers File Station, FTP and SMB/Samba, while NFS or scripts that delete files directly may bypass it. A disabled bin or expired retention also means the file won’t be here.
Method 2: Restore a deleted file from a snapshot
A snapshot taken before the deletion may still have the file, with its name and folder path intact. Whether you have one depends on the platform and how the storage was set up.
Synology: Snapshot Replication and Previous Versions
Synology Snapshot Replication protects supported shared folders on Btrfs volumes. If it was enabled before the deletion:
- Open Snapshot Replication > Recovery > Shared Folder.
- Select the affected share and click Recover.
- Choose a snapshot dated before the file was deleted, then click Browse.
- In File Station, select the missing item and use Copy to/Move to or Download.
On Windows, open the mapped shared folder, right-click the parent folder that held the deleted file, and select Properties > Previous Versions. Pick an earlier version and click Open, find the file there, and copy it somewhere else rather than using Restore on the whole folder. You go through the parent because you can’t right-click a file that’s already been deleted. This only works if the NAS exposes snapshots over SMB.
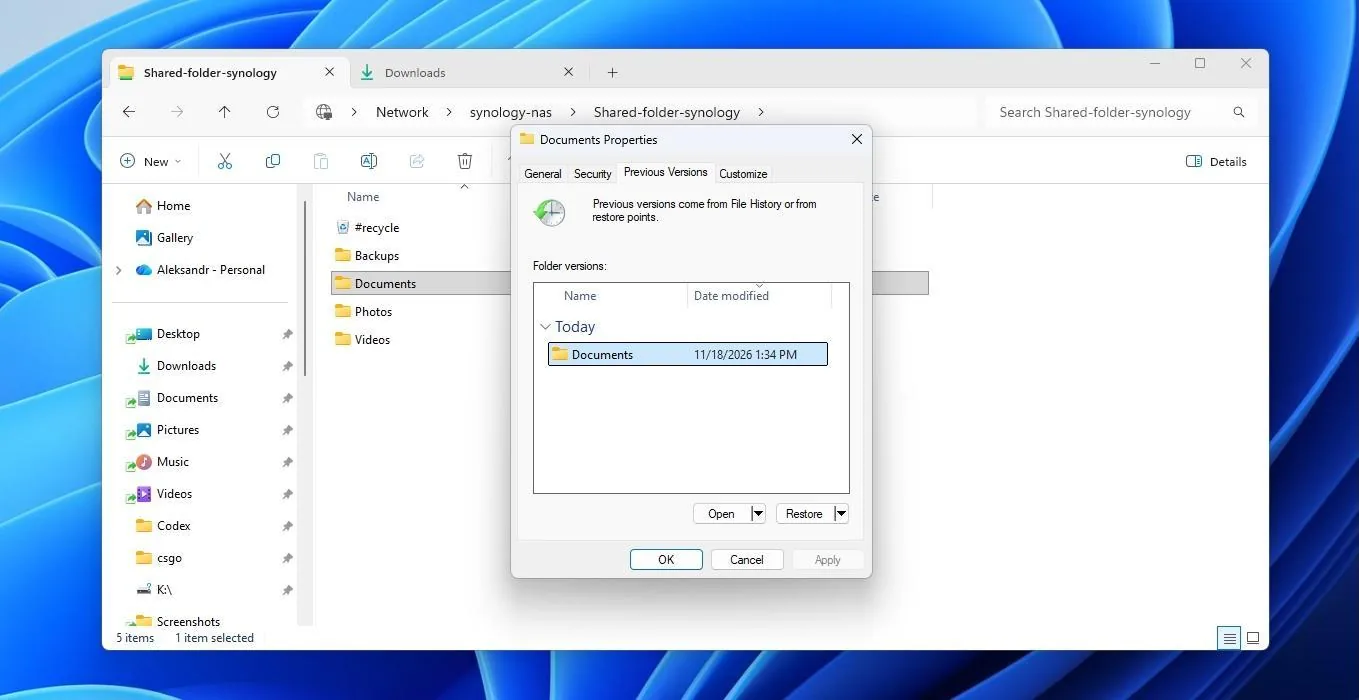
Avoid Restore to this snapshot when you only need one file. It can roll the entire shared folder back and remove every change made since the snapshot.
QNAP: Snapshot Manager
On supported QTS systems, snapshots protect thick and thin volumes in a storage pool. Static volumes don’t support them, and the NAS model needs snapshot support and at least 1 GB of RAM.
- Open Storage & Snapshots > Storage > Storage/Snapshots.
- Select the affected thick or thin volume and open Snapshot > Snapshot Manager.
- Pick a snapshot from before the deletion and select the missing files.
- Choose Restore > Restore Files to to copy them to another location, or download a ZIP copy. Plain Restore Files writes back to the original location and may replace current files.
Don’t use Revert Volume Snapshot to recover one document. It restores the state of the whole volume, not just the file you selected.
QNAP can also expose snapshots through Windows Previous Versions. In QTS, turn on Storage & Snapshots > Global Settings > Snapshots > Enable Windows Previous Versions, then confirm that the shared folder allows the feature. On Windows, browse the earlier version of the parent folder and copy the missing item out.
TrueNAS: ZFS snapshots
TrueNAS can expose ZFS snapshots to Windows as Previous Versions on SMB shares. Right-click the folder that used to hold the file, open Properties > Previous Versions, and copy the item out of the right version.
From a shell, snapshots may also be browsable under the dataset’s .zfs/snapshot/ directory, depending on permissions and configuration. Copy the file from the read-only snapshot to a different location:
# pool, dataset and snapshot names are examples
ls /mnt/tank/projects/.zfs/snapshot/
cp -a /mnt/tank/projects/.zfs/snapshot/auto-2026-11-10_00-00/report.docx /mnt/tank/restored/
Don’t run zfs rollback for a single deleted file. It changes the state of the whole dataset, not just that one item.
Method 3: Restore from a NAS backup
When the bin is empty and the snapshots have expired, a backup may still have the folder.
Synology Hyper Backup
- Open Hyper Backup and select the backup task that covers the shared folder.
- Click Backup Explorer (the magnifying-glass icon).
- Choose a version dated before the deletion, then browse to the missing file or folder.
- Download or copy what you need, or use the restore option. Restore to a separate destination untill you’ve confirmed the content.
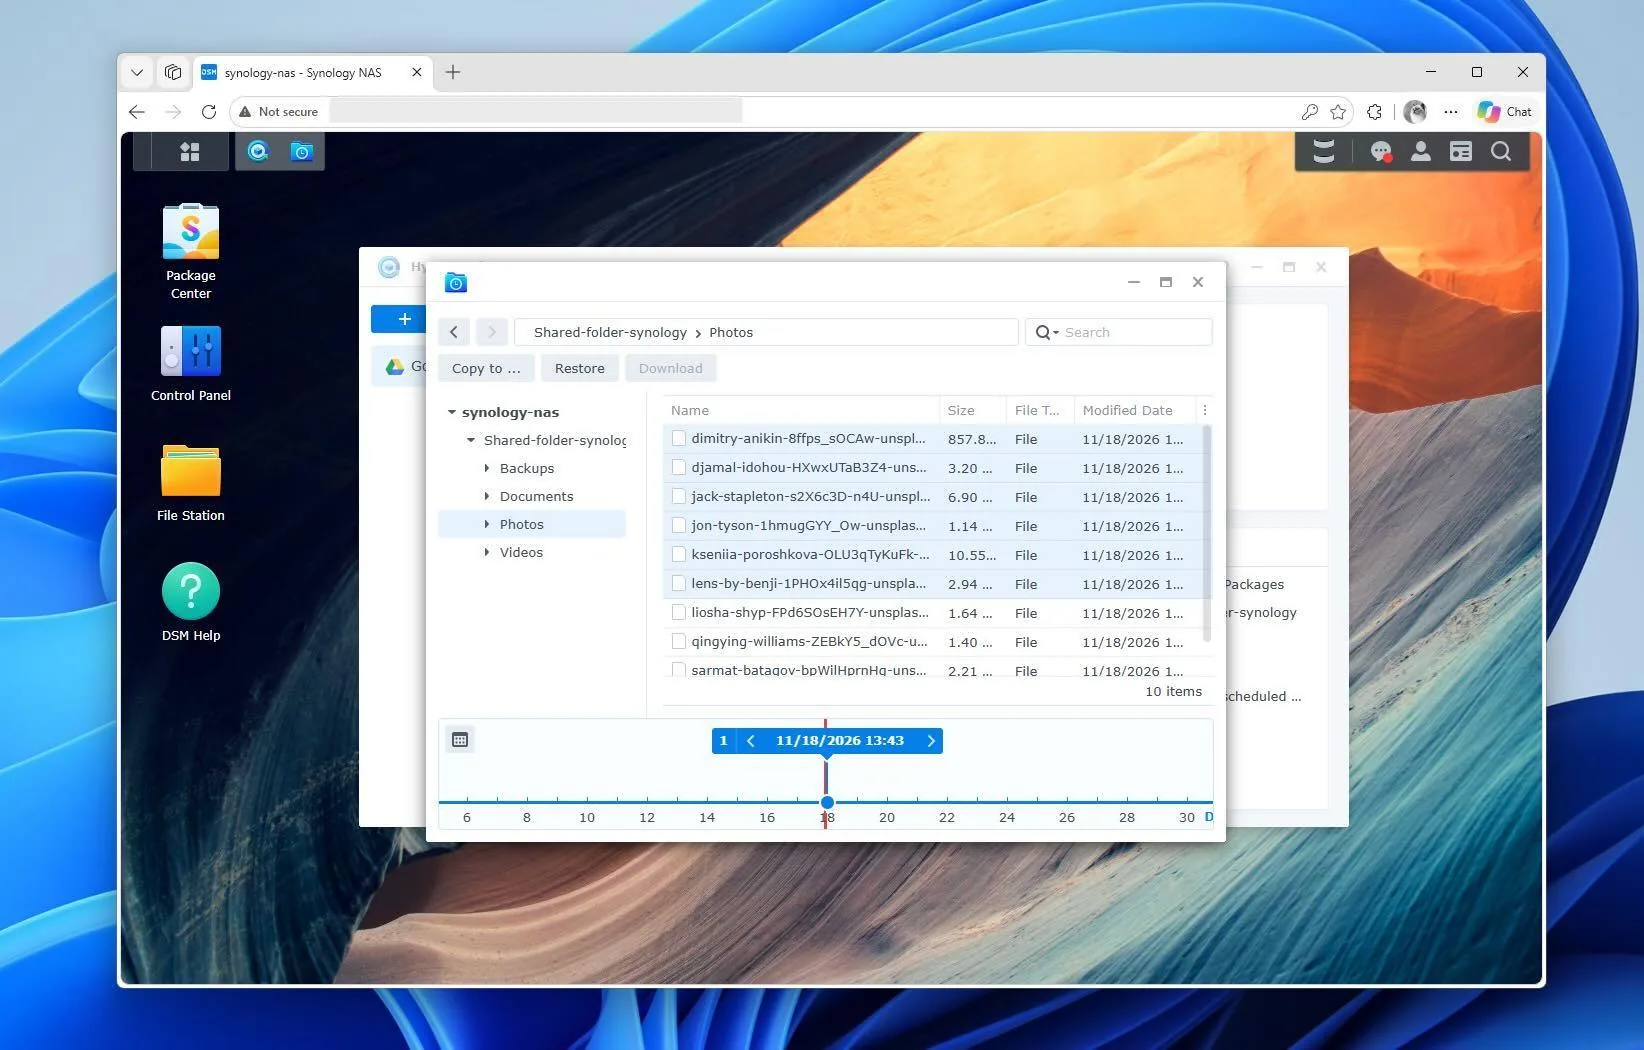
If the backup task is missing, relink the existing repository instead of editing backup files by hand.
QNAP Hybrid Backup Sync (HBS 3)
Open HBS 3 > Jobs, find a backup job that completed successfully, and create a Restore Job from it. If version management was enabled, select the version you need, then choose the source files and a restore location. In some HBS 3 versions the equivalent path is Backup & Restore > Create > Restore job.
Cloud storage, a USB drive or another NAS may also hold an older copy. Check its date, and restore it to a separate location so you don’t overwrite newer files. If the most recent backup ran after the deletion, look through earlier retained versions. A mirrored sync on its own may have copied the deletion too.
Method 4: Scan the volume with recovery software over SSH
If no earlier copy exists but the NAS is healthy enough to access, specialized data recovery software may find deleted content on supported storage volumes. Disk Drill offers a NAS & Linux via SSH mode that can access a compatible NAS without removing its drives.
Scanning Z:\ usually misses deleted NAS files for a simple reason. An SMB or NFS share exposes current files, not deleted file-system records or disk blocks, so a PC scan of the share can’t replace a scan of the storage underneath.
For a supported Synology, QNAP or similar Linux-based NAS:
Check the file system and storage health. Disk Drill advertises NAS scanning for EXT3, EXT4 and Btrfs. Don’t assume this workflow supports a TrueNAS ZFS pool.
Enable SSH in the NAS administration interface if it isn’t on already. On Synology DSM this is usually Control Panel > Terminal & SNMP > Enable SSH service. Use a trusted local network, and don’t expose the NAS’s management SSH port to the public internet.
Install Disk Drill on a separate Windows or Mac computer and open it. Don’t install tools on the affected NAS volume or save recovery results to it.
Open NAS & Linux via SSH. Select the detected NAS, or click Add network storage and enter its IP address, SSH port and authorized login credentials. Click Connect now.
Choose the storage device or volume and click Search for lost data. Use Review found items to inspect results during or after the scan. If the connection fails, confirm that the NAS is reachable, SSH is enabled and the account has enough permissions before you retry.
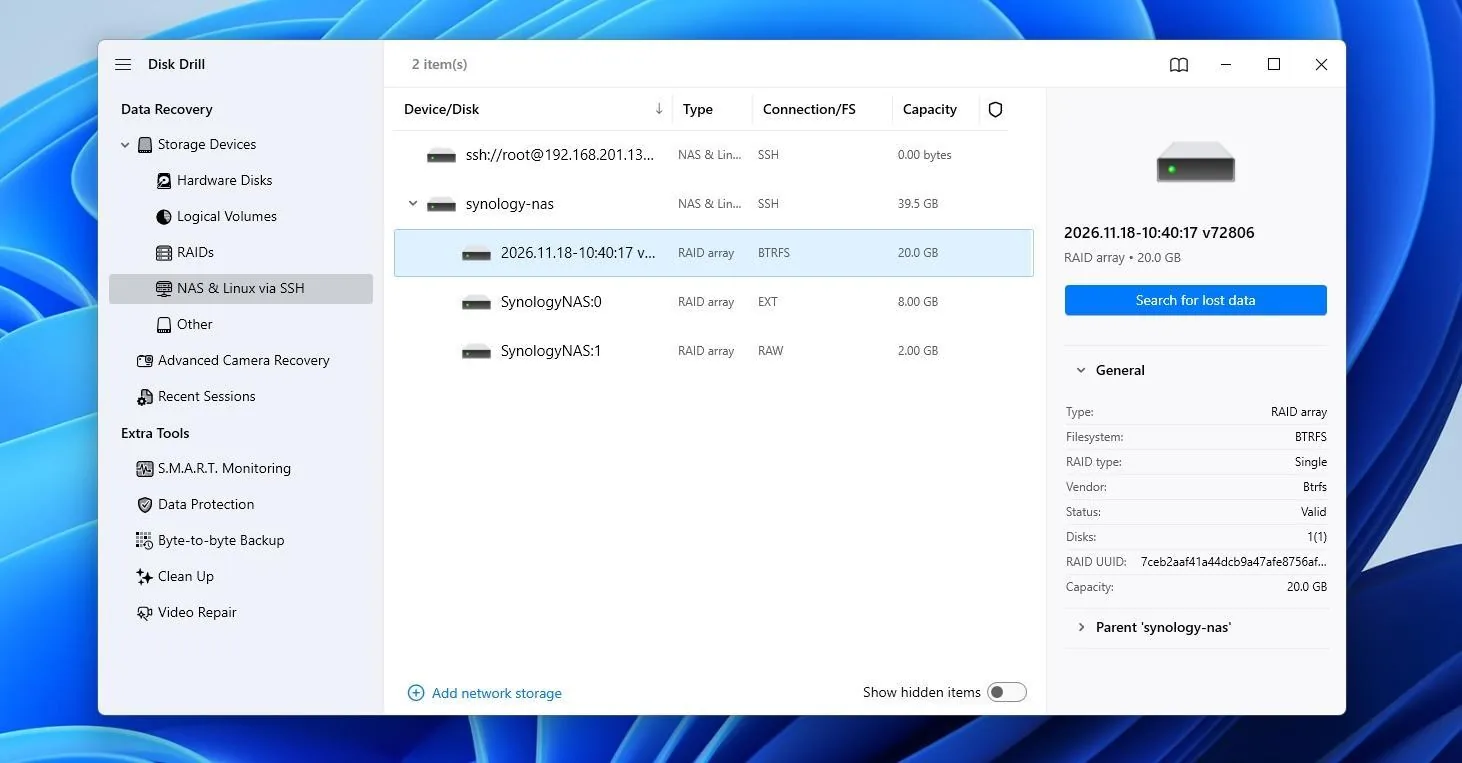
Preview the files and recover them elsewhere. Preview where you can, select what you need, and restore it to another physical disk or independent storage destination, not the same NAS pool.
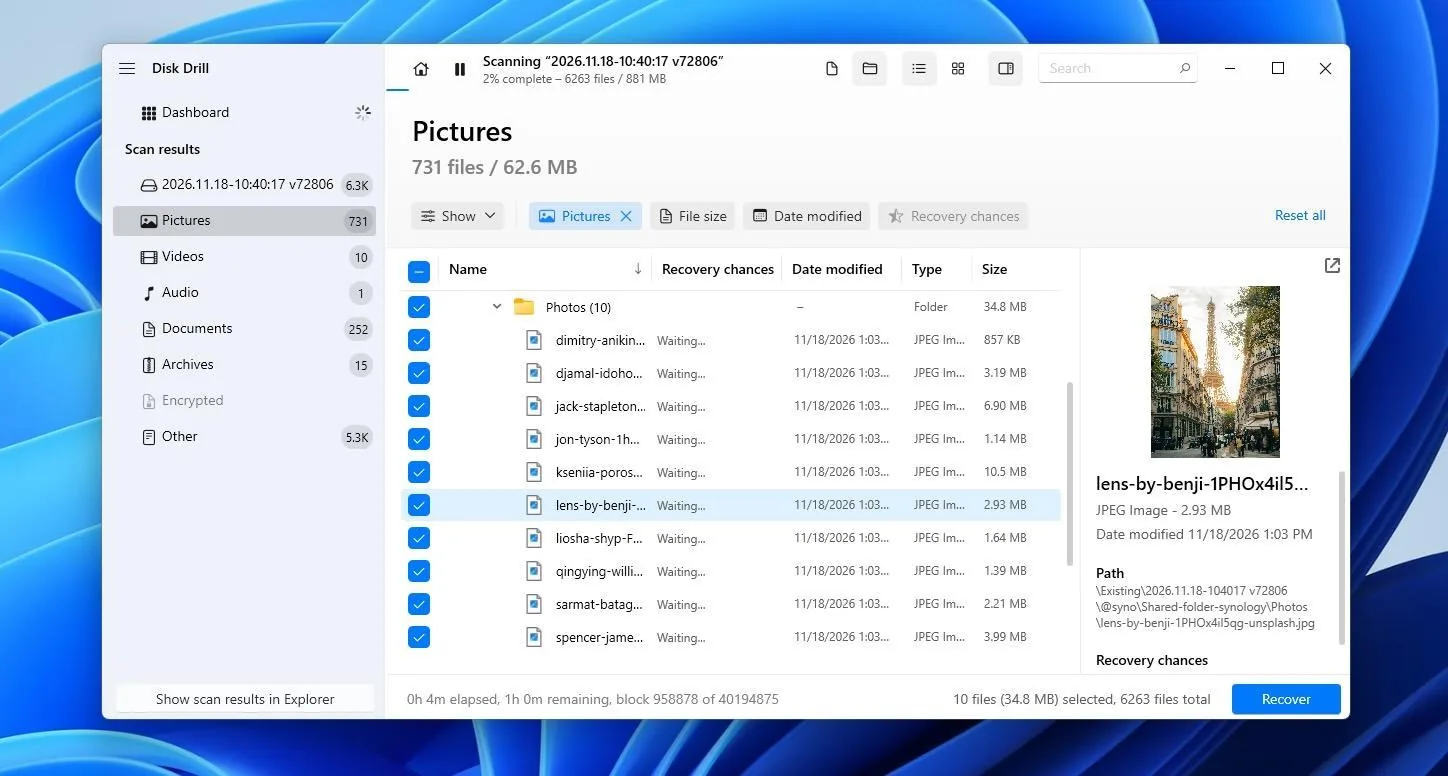
Use Disk Drill’s free scan and previews to check whether it finds the missing files, and whether the important ones open, before you buy a license. Disk Drill 6 for Windows can recover up to 100 MB for free. A NAS folder will often be bigger than that, so finishing the recovery may need a Pro license. On Mac, scanning and previews are free, but unrestricted recovery requires a license.
A live SSH scan still allows system writes. For irreplaceable data or unstable drives, image the disks and recover offline instead.
Method 5: Recover files when the NAS no longer boots
A failed NAS enclosure does not always mean its disks have failed. But once the array is inaccessible, NAS recovery starts with preserving the disk contents and identifying the array layout, not scanning a mapped drive letter.
Photograph the bays, label each disk with its slot, and write down the RAID and encryption details. If Windows offers to Initialize or Format a NAS disk, decline.
The RAID level changes the process. A RAID 1 mirror may have a usable copy on each member, though vendor partitions, LVM and encryption still complicate access. RAID 0 stripes data across members, and RAID 5 and 6 add parity on top of striping, so you generally need a correctly reconstructed array before you can scan the file system. Synology SHR and other proprietary layouts add more variables.
For critical data, work from sector-by-sector images. GNU ddrescue can image media that’s still readable; mechanically failing disks need a lab.
Advanced: inspect a Linux RAID without writing to its members
Experienced Linux users can check the RAID metadata on loop devices backed by those images, so the original disks are never touched:
# Image each member to a different disk first, then attach the image read-only.
# Device names and paths are examples.
sudo ddrescue -d -n /dev/sdb /mnt/rescue/disk1.img /mnt/rescue/disk1.map
sudo losetup --find --show --partscan --read-only /mnt/rescue/disk1.img   # prints /dev/loop0

sudo mdadm --examine /dev/loop0p3
sudo mdadm --examine /dev/loop1p3
cat /proc/mdstat
NAS data isn’t always on partition 3. Once you’ve verified the layout, mdadm --assemble --readonly can assemble an md array from the image-backed devices. For a confirmed two-member layout, that could look like sudo mdadm --assemble --readonly /dev/md127 /dev/loop0p3 /dev/loop1p3, but the actual devices and member counts vary. Never run assembly blindly on the original disks, and don’t use --create or --force as shortcuts.
For free NAS data recovery on a compatible ext4 volume or a correctly assembled image, PhotoRec can carve files by their signatures, often without the original filenames or folder paths. Synology’s own PhotoRec instructions cover ext4, not Btrfs. TestDisk can recognize ext4 but can’t undelete files from it; its undelete support covers ext2 instead.
On a damaged Btrfs image, btrfs-find-root can identify candidate tree roots, and btrfs restore -t can try to extract files to another disk:
sudo btrfs-find-root /dev/md127
sudo btrfs restore -v -t <bytenr> /dev/md127 /mnt/rescue/out/   # <bytenr> from btrfs-find-root
This is file-system salvage, not a reliable undelete. The results may be incomplete or older than the version you lost.
Stop and call a recovery lab when the hardware is failing
Stop if drives click or disconnect, several RAID members fail, a rebuild fails, or the disk order is unknown. RAID reconstruction can’t get around a lost encryption key either.
Specialist labs can image unstable media and reconstruct arrays. For business-critical files with no backup, ask for an assessment before you run more scans or repairs. The RAID level alone can’t predict whether recovery will succeed.
Give the NAS its own backup
A NAS may hold backups of every computer in your office. But who backs up the NAS itself? In Backblaze's 2025 Drive Stats, 344,196 data-center hard drives had a 1.36% annualized failure rate. That isn’t a NAS data-loss rate, but it still shows that even managed storage has hardware failures.
RAID can tolerate certain drive failures, but it can’t undo a mistaken sync, a deleted folder or ransomware. Snapshots preserve earlier versions, but snapshots stored in the same pool are lost along with the pool.
Give the NAS its own backup destination: another device or cloud storage with version history, plus an off-site or isolated copy. Then test it by restoring a file from that independent backup. If the NAS disappeared tomorrow, its backups should still exist somewhere else.
Check the saved copies first, then scan
For an ordinary deleted file, check the NAS recycle bin, retained snapshots and backup versions first. These are usually faster, and they keep file names and folders intact. If no copy remains, a compatible SSH recovery scan may help while the NAS is still healthy. If the enclosure or RAID is failing, stop treating it as a simple deletion and preserve the disks for offline recovery.