In this article
Most home and mobile internet connections no longer come with a dedicated public IP address - IPv4 ran out years ago, so ISPs increasingly put customers behind a shared one instead. That’s invisible for ordinary browsing, but it quietly breaks anything that depends on someone else initiating a connection to you.
Setting up port forwarding can seem daunting, especially when you encounter obstacles like CGNAT (Carrier-Grade Network Address Translation). Whether you’re trying to host a Minecraft server, run a web application, or enable remote SSH access, this guide will walk you through everything you need to know about port forwarding and how to make it work even in challenging network environments.
Summary
Check if you need port forwarding: Only required for hosting applications, games, or remote access when behind NAT.
For standard routers: Access admin panel (usually 192.168.1.1), find port forwarding section, create rule with desired port and device IP.
For CGNAT situations: Use Pinggy tunnel with command:
ssh -p 443 -R0:localhost:8080 free.pinggy.ioGet persistent access: Sign in to Pinggy Dashboard for permanent URLs and custom domains.
Do you really need port forwarding?
Port forwarding isn’t always necessary. You only need it when you want to make services on your local network accessible from the internet. Common scenarios include:
Gaming and Entertainment:
- Hosting multiplayer game servers (Minecraft, CS2, etc.)
- Running media servers for remote streaming
- Setting up game development test environments
Web Development and Hosting:
- Running local web servers accessible from outside
- Testing webhooks and API integrations
- Hosting personal websites or applications
Remote Access and Management:
- SSH access to home computers or servers
- Remote desktop connections
- Accessing Network Attached Storage (NAS) devices
- Managing IoT devices and home automation systems
If your device had a direct public IP address, port forwarding wouldn’t be necessary at all - but that’s rare these days. In the normal case, your ISP gives your router a public IP, and the router then uses NAT (Network Address Translation) to share it across every device on your network. That sharing is exactly what blocks incoming connections by default, and it’s what port forwarding is designed to fix. CGNAT is a level worse: your router’s WAN address isn’t a real public IP either, so there’s no forwarding rule on your router that can help.
Understanding port forwarding
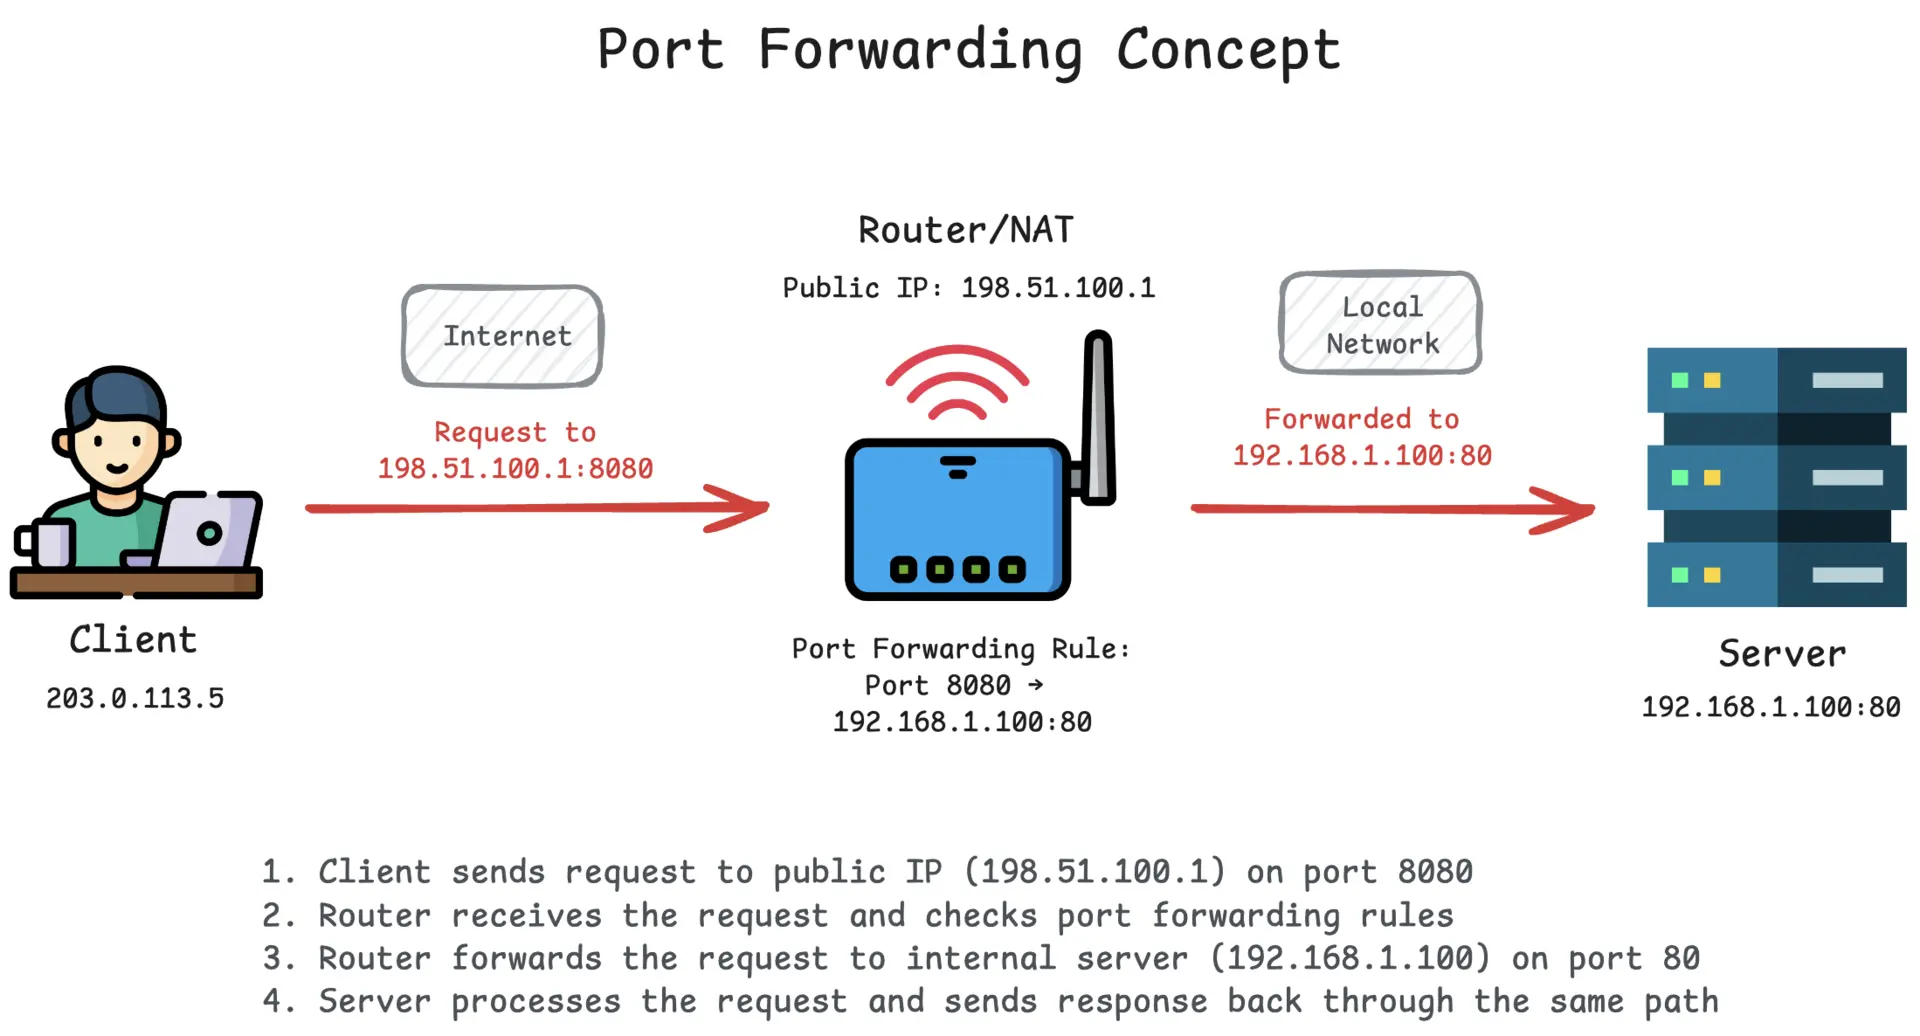
Think of port forwarding as creating a specific pathway through your router’s firewall. Your router acts like a security guard, normally blocking all uninvited visitors from the internet. Port forwarding gives the guard specific instructions: “When someone knocks on port 8080, let them through to the computer at 192.168.1.100.”
This process involves mapping an external port on your router’s public IP to an internal port on a specific device within your network. When external traffic arrives at the specified port, your router knows exactly where to send it.
Common ways to set up port forwarding on your router
Most modern routers provide web-based interfaces for configuring port forwarding. Here’s the general process:
Step 1: Access your router’s admin panel
Open a web browser and navigate to your router’s IP address (commonly 192.168.1.1 or 192.168.0.1). Log in using your admin credentials.
Step 2: Find the port forwarding section Look for sections labeled “Port Forwarding,” “Virtual Servers,” “Port Mapping,” or “NAT/Gaming.” The exact terminology varies by manufacturer.
Step 3: Create a forwarding rule You’ll typically need to specify:
- Service name (for your reference)
- External port (what the internet sees)
- Internal IP address (your device’s local IP)
- Internal port (usually the same as external port)
- Protocol (TCP, UDP, or both)
Step 4: Save and apply settings After creating the rule, save your configuration and restart your router if required.
Popular router interfaces like ASUS, Netgear, Linksys, and TP-Link all follow similar patterns, though the exact menu locations may differ.
But what to do in case of CGNAT?
CGNAT presents a significant challenge for traditional port forwarding. Internet service providers including T-Mobile Home Internet, Verizon 5G Home, Starlink, and most mobile carriers use CGNAT to stretch a shrinking pool of IPv4 addresses across many customers. Under CGNAT, multiple customers share a single public IP address, making direct port forwarding impossible.
How to identify CGNAT:
Check your router’s WAN IP address in the admin panel. If it falls in 100.64.0.0/10 (the range IANA reserved specifically for carrier-grade NAT, so 100.64.x.x through 100.127.x.x), you’re behind CGNAT for certain. Seeing a private range instead, like 10.x.x.x, 172.16-31.x.x, or 192.168.x.x, usually means the same thing in practice: your router isn’t holding a real public IP, whether that’s CGNAT or another layer of NAT upstream.
CGNAT limitations:
CGNAT imposes several limitations that can hinder your ability to host services or access devices remotely. Since your network shares a public IP address with many other users, direct inbound connections from the internet are not possible. This means traditional port forwarding rules won’t work.
- No direct inbound connections possible
- Traditional port forwarding rules won’t work
- UPnP (Universal Plug and Play) is ineffective
- Gaming and hosting applications may fail
Use Pinggy to bypass CGNAT
Pinggy provides an elegant solution for CGNAT limitations through reverse tunneling. Instead of trying to punch holes through CGNAT, Pinggy creates an outbound connection from your device to Pinggy’s servers, then routes incoming traffic back through this established tunnel.
For HTTP/HTTPS services:
Customize for your needs:
For TCP services (SSH, gaming, databases):
Customize for TCP services:
The process is straightforward:
- Open CMD or terminal
- Run the tunnel command replacing the port number with your service’s port
- Access your service using the provided public URL
- Get persistent URLs by signing up for a free Pinggy account
Advanced Pinggy features:
- Custom domain linking for permanent URLs
- Authentication and access control
- Traffic inspection and debugging tools
- Multiple tunnel management through the dashboard
Why port forwarding beats disabling firewall or using DMZ
Some users consider disabling their firewall entirely or enabling a DMZ (Demilitarized Zone) for a device, but both approaches create massive security risks. Port forwarding is superior because:
Selective exposure: Only specific ports on specific devices are accessible, not your entire network.
Maintained security: Your firewall continues protecting all other services and devices.
Controlled access: You can easily modify or remove forwarding rules as needed.
Audit trail: Most routers log port forwarding activity for security monitoring.
Disabling your firewall exposes every device on your network to potential attacks, while port forwarding creates controlled, monitored access points.
Conclusion
Port forwarding is still the right tool for hosting a server or reaching a device remotely, but CGNAT takes the usual router setup off the table. Pinggy works around that by tunneling your local service out over an outbound SSH connection instead of an inbound router rule, so no public IP is required. Whether you’re coding, gaming, or just SSHing home, it’s a quick way to make it work from anywhere.