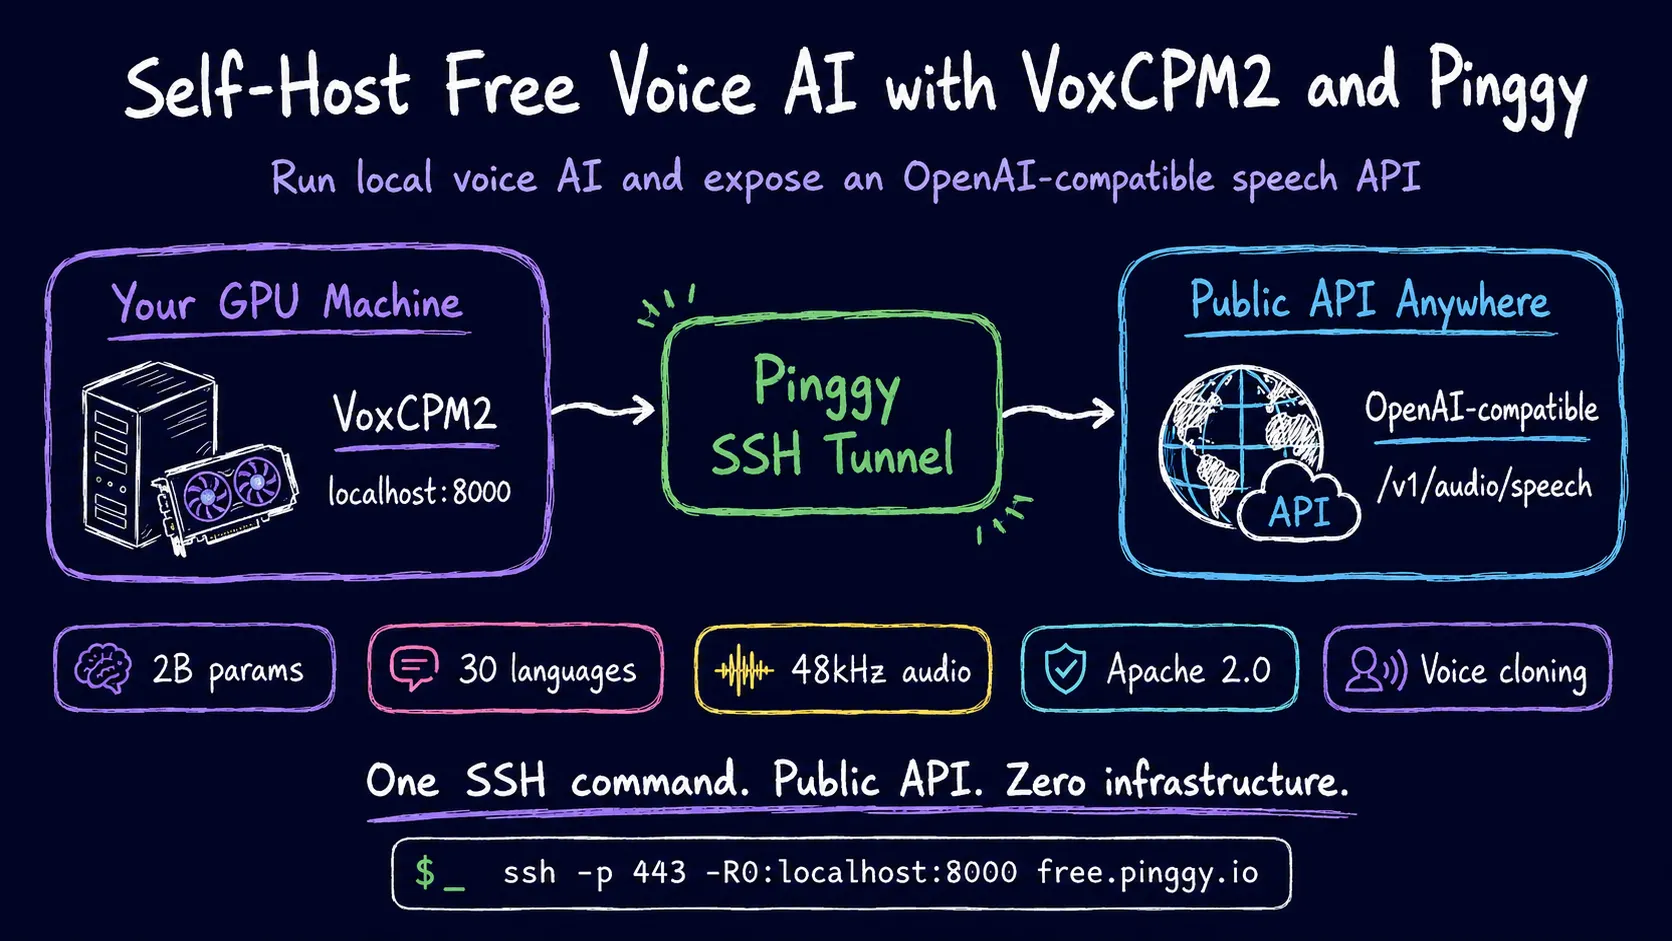
If you want high-quality text-to-speech without paying per-character rates to ElevenLabs or OpenAI, running an open-source model on your own GPU is the obvious alternative. VoxCPM2 is one of the more capable options available - a 2-billion-parameter TTS model from OpenBMB (the team behind MiniCPM) that does something most TTS systems still do not: it skips audio tokenization entirely and generates continuous speech representations end-to-end via a diffusion autoregressive architecture. The result is 48 kHz studio-quality audio, support for 30 languages, and three synthesis modes that go well beyond “type text, get audio.”
What makes it useful for developers is that it ships with a vLLM-based server that exposes a /v1/audio/speech endpoint - the same format as OpenAI’s TTS API. If you have code that calls openai.audio.speech.create, you can point it at your local VoxCPM2 instance with a single config change.
The catch: it runs on your machine, and your machine probably does not have a public IP. That is what Pinggy fixes.
Summary
- Install:
pip install voxcpm(Python 3.10+, CUDA 12+, ~8 GB VRAM) - Quick demo:
python -m voxcpm.app --port 8808 - Production API server:
vllm serve openbmb/VoxCPM2 --omni --port 8000 - Expose publicly:
ssh -p 443 -R0:localhost:8000 free.pinggy.io - Call it from anywhere:
curl https://<your-pinggy-url>/v1/audio/speech \
  -H "Content-Type: application/json" \
  -d '{"model":"openbmb/VoxCPM2","input":"Hello from VoxCPM2!","voice":"default"}' \
  --output speech.wav
What is tokenizer-free TTS and why does it matter
Most open-source TTS pipelines - Kokoro, XTTS, F5-TTS - work in two stages: first encode the text into audio tokens, then decode those tokens into a waveform. The tokenization step is where a lot of expressiveness gets lost. You are compressing speech into a discrete codebook, and then regenerating from that compressed representation.
VoxCPM2 skips the codebook. It uses a four-stage pipeline (LocEnc → TSLM → RALM → LocDiT) that operates entirely in the latent space of a learned audio VAE, generating continuous representations instead of discrete tokens. This is why the model can handle things like subtle emotion changes mid-sentence and match a speaker’s breath patterns on a voice clone - information that would be quantized away in a token-based system.
Practically, the tradeoff is compute. At 2B parameters, it needs significantly more VRAM than Kokoro’s 82M or F5-TTS. On an RTX 4090 with vanilla inference the real-time factor is 0.30 (30 seconds of speech takes 9 seconds to generate). With the Nano-vLLM optimized inference, that drops to 0.13 - close to real-time for short utterances. An RTX 3090 or 3080 with 24 GB VRAM will work fine; a 12 GB card will be tight.
The three synthesis modes
VoxCPM2 ships with four synthesis capabilities. Three are immediately interesting:
Standard TTS - text in, audio out. Nothing special here beyond the quality.
Voice Design - you describe a voice in natural language and the model synthesizes from that prompt with no reference audio at all. Something like “a warm, slightly husky female voice, mid-forties, American English, measured pace” generates a consistent persona you can reuse across sessions. This is genuinely new; most models require audio samples.
Controllable Voice Cloning - provide a 3-10 second reference clip and the model clones the voice. The “controllable” part means you can layer style instructions on top: clone the reference voice but make it sound more energetic, or slower, or more formal. The timbre stays, the delivery changes.
Ultimate Cloning - reference audio plus its transcript for maximum fidelity. Best for when you need the model to nail a specific person’s idiolect.
The model is Apache 2.0 licensed, which means commercial use is fine.
System requirements
- Python 3.10 or 3.11 (not 3.12/3.13 yet)
- CUDA 12.0+
- PyTorch 2.5.0+
- ~8 GB VRAM (bfloat16 precision)
- FFmpeg on your system PATH
You can run inference on CPU or Apple Silicon MPS, but generation will be slow enough to be impractical for anything beyond testing. Disable torch.compile on non-CUDA devices with --no-optimize.
Installing VoxCPM2
# Create a virtual environment first
python3 -m venv voxcpm-env
source voxcpm-env/bin/activate

# Install
pip install voxcpm
To verify the install and pull the model weights (downloaded automatically from Hugging Face on first run):
python -c "from voxcpm import VoxCPM2; m = VoxCPM2(); print('ready')"Model weights are about 4 GB and are cached in ~/.cache/huggingface/hub/.
Running the Gradio demo
The quickest way to try it is the built-in web demo:
python -m voxcpm.app --port 8808Open http://localhost:8808. The interface has tabs for each synthesis mode. Voice Design is the one to try first - type a description and generate audio; you do not need any sample files.
This demo is fine for exploration but is not the interface you want to expose or integrate with. For that, use the API server.
The OpenAI-compatible API server
VoxCPM2 ships with first-class support for vLLM-Omni, which adds omni-modal inference (including TTS) on top of vLLM’s continuous batching and PagedAttention infrastructure.
Install it:
pip install "vllm==0.19.0" vllm-omniStart the server:
vllm serve openbmb/VoxCPM2 --omni --port 8000On first run, this downloads the model if it is not already cached. After a minute or two (GPU loading time), you will see:
INFO:     Application startup complete.
INFO:     Uvicorn running on http://0.0.0.0:8000 (Press CTRL+C to quit)
Test it locally:
curl http://localhost:8000/v1/audio/speech \
  -H "Content-Type: application/json" \
  -d '{
    "model": "openbmb/VoxCPM2",
    "input": "The quick brown fox jumps over the lazy dog.",
    "voice": "default"
  }' \
  --output test.wav
You should have a test.wav with high-quality audio in a few seconds.
The endpoint is compatible with the OpenAI TTS API format. If you are using the Python openai SDK, you can point it at VoxCPM2 like this:
from openai import OpenAI

client = OpenAI(
    base_url="http://localhost:8000/v1",
    api_key="not-needed"
)

response = client.audio.speech.create(
    model="openbmb/VoxCPM2",
    voice="default",
    input="Hello from my local GPU!"
)
response.stream_to_file("output.mp3")
Change base_url to your Pinggy URL and the same code works from anywhere.
Exposing it publicly with Pinggy
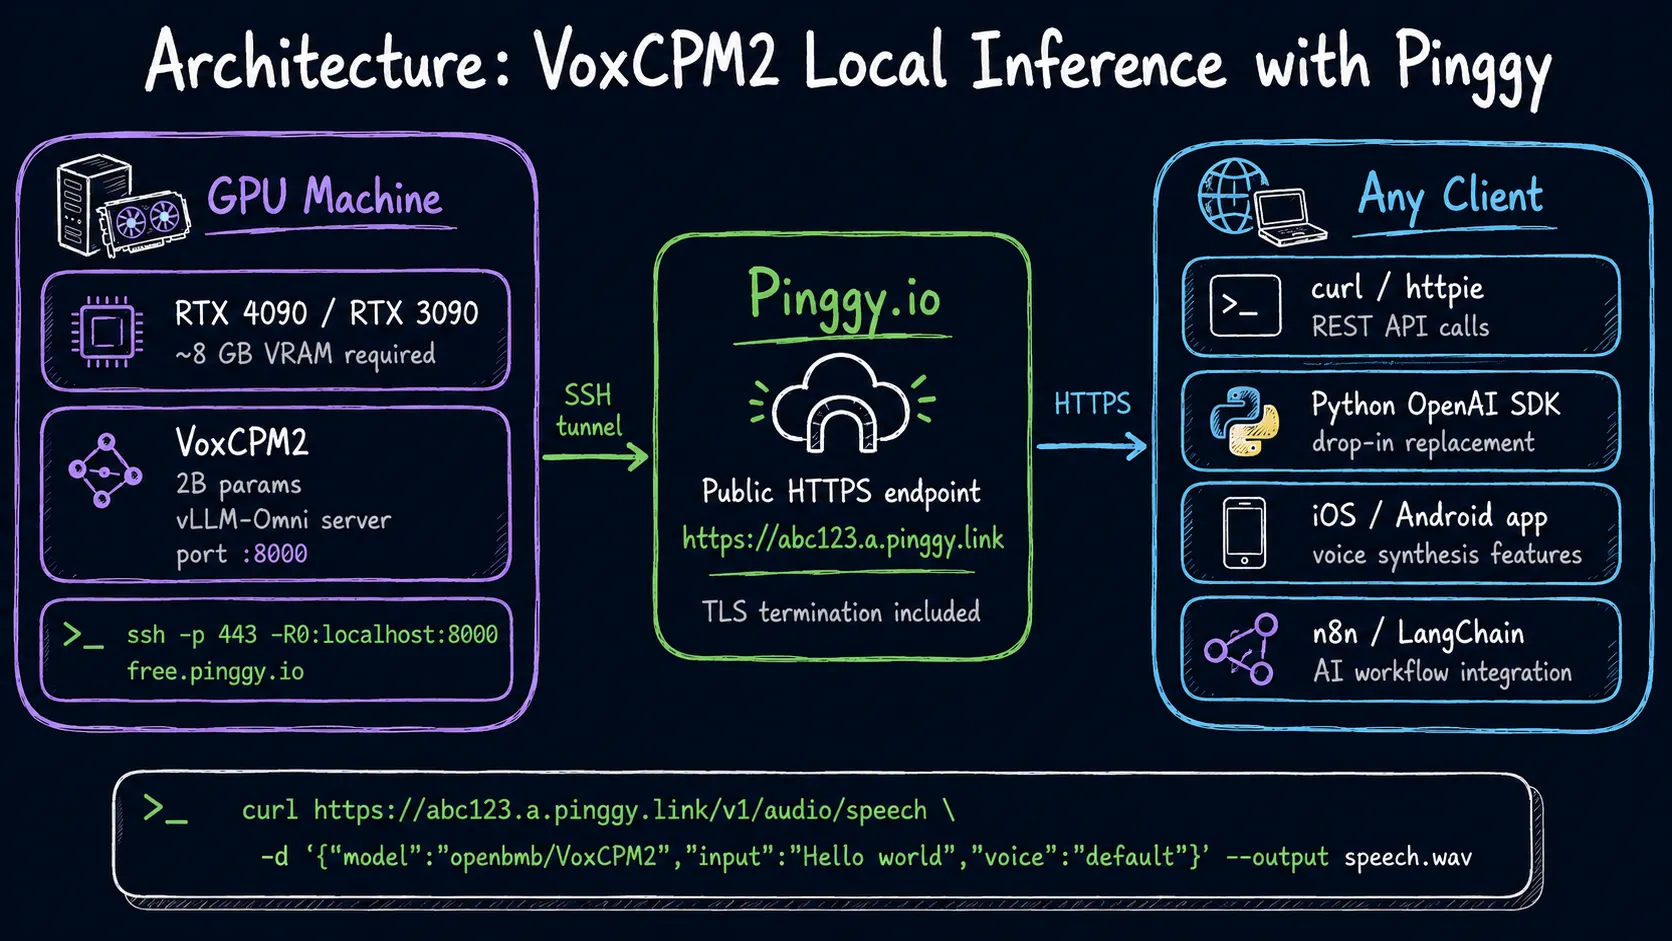
Your VoxCPM2 server is listening on localhost:8000. To share it - with a client, a collaborator, or an app you are testing - you need a public URL. Pinggy creates a tunnel from its edge servers to your local port over SSH. No inbound ports, no router config, no VPN.
In a new terminal (keep the vLLM server running):
ssh -p 443 -R0:localhost:8000 free.pinggy.ioPinggy responds with something like:
You are assigned a random subdomain: https://abc123.a.pinggy.linkThat URL is now a live, HTTPS-terminated proxy to your VoxCPM2 API server. Anyone with the URL can call your endpoint. Use it the same way you would use localhost:8000, just swap the host.
From another machine:
curl https://abc123.a.pinggy.link/v1/audio/speech \
  -H "Content-Type: application/json" \
  -d '{
    "model": "openbmb/VoxCPM2",
    "input": "This is generated on a remote GPU and delivered over a tunnel.",
    "voice": "default"
  }' \
  --output remote.wav
If you need a persistent subdomain instead of a random one on every restart, Pinggy’s paid plans give you a fixed URL you can reference in environment variables.
Adding password protection
If you are sharing this with a client or a small team and do not want the URL to be open to anyone who discovers it, Pinggy supports HTTP basic auth:
ssh -p 443 -R0:localhost:8000 a.pinggy.io -t "b:myuser:mypassword"All requests to the public URL will require the credentials. This is not a substitute for proper API key auth if you are building a product, but it is enough to keep the endpoint from being scraped while you are demoing.
Use cases worth trying
Prototype a voice API product. You have a GPU, vLLM-Omni, and a Pinggy URL. That is a functional TTS API endpoint your front-end can call. You can iterate on prompts, test voice designs, and show clients a working demo without spinning up cloud infrastructure first.
Voice cloning for content workflows. Record a short reference clip, call the clone endpoint from your content pipeline, generate narration at scale. The cloning fidelity is good enough for internal use. Check the license for your reference audio before using it commercially.
Local multilingual TTS for an app. VoxCPM2 supports 30 languages natively. If you are building something that needs high-quality TTS across multiple languages and do not want to pay per-character ElevenLabs rates, running it on your own GPU and tunneling through Pinggy is a reasonable development setup.
Share with teammates. You have the GPU, they do not. One tunnel command and they can call your inference server directly from their laptops.
What does not work yet
The vLLM-Omni path (the OpenAI-compatible server) is Linux-only right now. macOS and Windows users are limited to the Python API and the Gradio demo. The vLLM serving layer handles concurrent requests via async batching, but at 2B parameters with bfloat16 you will feel the throughput limits quickly if multiple users are hitting it simultaneously. For a small team it is fine; for production load you would want proper cloud deployment.
Voice Design voices are currently not persisted across server restarts - you generate, save the audio, and regenerate if you need the same voice again. The GitHub repo has an open issue tracking persistent voice IDs.
Conclusion
Self-hosting voice AI used to mean stitching together mediocre models and fighting CUDA errors all afternoon. VoxCPM2 changes that: Voice Design, voice cloning, and an OpenAI-compatible API all work out of the box, and the Pinggy tunnel makes the whole thing publicly accessible in one command. If you have a GPU sitting idle, this is one of the better uses for it right now. The VoxCPM2 repository has a cookbook section with voice cloning tips worth reading once the basic setup is running.