What Is a Webhook? A Developer's Complete Guide to Real-Time HTTP Event Callbacks
Updated on Jun 30, 2026 · 14 mins read
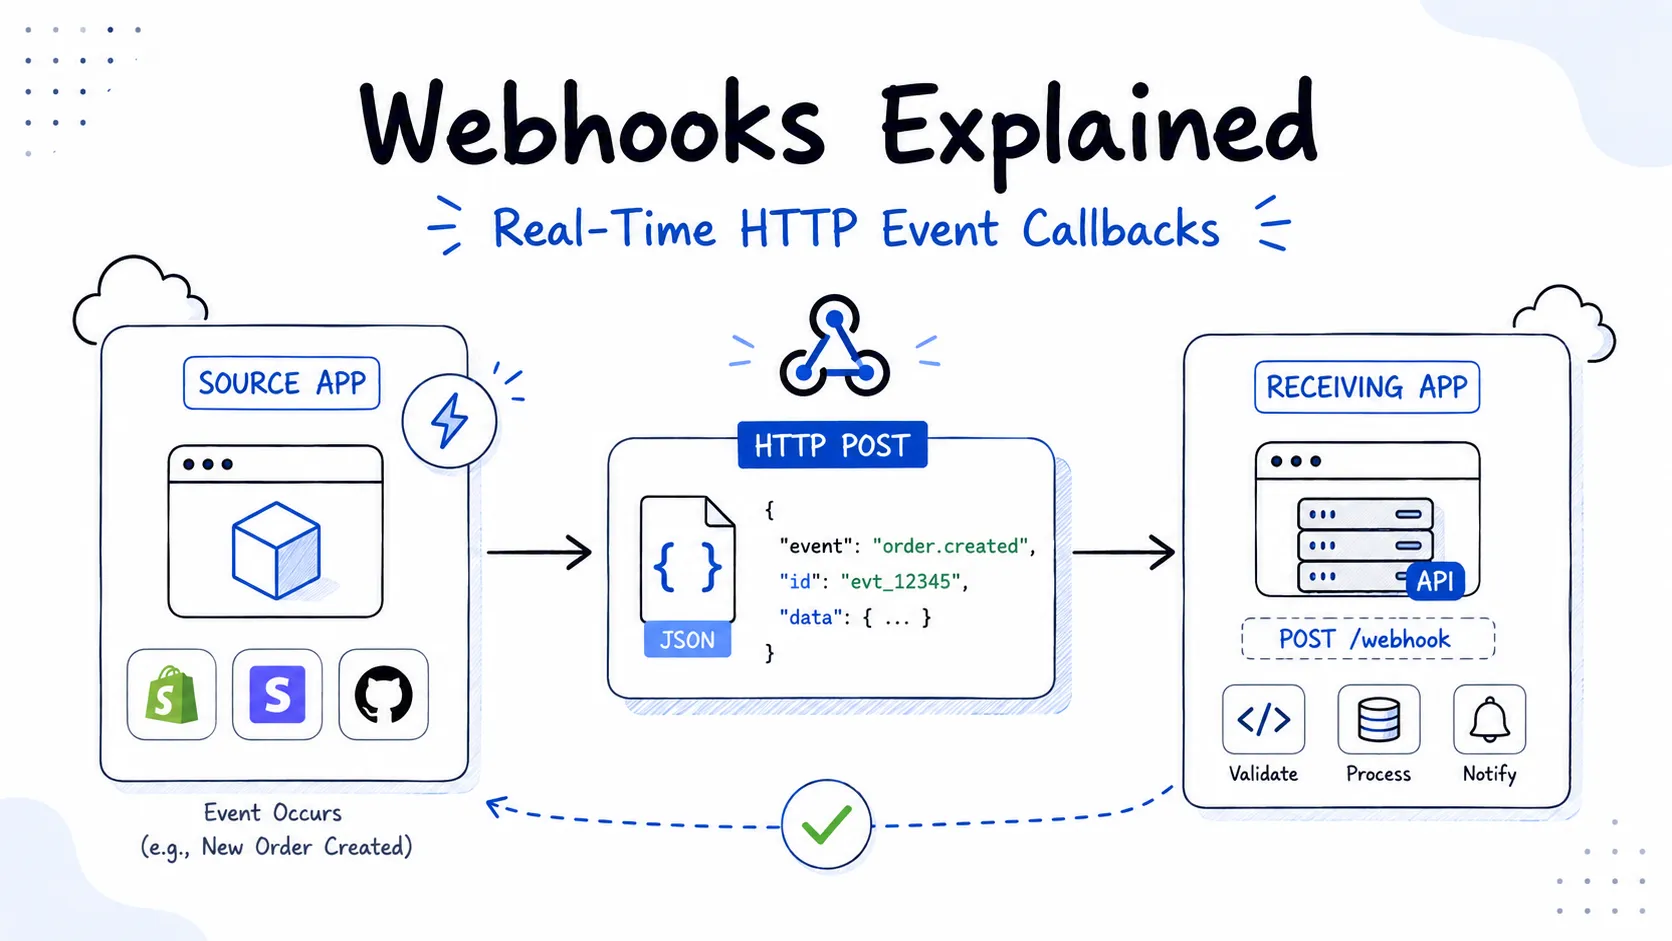 A webhook is an HTTP POST request that one server sends to another as soon as something happens. The term was coined by Jeff Lindsay in 2007, and the pattern has become one of the most common primitives in modern software integration. If you have ever configured GitHub to trigger a CI build when you push code, or watched a Stripe payment update your database the moment a charge succeeds, you have been on the receiving end of a webhook.
The idea is simple: instead of your application periodically asking another service “did anything happen?”, the other service calls your application the instant something does. That shift from polling to push changes everything about how you design integrations - latency drops from minutes to milliseconds, server load shrinks dramatically, and your code reflects what actually happened rather than what you managed to detect.
This guide covers how webhooks work at the HTTP layer, how to build a receiver that is both correct and secure, and how to handle the production concerns that trip up most implementations.
Summary
What is a webhook? An HTTP POST request sent by a source system to your endpoint the moment a specific event occurs. The payload - usually JSON - describes what happened.
Key concepts:
- Webhooks are push-based. The provider calls you; you do not poll them.
- Your endpoint must respond with
2xxwithin the provider’s timeout (typically 5-30 seconds). Anything outside that window is treated as a failure and retried. - Validate the HMAC-SHA256 signature on every request before processing. Ignore this and anyone can spoof events to your endpoint.
- Process events idempotently. Providers retry on failure, so the same event will arrive more than once. Check the event ID before acting.
Useful tools for webhook development:
- webhook.site - inspect incoming payloads instantly without writing any code
- DevToolLab Webhook Receiver - another HTTPS endpoint for receiving and inspecting webhook requests without setting up a server
- Pinggy - expose your localhost server to the internet over a secure SSH tunnel for end-to-end local testing
- Hookdeck - event gateway with filtering, replay, and fanout for production webhook infrastructure
- GitHub Webhooks - the reference implementation, well-documented with clear payload schemas
The Problem Webhooks Solve
Before webhooks existed, the standard approach for detecting changes in an external system was polling: send a GET request every N seconds, compare the response to what you stored, act on anything new. Polling works, but it is wasteful in almost every dimension.
Consider a payment processor. Your order service needs to know when a payment transitions from pending to succeeded or failed. With polling, you might check every 5 seconds. In the median case, you waste 2.5 seconds of latency waiting for the next poll cycle. In the worst case, you hammer the payment API’s rate limits while most of your requests return “nothing changed”. You also pay for every outbound request, whether or not it produced useful data.
Webhooks invert this. The payment processor calls your endpoint the instant the charge status changes. Your latency drops to however long the HTTP round-trip takes - usually under a second. You make no requests when nothing happens. Your system reacts to facts, not to the absence of change.
The tradeoff is that you now need a publicly reachable HTTPS endpoint. You are on the receiving end of an incoming connection, not the initiating end. This is the one thing that makes webhooks genuinely harder than polling to develop locally - your laptop is not publicly accessible by default.
How a Webhook Works: The Full Lifecycle
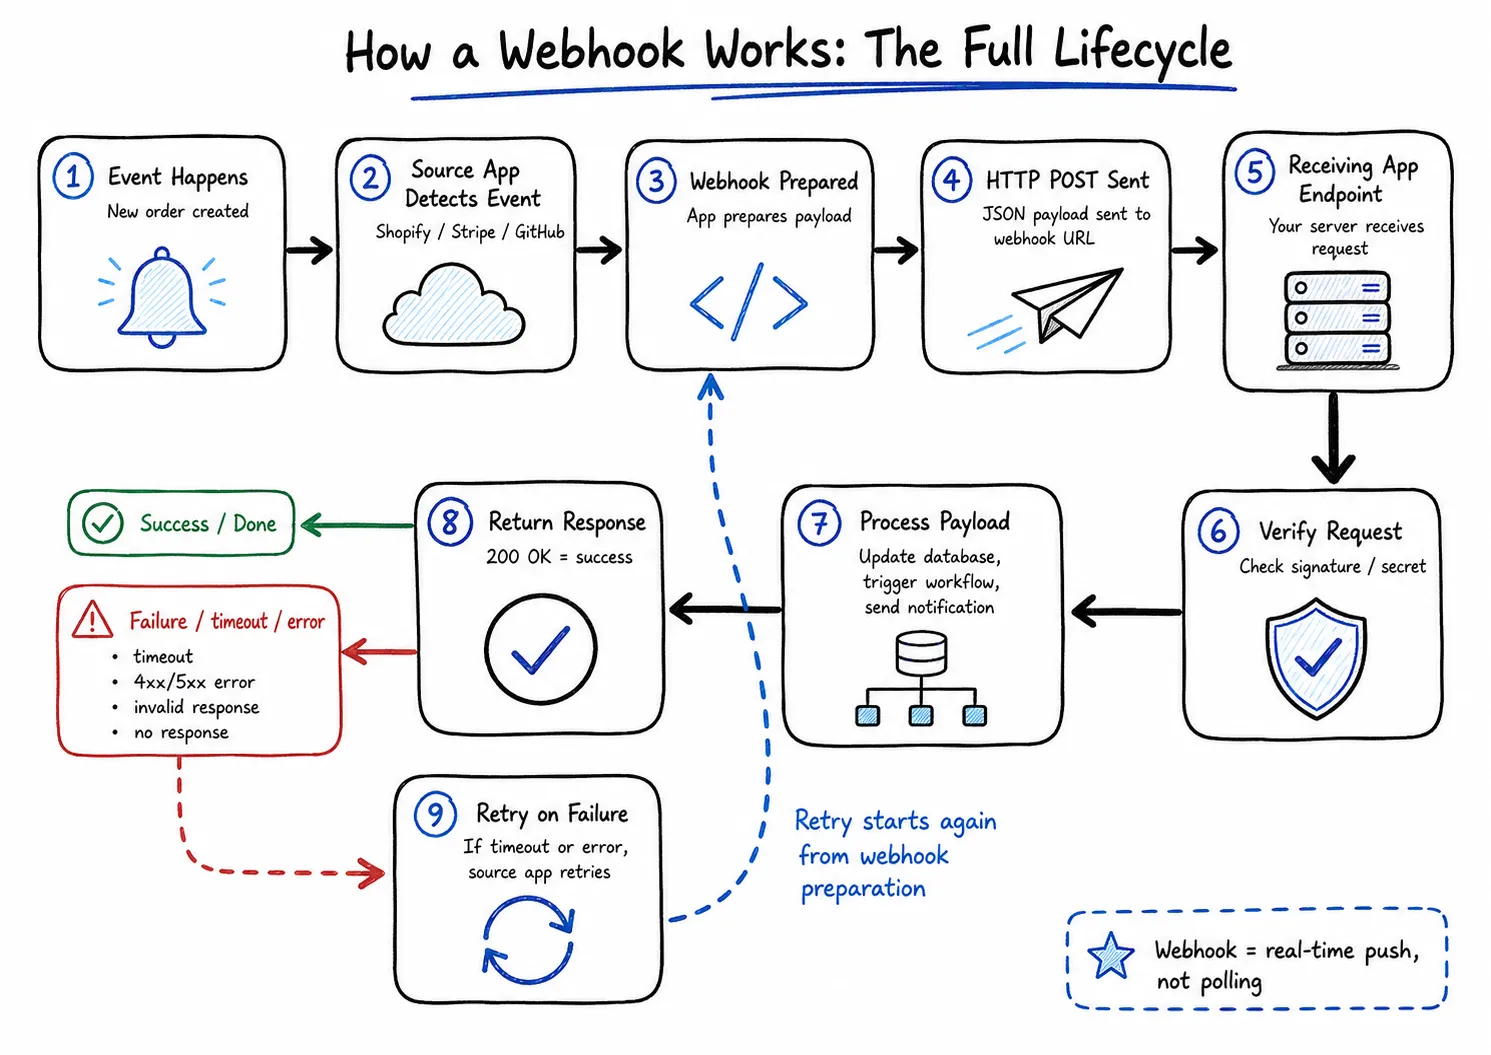
When you register a webhook with a provider - say, GitHub - you give them two things: a URL (your endpoint) and a list of event types you care about (push events, pull request events, etc.). The provider stores this registration.
When the triggering event occurs, the provider’s backend constructs an HTTP POST request with a JSON body describing the event, signs it with an HMAC-SHA256 digest using a shared secret, and sends it to your URL. Your server receives the request, validates the signature, enqueues the payload for background processing, and returns HTTP 200 OK.
The provider observes the 2xx response and marks the delivery as successful. If your server responds slowly, crashes, or returns a non-2xx status code, the provider marks the delivery as failed and schedules a retry - typically with exponential backoff. Most providers retry for 24 to 72 hours before giving up and flagging the endpoint as unreachable.
That handshake - POST, validate, acknowledge, process async - is the entire model. The complexity comes from getting each step right under failure conditions.
Anatomy of a Webhook HTTP Request
A webhook delivery is a plain HTTP POST. What makes it recognizable as a webhook rather than an arbitrary POST is a specific set of headers the provider attaches.
Request Headers
Every major provider uses a slightly different header scheme, but the categories are consistent: a content type header, a delivery identifier for deduplication, an event type identifier, and a signature for authentication.
GitHub’s webhooks, for example, send:
Content-Type: application/json
X-GitHub-Event: push
X-GitHub-Delivery: 72d3162e-cc78-11e3-81ab-4c9367dc0958
X-Hub-Signature-256: sha256=6f27acee78b4e87a93e06eed7b7697bffec3745d0f06d12db0eda8b75d86b8ce
X-GitHub-Event tells you what happened. X-GitHub-Delivery is a UUID that uniquely identifies this specific delivery attempt - use it as your idempotency key. X-Hub-Signature-256 is the HMAC-SHA256 digest of the raw request body, prefixed with sha256=.
Stripe follows a different convention but the same principle:
Content-Type: application/json
Stripe-Signature: t=1714123456,v1=5257a869e7ecebeda32affa62cdca3fa51cad7e77a05bd539a34e0c2c545c1b4
Stripe’s signature header encodes both a timestamp and the HMAC digest together. The timestamp is part of the signed content, which lets you detect replay attacks - if the timestamp is more than a few minutes old, the request is stale and should be rejected regardless of whether the signature is valid.
Slack uses a similar approach:
Content-Type: application/json
X-Slack-Signature: v0=a2114d57b48eac39b9ad189dd8316235a7b4a8d21a10bd27519666489c69b503
X-Slack-Request-Timestamp: 1531420618
The version prefix v0= indicates the signing scheme. Slack includes the timestamp separately in X-Slack-Request-Timestamp and signs v0:{timestamp}:{body} as the message, giving you the same replay-attack protection as Stripe.
The Payload Body
The body is almost always application/json. The shape varies entirely by provider, but there are two structural patterns you will encounter.
Event type in the body (Stripe, Svix, most SaaS APIs):
{
  "id": "evt_1OgzP7Dk5DSQroFp4aCCPb0Y",
  "object": "event",
  "type": "payment_intent.succeeded",
  "created": 1714123456,
  "data": {
    "object": {
      "id": "pi_3OgzOYDk5DSQroFp1KFHXj3d",
      "amount": 2000,
      "currency": "usd",
      "status": "succeeded"
    }
  }
}
The type field tells you what to do with the payload. The id field is your idempotency key. The data.object is the resource that changed.
Event type in the header (GitHub):
{
  "ref": "refs/heads/main",
  "before": "6dcb09b5b57875f334f61aebed695e2e4193db5e",
  "after": "15aef4b32e9f62c9a9d1d2e5a45be0f3a2ab8f5c",
  "repository": {
    "id": 1296269,
    "full_name": "octocat/Hello-World",
    "private": false
  },
  "pusher": {
    "name": "octocat",
    "email": "octocat@github.com"
  },
  "commits": [
    {
      "id": "15aef4b32e9f62c9a9d1d2e5a45be0f3a2ab8f5c",
      "message": "Update README",
      "timestamp": "2026-06-29T08:30:00Z"
    }
  ]
}
Here the event type comes from the X-GitHub-Event: push header, not the body. The X-GitHub-Delivery header carries the idempotency key.
Building a Webhook Receiver
The receiver pattern is the same regardless of language or framework: read the raw body, validate the signature, return 200 OK, and hand off to async processing.
Python with Flask
import hmac
import hashlib
import json
from flask import Flask, request, abort

app = Flask(__name__)

WEBHOOK_SECRET = b"your_webhook_secret_here"

@app.route("/webhook", methods=["POST"])
def webhook():
    raw_body = request.get_data()

    signature_header = request.headers.get("X-Hub-Signature-256", "")
    expected = "sha256=" + hmac.new(WEBHOOK_SECRET, raw_body, hashlib.sha256).hexdigest()

    if not hmac.compare_digest(signature_header, expected):
        abort(403)

    payload = json.loads(raw_body)
    event_type = request.headers.get("X-GitHub-Event")
    delivery_id = request.headers.get("X-GitHub-Delivery")

    # Hand off to async queue - do not block here
    enqueue_event(event_type, delivery_id, payload)

    return "", 200

def enqueue_event(event_type, delivery_id, payload):
    # In production: push to Celery, RQ, or any job queue
    print(f"Queued event {event_type} delivery={delivery_id}")

if __name__ == "__main__":
    app.run(port=5000)
One subtlety: request.get_data() reads the raw bytes from the request body. This is critical because you must sign the raw bytes, not the parsed representation. If you call request.json first, some frameworks buffer and normalize the body in ways that can break signature validation. Always read raw first.
Node.js with Express
const express = require("express");
const crypto = require("crypto");

const app = express();
const WEBHOOK_SECRET = "your_webhook_secret_here";

// Parse as raw buffer so we have the original bytes for HMAC validation
app.use("/webhook", express.raw({ type: "application/json" }));

app.post("/webhook", (req, res) => {
  const signature = req.headers["x-hub-signature-256"] || "";
  const hmac = crypto.createHmac("sha256", WEBHOOK_SECRET);
  const digest = "sha256=" + hmac.update(req.body).digest("hex");

  // timingSafeEqual requires identical buffer lengths
  if (
    signature.length !== digest.length ||
    !crypto.timingSafeEqual(Buffer.from(signature), Buffer.from(digest))
  ) {
    return res.status(403).send("Invalid signature");
  }

  const payload = JSON.parse(req.body);
  const event = req.headers["x-github-event"];
  const deliveryId = req.headers["x-github-delivery"];

  // Acknowledge immediately; process in background
  setImmediate(() => processEvent(event, deliveryId, payload));

  res.status(200).send("OK");
});

function processEvent(event, deliveryId, payload) {
  // In production: push to BullMQ, SQS, or any job queue
  console.log(`Processing event=${event} delivery=${deliveryId}`);
}

app.listen(3000, () => console.log("Listening on :3000"));
The express.raw() middleware mounted only on /webhook ensures the body arrives as a Buffer rather than a parsed object. If you mount express.json() globally and later add a webhook route, the signature validation will fail because the body has already been consumed and re-encoded.
Securing Webhooks with HMAC Signatures
Without signature validation, your webhook endpoint is an unauthenticated POST handler that anyone on the internet can call with fabricated payloads. An attacker who discovers your webhook URL can trigger fake payment confirmations, fake repository events, or anything else your handler is wired to act on.
The fix is HMAC-SHA256 signature validation. HMAC (Hash-based Message Authentication Code) uses a shared secret key to produce a digest of the message. Only someone who knows the secret can produce a valid digest for a given payload. Providers compute the HMAC of the raw request body using the secret you configured when registering the webhook, then include the digest in a header. Your receiver computes the same HMAC independently and compares the two values.
Two implementation details matter significantly.
The first is using a timing-safe comparison. Standard string equality (=== in JavaScript, == in Python) short-circuits as soon as it finds a differing character. An attacker can measure response times across many requests with slightly varying invalid signatures to gradually reconstruct what a valid signature looks like - a timing side-channel attack. crypto.timingSafeEqual in Node.js and hmac.compare_digest in Python always take the same amount of time regardless of where the mismatch occurs, closing this attack vector.
The second is reading the raw body before any parsing. JSON parsers can normalize whitespace, reorder keys, or alter number representation in ways that change the byte sequence. Since the provider signed specific bytes, you must validate those exact bytes. Never validate a signature against a re-serialized JSON object.
For Stripe specifically, the timestamp embedded in Stripe-Signature adds replay-attack protection. Stripe signs {timestamp}.{raw_body} as the message, not just {raw_body}. If you check that the timestamp is within a 300-second window of the current time (Stripe’s recommended tolerance), then capturing and replaying a valid webhook request more than 5 minutes later will fail validation even though the HMAC is correct.
The Retry Problem and Idempotency
Every provider retries failed deliveries. A delivery is considered failed if your endpoint returns a non-2xx status code or does not respond within the timeout window - typically 5 to 30 seconds depending on the provider. Stripe retries up to 36 times over 72 hours with exponential backoff. GitHub retries a handful of times but eventually gives up and marks the webhook delivery as failed in its dashboard.
This creates a fundamental problem: if your server crashes halfway through processing an event, the provider sees a failure (or no response) and retries the delivery. When the retry arrives, your server may try to process the same event again and produce a duplicate outcome - two emails sent, two orders created, two charges attempted.
The solution is idempotent event handling. An operation is idempotent if running it once produces the same result as running it ten times. For webhook handlers, idempotency means: check whether you have already processed this event, and if so, return success without doing any work.
The implementation is straightforward. Each event has a unique identifier - X-GitHub-Delivery on GitHub, evt_... in Stripe’s payload body. Before processing the event, look up that ID in a processed_events table or a Redis key:
CREATE TABLE processed_webhook_events (
    event_id    TEXT PRIMARY KEY,
    received_at TIMESTAMPTZ NOT NULL DEFAULT now()
);
In Python:
from psycopg2.errors import UniqueViolation

def handle_event(event_id, payload):
    try:
        with db.cursor() as cur:
            cur.execute(
                "INSERT INTO processed_webhook_events (event_id) VALUES (%s)",
                (event_id,)
            )
        # INSERT succeeded - this is the first time we've seen this event
        process_payload(payload)
    except UniqueViolation:
        # Already processed - safe to acknowledge without reprocessing
        pass
The database PRIMARY KEY constraint makes the deduplication atomic and crash-safe. If your server crashes after inserting the event_id but before process_payload completes, you have a gap - but that is a harder problem (exactly-once processing) that requires saga patterns or transactional outboxes. For most applications, at-least-once delivery with idempotent handlers is the right balance.
One important detail on TTL: set your idempotency record retention to exceed the provider’s retry window. If Stripe retries for 72 hours, keep your processed_events records for at least 72 hours. Otherwise, late retries will slip through your deduplication check and be treated as fresh events.
Event Ordering Is Not Guaranteed
Webhook providers send events in the order they occur, but network conditions mean they may arrive out of order. A payment_intent.payment_failed event can arrive before the payment_intent.created event it logically follows. A customer.updated event can arrive before customer.created.
The robust pattern is to treat each webhook as a trigger to fetch fresh data, not as the authoritative source of that data. When you receive a payment_intent.succeeded event, call Stripe’s API to retrieve the current state of the PaymentIntent rather than trusting the snapshot in the webhook payload. This makes your handler correct regardless of delivery order, because you are always acting on the current state.
This matters most for events with sequential state machines (order status, payment status, subscription lifecycle). For events that carry self-contained facts that do not transition through states (new comment posted, file uploaded), the ordering concern is usually less significant.
Testing Webhooks Locally
The practical challenge with webhook development is that your local server is not accessible from the internet. The GitHub or Stripe backend cannot reach localhost:5000. You need a publicly accessible URL that tunnels traffic to your local process.
Quick Payload Inspection with webhook.site
webhook.site gives you a unique URL that logs every HTTP request it receives. Before writing any code, point your provider’s webhook at a webhook.site URL to see exactly what headers and payload shape arrive. This is the fastest way to understand an unfamiliar provider’s format. DevToolLab’s Webhook Receiver works the same way if you want a second option for quick inspection.
Full Local Development with Pinggy
For end-to-end local testing - where you actually want your handler code to run - you need a tunnel. Pinggy creates a secure SSH tunnel from a public URL to your local port in a single command.
If your webhook server is running on port 5000:
ssh -p 443 -R0:localhost:5000 free.pinggy.io
Pinggy prints a public HTTPS URL like https://abc123.a.pinggy.link. Paste that URL into GitHub’s webhook settings or Stripe’s dashboard, and all events will be forwarded to your local server. You can test signature validation, retry behavior, and idempotency logic end-to-end without deploying to a staging environment. For more detail, see our guide on
receiving and testing webhooks on localhost.
For Node.js servers running on port 3000, swap 5000 for 3000 in the command above.
Hookdeck for Production-Grade Infrastructure
Hookdeck sits between providers and your server, adding a persistent event queue, configurable retry logic, request transformation, and an inspection UI. If you need to fan a single incoming webhook out to multiple destinations, or if you want to filter events before they reach your handler, Hookdeck handles that at the infrastructure layer so your application code stays simple.
Svix for Sending Webhooks
Svix is the other direction: if you are building a platform that sends webhooks to your customers, Svix provides the delivery infrastructure, retry logic, failure tracking, and a management portal. It is the easiest way to add outbound webhooks to your product without building a delivery system from scratch.
Webhooks vs. Polling vs. WebSockets
Webhooks push data when something happens. Polling pulls data on a schedule. The right choice depends on how frequently events occur and what latency you can tolerate.
Polling makes sense when the event source does not support webhooks (many internal systems), when you need to control the exact timing of data retrieval, or when event volume is so high that the overhead of webhook delivery matters. It is also simpler to implement when security requirements around public endpoints are a concern.
Webhooks are the correct choice when you need near-real-time notification of external events, when events are infrequent enough that polling would waste requests, and when the provider supports them (most modern SaaS APIs do).
WebSockets are appropriate when you need bidirectional, persistent, low-latency communication - a chat application, a live collaboration tool, a trading dashboard. Webhooks are one-directional (server to server) and stateless per delivery. They are not a substitute for WebSockets in scenarios requiring streaming data or two-way messaging.
For a deeper comparison, our guide on webhooks vs APIs covers the architectural tradeoffs in more detail.
Conclusion
Webhooks are simple at the HTTP level - a POST request with a JSON body and a signature header. Get the operational details right - raw body validation, timing-safe comparison, a background queue, and idempotency by event ID - and you have covered most production failure modes.
Start a new integration by pointing a webhook.site URL at it, then test your real handler with Pinggy before deploying.