JetKVM Mini: A $39 KVM Over IP, and What to Do When Its Cloud Can't Reach You
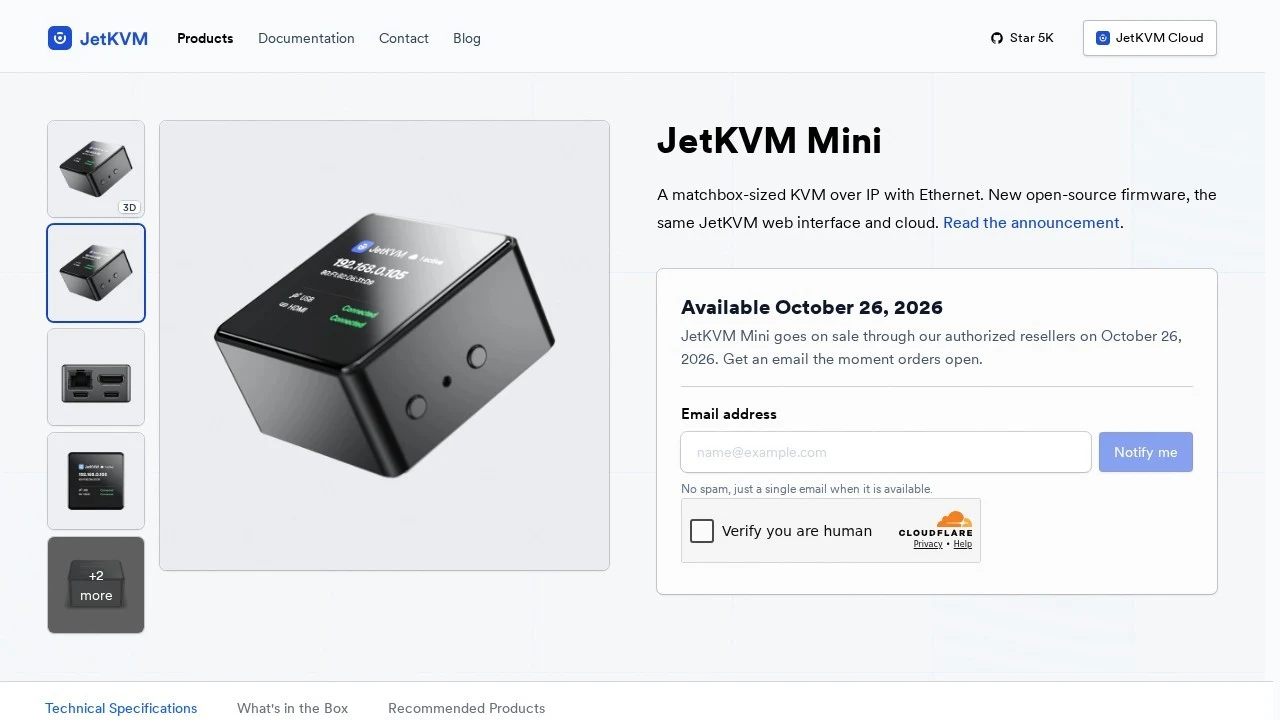
JetKVM Mini is a KVM-over-IP device the size of a matchbox: 42 x 42 x 23mm, aluminum shell, $39 for the Ethernet model or $33 apiece in a three-pack. A wireless version with 802.11ax and Bluetooth LE adds three dollars. It ships October 26, 2026, and it does the same job as a rack-mounted IP-KVM that used to cost hundreds of dollars: give you a keyboard, a mouse, and a video feed on any computer, over the network, even when that computer’s operating system is dead, its SSH daemon isn’t running, or it hasn’t gotten past BIOS.
That’s a real category, not a gimmick. Homelabbers use IP-KVMs to reach a machine after a bad kernel update. Sysadmins use them to reinstall an OS on a box in a colo they can’t drive to. The point of the device is that it works when your normal remote access doesn’t.
Summary
- What it is: a $39 (Ethernet) or $42 (Wi-Fi) matchbox-sized KVM-over-IP, shipping October 26, 2026, built from scratch around video capture, HID control, and virtual media rather than a cut-down version of the original $69 JetKVM.
- How you reach it: JetKVM Cloud (WebRTC, with STUN/TURN fallback over Cloudflare) or Tailscale, both documented and both genuinely easy to set up.
- Where that breaks: networks that only allow outbound TCP on 443 block the UDP traffic WebRTC needs, and Tailscale still needs a client installed on whatever device you’re viewing from.
- The backup path: the local web UI is plain HTTP with no built-in TLS, so a plain SSH tunnel from another machine on the same LAN puts it behind a public HTTPS URL over the same port 443 your browser already uses for everything:
ssh -p 443 -R0:<jetkvm-lan-ip>:80 free.pinggy.io. - Keep it as a fallback: the tunnel adds a relay hop that direct WebRTC doesn’t have, so it’s the way in when the usual path is blocked, not the everyday connection.
What’s actually new here
The original JetKVM launched in 2025 at $69 and built a loyal following for two reasons: it’s genuinely well engineered (native 1080p capture, a real web app, virtual media mounting), and its firmware is open source. Mini isn’t a cut-down version of that board. According to JetKVM’s own announcement, it was built from scratch around a narrower set of jobs, video capture, HID control, and virtual media, which let them drop the DRAM and eMMC a full Linux SBC needs and land at roughly half the price.
Specs, from JetKVM’s product page:
- MCU: ESP32-P4X, dual-core RISC-V at 400MHz, with a hardware H.264 encoder
- Video: 1080p30 or 720p60 over WebRTC, up to 4K with the paid JetKVM OS Services tier
- Network: RJ45, up to 100Mbps (the Mini W wireless variant adds an ESP32-C5 with dual-band Wi-Fi 6 and BLE)
- USB: one USB 2.0 High Speed port to the target machine (keyboard, mouse, virtual media, and power), one Full Speed port for general use
- Storage: a TF card slot for mounting ISOs as virtual media
- Firmware: open source from day one, with OTA updates and automatic rollback
How you’re meant to reach it remotely
A KVM device is only useful if you can get to it when you’re not home, so JetKVM ships two remote-access paths, both documented on their site.
The default is JetKVM Cloud: sign in on their dashboard and it opens a WebRTC connection to the device, encrypted with DTLS. When a direct peer-to-peer connection isn’t possible, which is most of the time once either side is behind NAT, it falls back to STUN to discover public addresses and, if that still doesn’t work, a TURN relay that JetKVM runs on Cloudflare’s network at no extra cost. This is a solid design and it’s why the setup is genuinely one click for most people.
The second path is Tailscale, which added official support for JetKVM devices, including a documented option to point at a self-hosted Headscale coordination server instead of Tailscale’s own. Install it on the device with a one-line script, install the client wherever you’re connecting from, and you get the whole LAN, not just the KVM.
Where that falls over
Both paths share an assumption: that the network you’re connecting from will let a WebRTC-style connection out. Most networks do. Some very deliberately don’t.
Locked-down corporate networks, plenty of hotel and conference Wi-Fi, and campus networks often allow outbound TCP on 443 and nothing else, no UDP, no STUN, sometimes no arbitrary TURN relay either. That’s the exact traffic JetKVM Cloud’s fallback path needs. And Tailscale, while it also has a working DERP-relay fallback over plain TCP, still requires installing and authenticating a client on whatever device you’re using to look in, which is a real ask if you’re on a borrowed laptop or a library machine and just need to glance at a stuck boot screen for thirty seconds.
There’s a second, quieter issue: JetKVM Cloud’s signaling goes through JetKVM’s own dashboard. That’s fine day to day, but the entire reason you own a KVM is to have a way in when things have already gone wrong. Making that path depend on a third party’s servers staying up adds a dependency to the one tool that’s supposed to have none.
None of this is a knock on JetKVM’s design; STUN/TURN plus a mesh VPN option covers the overwhelming majority of real setups, and it’s more thought-out remote access than most $39 hardware ships with. It’s just not the only path worth having.
A backup path: tunnel straight to it
The Mini’s local web UI is a plain HTTP server on the device’s LAN address (there’s no built-in TLS for local access, per JetKVM’s own docs, which is also why at least one open GitHub issue on the project discusses running a personal SSH tunnel just to get HTTPS on the local network). That’s actually convenient here, because it means the interface is a normal web page you can put behind any TCP tunnel.
Pinggy opens an outbound SSH connection to a public relay and forwards traffic back down it, so from the outside it looks like a normal HTTPS site, and from the inside it never required an inbound port to be opened. Because that connection is a single outbound TCP stream to port 443, the same port your browser already uses for every HTTPS site, it gets through networks that block WebRTC’s UDP and STUN/TURN traffic outright.
The JetKVM Mini itself has no shell to run a client on, so the tunnel runs from a second always-on machine on the same LAN, a home server, a NAS, a Raspberry Pi, whatever you’ve already got, and points at the Mini’s local IP instead of localhost:
ssh -p 443 -R0:192.168.1.50:80 free.pinggy.ioSwap 192.168.1.50 for whatever address is shown on the Mini’s own screen. Pinggy replies with a public HTTPS URL:
Allocated port 7 for remote forward to 192.168.1.50:80
Your tunnel will expire in 60 minutes. Upgrade to Pinggy Pro to get unrestricted tunnels.
https://rpuwm-44-227-128-71.free.pinggy.net
Open that from anywhere, including a network that would refuse the WebRTC path outright, and the JetKVM login screen loads over HTTPS with a valid certificate.
Lock it down before you open that URL to yourself. A device that hands out full keyboard, mouse, and power control deserves more than one layer of auth. JetKVM’s own password protection is optional; turn it on. Then add a second gate at the tunnel edge:
ssh -p 443 -R0:192.168.1.50:80 free.pinggy.io b:youruser:yourpasswordThat rejects unauthenticated requests before they ever reach your network. If you’d rather restrict by network instead of credentials, w:203.0.113.0/24 limits the tunnel to a known CIDR range. For a tunnel you’ll reuse rather than spin up once, a Pinggy Pro token removes the 60-minute expiry and keeps the hostname fixed across restarts:
ssh -p 443 -R0:192.168.1.50:80 YOUR_TOKEN@pro.pinggy.ioWhere this fits next to Cloud and Tailscale
| Path | Works when UDP/WebRTC is blocked | Needs a client on the viewer | Depends on a third-party service being up |
|---|---|---|---|
| JetKVM Cloud (WebRTC + Cloudflare TURN) | Sometimes; TURN over TCP can still be filtered | No, just a browser | Yes, JetKVM's dashboard |
| Tailscale | Yes, DERP relay falls back to TCP | Yes, an installed and authenticated client | Optional, self-host with Headscale |
| Pinggy tunnel to the local UI | Yes, plain TCP on port 443 | No, just a browser | Only while the tunnel session runs |
This isn’t a case for replacing Cloud or Tailscale. WebRTC’s peer-to-peer path, when it connects directly, has lower latency than any relay, and that matters for a device whose entire value is responsive keyboard and mouse input. A tunnel adds a hop the direct path doesn’t have, so treat it the way you’d treat a spare key, not something you reach for every day, but something that works precisely on the day your usual way in doesn’t.
The takeaway
JetKVM Mini is a genuinely good piece of hardware at a genuinely low price, and its cloud-plus-Tailscale remote access covers most situations well. The gap is narrow but real: networks that only allow outbound TCP on 443, and moments when you need in from a machine that isn’t yours to install software on. An SSH tunnel to the device’s local web UI closes that gap with one command and no dependency beyond an outbound connection you already know works, because it’s the same one your browser uses for every HTTPS page you load.