If you’ve ever typed localhost in your browser or seen 127.0.0.1 in configuration files, you’ve encountered one of networking’s most fundamental concepts: the loopback address. This special IP address is your computer’s way of talking to itself, and understanding it is crucial for anyone doing development work.
Summary
What is 127.0.0.1? The address 127.0.0.1 is the standard IPv4 loopback address that always points to your own computer. It’s the IP address behind “localhost” and enables local network communication without ever leaving your machine.
Loopback Address Range: The IPv4 loopback range spans from 127.0.0.0/8 (covering 127.0.0.1 to 127.255.255.255), while IPv6 uses a single address ::1. Most applications default to using 127.0.0.1 for its simplicity and universal compatibility.
How It Works: When you send traffic to 127.0.0.1, it never leaves your computer and gets processed entirely by the network stack without involving any physical network hardware. This makes it the fastest possible network communication method available.
Common Uses: Developers primarily use 127.0.0.1 for local development servers, testing network applications, enabling inter-process communication, and connecting to databases running on the same machine.
What is 127.0.0.1?
127.0.0.1 is the most famous IP address in networking - it’s the standard IPv4 loopback address that every computer uses to refer to itself. When you send data to 127.0.0.1, you’re essentially sending it to your own machine, creating a closed loop that never touches any external network.
Think of it as your computer’s internal phone number. Just like you might call your own phone to test if it’s working, applications use 127.0.0.1 to communicate with other services running on the same computer.
The Magic Behind the Numbers
The address 127.0.0.1 isn’t arbitrary - it’s part of a reserved block defined by internet standards. The entire 127.x.x.x range (specifically 127.0.0.0/8) is reserved for loopback functionality, with 127.0.0.1 being the standard and most commonly used address. While addresses from 127.0.0.2 to 127.255.255.255 are also valid loopback addresses, they’re rarely used in practice.
This reservation ensures that no matter where you are in the world, 127.0.0.1 always means “this computer” and never gets routed to some random server on the internet. It’s a fundamental part of how the internet protocol suite maintains consistency across different systems and networks.
Understanding Loopback Addresses
The term “loopback” perfectly describes what happens: network packets loop back to their origin without ever leaving the computer. It’s like throwing a ball at a wall and having it bounce straight back to you.
IPv4 vs IPv6 Loopback
When it comes to loopback addresses, there are two main versions to understand. IPv4 loopback uses 127.0.0.1 as part of a large address range containing over 16.7 million possible addresses. This version is universally supported across all systems and remains the default choice for most applications due to its widespread compatibility.
IPv6 loopback takes a different approach, using a single address ::1 that’s more efficient in terms of address space usage. While IPv6 loopback is seeing growing adoption with modern systems and provides equivalent functionality to 127.0.0.1, the IPv4 version still dominates in practical usage.
Most systems today support both protocols simultaneously, but 127.0.0.1 remains the go-to choice for developers because of its simplicity and universal compatibility across different operating systems and network configurations.
How Loopback Works
Understanding how loopback works helps explain why it’s so fast and reliable for local development.
The Network Stack Journey
When you send data to 127.0.0.1, the process follows a specific path through your computer’s network stack. Your application first sends data destined for 127.0.0.1, which then moves to the transport layer where TCP or UDP adds the necessary port information. At the network layer, the IP stack recognizes this as a loopback address and immediately redirects the traffic internally through the loopback interface. Finally, the data travels back up the stack to arrive at the destination application.
The key point here is that the data never reaches the physical network interface. Instead, it’s processed entirely within your computer’s network stack, making it incredibly fast and secure since no external network hardware is involved in the communication process.
Why It’s So Fast
Loopback communication represents the fastest possible network communication method available to applications. This speed advantage comes from several factors working together. First, loopback completely bypasses physical hardware like network cards, cables, and switches, eliminating the time needed for electrical signals to travel through these components.
Additionally, there are no network delays from routing, switching, or transmission across physical media. The communication follows an optimized path through the network stack that’s specifically designed for internal traffic. Perhaps most importantly, internal loopback communication is 100% reliable with no packet loss, eliminating the need for retransmission protocols that can slow down network communication.
This combination of factors makes loopback perfect for high-performance inter-process communication and local development scenarios where speed and reliability are both critical.
How Loopback Interface Works on Windows
Windows implements the loopback interface differently from Unix-like systems, but the end result for developers remains the same. Understanding these Windows-specific details can help when troubleshooting connectivity issues or optimizing applications on Windows systems.
Windows Loopback Adapter
On Windows, the loopback functionality is handled by a special network adapter called the “Microsoft Loopback Adapter” or “Microsoft KM-TEST Loopback Adapter” in newer versions. Unlike physical network adapters, this is a software-only adapter that exists purely to handle internal network communication. You can view this adapter in the Device Manager under Network Adapters, though it’s often hidden by default.
The Windows loopback adapter operates at the kernel level through the Windows Filtering Platform (WFP) and the Network Driver Interface Specification (NDIS). When an application sends data to 127.0.0.1, the Windows TCP/IP stack recognizes this as a loopback address and immediately routes the packet through the loopback adapter instead of attempting to send it through physical network hardware.
Windows-Specific Behavior
Windows has some unique characteristics in how it handles loopback traffic. The Windows Firewall typically allows loopback traffic by default, but certain security software or Group Policy settings can interfere with this behavior. Additionally, Windows uses a different internal routing mechanism compared to Linux, which can sometimes result in slightly different performance characteristics.
One important Windows-specific consideration is that some versions of Windows Server have enhanced loopback processing that can provide even better performance for high-throughput applications. This is particularly relevant for applications like databases or web servers that rely heavily on local inter-process communication.
Viewing Loopback Interface on Windows
You can examine the loopback interface on Windows using several built-in tools. The ipconfig command will show the loopback adapter, and you can use netstat -rn to view the routing table and see how 127.0.0.1 traffic is handled. For more detailed information, the Get-NetAdapter PowerShell cmdlet can provide comprehensive details about all network adapters, including the loopback adapter.
# View all network adapters including loopback
Get-NetAdapter | Where-Object {$_.InterfaceDescription -like "*Loopback*"}

# Check loopback routing
route print | findstr "127.0.0.1"
Understanding these Windows-specific implementation details can be valuable when developing applications that need to work reliably across different Windows versions or when troubleshooting network connectivity issues in Windows environments.
Practical Uses of 127.0.0.1
Developers encounter 127.0.0.1 in countless scenarios. Here are the most common and practical uses:
Local Development Servers
When you run a development server, it typically binds to 127.0.0.1:
# Node.js development server
npm run dev
# Server running at http://127.0.0.1:3000

# Python Flask app
flask run --host=127.0.0.1 --port=5000

# Django development server
python manage.py runserver 127.0.0.1:8000
This setup ensures your development server is only accessible from your own machine, providing security during development.
Database Connections
Many applications connect to databases running on the same server:
# Python database connection
import psycopg2
conn = psycopg2.connect(
    host="127.0.0.1",
    port=5432,
    database="myapp"
)
// Node.js MongoDB connection
const mongoose = require('mongoose');
mongoose.connect('mongodb://127.0.0.1:27017/myapp');
Using 127.0.0.1 for database connections is faster than using external IP addresses and more secure than allowing remote connections.
127.0.0.1 vs localhost vs 0.0.0.0
Understanding the differences between these addresses is crucial for developers working with network applications. Each serves a different purpose and has distinct characteristics that affect how your applications behave.
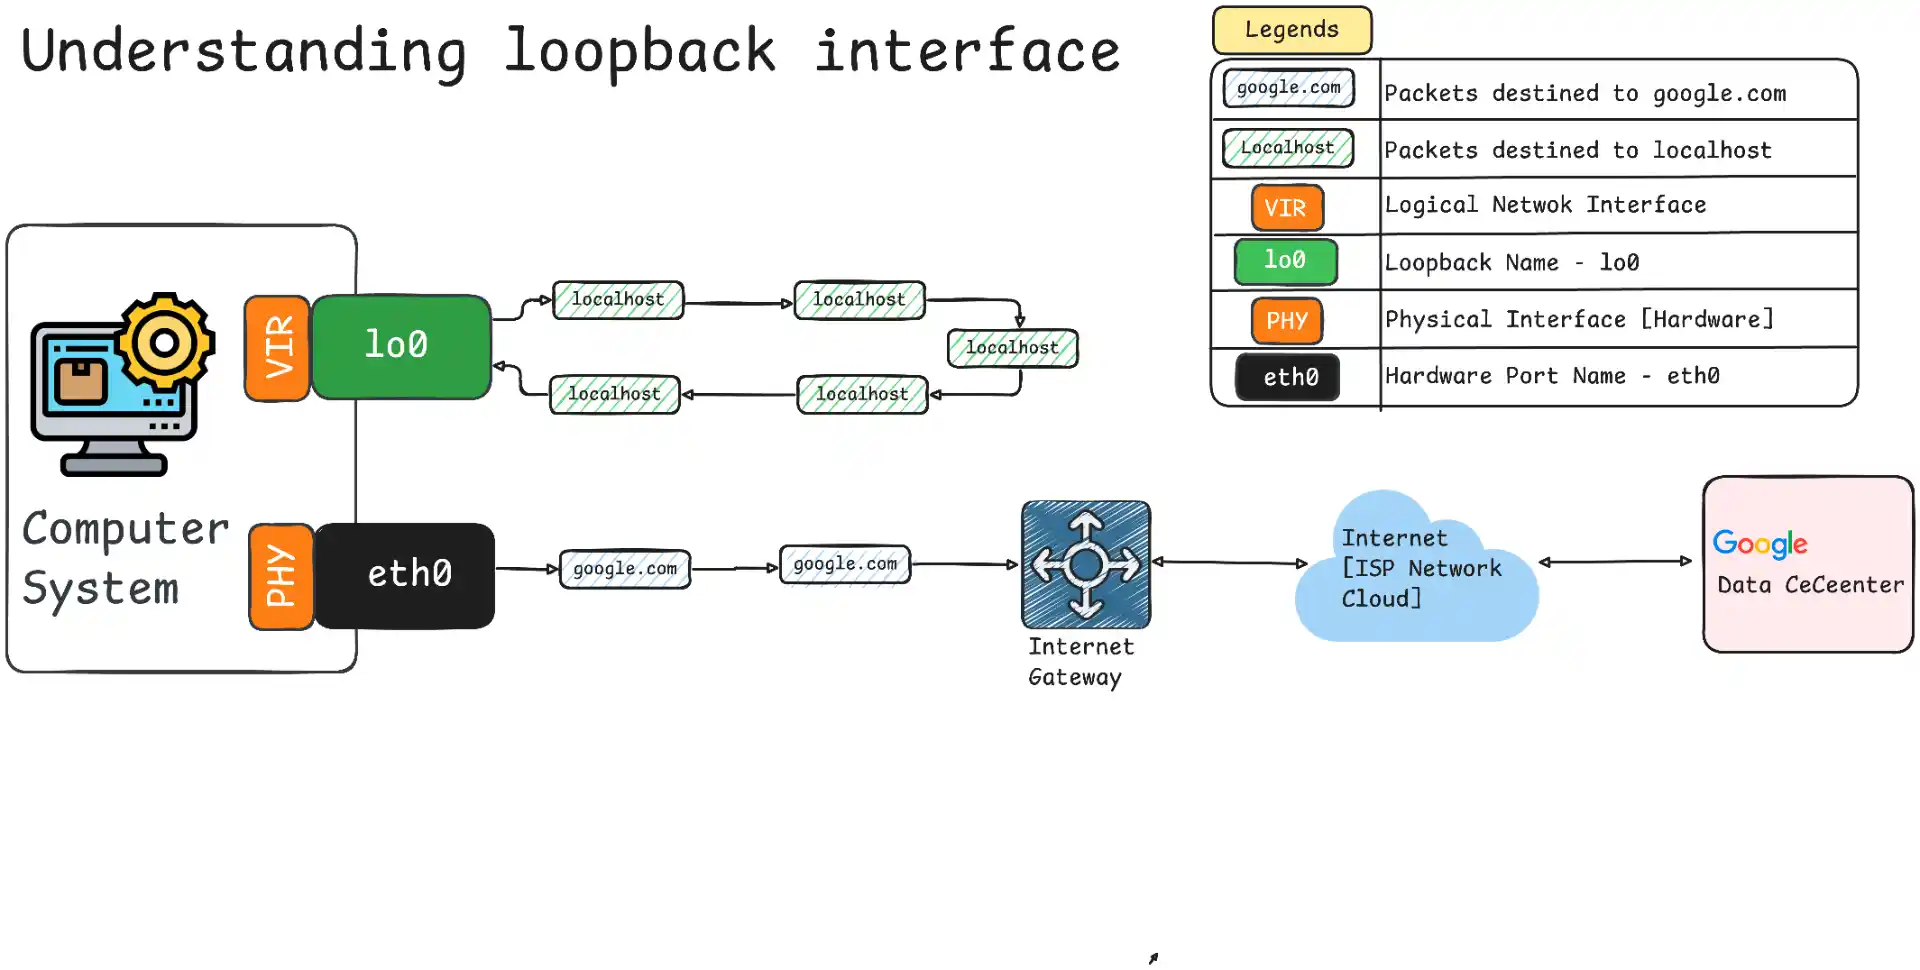
The explicit loopback address 127.0.0.1 always resolves directly to the loopback interface without requiring any DNS lookup. This makes it guaranteed to work even if DNS services are broken or misconfigured, and provides the fastest possible resolution since no name lookup is involved. However, connections coming to other interfaces (such as through WiFi or Ethernet eth0) will not be able to reach your service listening on 127.0.0.1, since the binding is to the loopback interface (e.g. lo0).
In contrast, localhost is a hostname that typically resolves to 127.0.0.1 (or ::1 for IPv6) through DNS or the local hosts file. While this approach is more readable in configuration files, it’s slightly slower due to the name resolution process. The advantage is that localhost can be customized in /etc/hosts if needed for specific testing scenarios.
The address 0.0.0.0 takes a completely different approach by binding to all available network interfaces on the system. This means it accepts connections from any IP address, making it useful when you want external access to your application. However, this approach is less secure for development work since it exposes your application to the entire network.
Example Comparison:
# Only local access
python -m http.server --bind 127.0.0.1 8000

# Local access (same as above, but via hostname)
python -m http.server --bind localhost 8000

# Accept connections from anywhere
python -m http.server --bind 0.0.0.0 8000
IPv6 vs IPv4 Confusion
Modern systems often support both IPv4 and IPv6, which can sometimes cause confusion when working with loopback addresses. Some systems prefer IPv6 by default, so when you ping localhost, it might resolve to ::1 instead of the expected 127.0.0.1.
# This might resolve to ::1 instead of 127.0.0.1
ping localhost

# Force IPv4
ping -4 localhost

# Force IPv6
ping -6 localhost
If you need to ensure you’re using a specific protocol version, you can force the behavior using the appropriate command-line flags.
Sharing Local Development with Pinggy
While 127.0.0.1 keeps your development secure and local, sometimes you need to share your work with teammates or test webhooks from external services.
Pinggy makes this easy by creating secure tunnels to your local development servers.
Share your local server running on 127.0.0.1:8000 with a single command:
This creates a secure tunnel that allows external access to your local development server while keeping your actual machine protected.
Conclusion
127.0.0.1 (loopback) is a core part of networking, enabling secure and reliable local communication. It’s essential for development, testing, and debugging tasks like running servers, connecting to databases, or checking APIs. More than just an IP, it’s your computer’s way of talking to itself—understanding it helps you build and troubleshoot applications effectively.