
Model Context Protocol (MCP) has become a practical way to connect AI assistants and agents to external tools, databases, documents, and workflows. During development, many MCP servers start on your own machine, which is convenient for testing but limiting when you want to connect from a hosted AI client, share a prototype with a teammate, or test the server from another device.
Pinggy solves that localhost access problem by creating a public HTTPS tunnel to your local MCP server. You keep the server running on your laptop or workstation, and Pinggy gives you a temporary public URL that remote MCP clients can reach without deploying to cloud infrastructure, opening router ports, or changing firewall rules.
Summary
MCP lets AI applications connect to external tools, data sources, and workflows through a standard protocol. Learn the basics from the official MCP introduction.
For remote sharing, prefer an MCP server that supports Streamable HTTP. The current MCP transport specification defines stdio for local process communication and Streamable HTTP for HTTP-based client-server communication. See the MCP transport specification.
If your MCP server is running at http://localhost:3000/mcp, expose it with Pinggy:
ssh -p 443 -R0:localhost:3000 -L4300:localhost:4300 -t free.pinggy.ioUse the generated HTTPS URL plus your MCP endpoint path, for example https://example.pinggy.link/mcp, in your MCP-compatible client.
Before sharing the URL, add authentication. Pinggy supports browser basic authentication and bearer-token style key authentication; use key authentication for API-style MCP clients when possible.
What Is an MCP Server?
An MCP server is a small service that exposes capabilities to an AI application. Those capabilities usually fall into three groups: tools, resources, and prompts. Tools let an AI model take actions, such as querying a database or calling an internal API. Resources provide context, such as files, documents, records, or service metadata. Prompts provide reusable interaction templates.
If you are new to MCP, start with our earlier article on how AI agents use MCP servers. The short version is that MCP gives AI clients a common way to discover and call external capabilities without every app needing a custom integration for every service.
Why Share an MCP Server from Localhost?
Local development is still the easiest place to build and debug an MCP server. You can inspect logs, edit code quickly, test tools against local data, and avoid a cloud deployment while the API is changing.
The problem is that many useful testing scenarios are not local. A hosted AI client cannot reach localhost on your laptop. A teammate cannot test your MCP server unless they are on the same machine. A mobile device cannot call your local endpoint unless you configure network access. Pinggy bridges that gap with a tunnel from a public URL to your local port.
This is useful when you want to test a new MCP tool with a remote AI client, demo an internal automation server, connect a browser-based client to a local MCP server, or debug HTTP requests before deploying the server permanently.
Understand MCP Transports Before You Tunnel
Before creating a tunnel, confirm how your MCP server communicates. MCP supports more than one transport, and this affects what Pinggy can expose directly.
stdio MCP servers are launched by the local MCP client as a subprocess. They read JSON-RPC messages from standard input and write responses to standard output. This is excellent for local desktop clients and command-line workflows, but it is not an HTTP service, so there is no localhost port for Pinggy to expose directly.
Streamable HTTP MCP servers run as independent HTTP services. They expose an MCP endpoint, commonly something like /mcp, and clients communicate with that endpoint using HTTP POST and optional GET-based streaming. This is the right fit for sharing over Pinggy because Pinggy can forward public HTTPS traffic to the local HTTP port.
Older MCP servers may still use the HTTP+SSE transport from earlier MCP versions. These can often be tunneled too, but your client must support that older transport or the server must expose a current Streamable HTTP endpoint alongside it.
Prerequisites
You need a local MCP server that supports HTTP transport and is already running on a known port. In the examples below, the server listens on localhost:3000 and exposes its MCP endpoint at /mcp. Replace both values with the port and endpoint path used by your own server.
You also need an SSH client. macOS and Linux include one by default, and modern Windows installations include OpenSSH. You do not need to install a separate tunneling binary for the SSH-based Pinggy flow.
For background on how Pinggy tunnels work, see the HTTP and HTTPS tunnels documentation and our guide to SSH reverse tunneling.
Step 1: Start Your MCP Server Locally
Start your MCP server using its normal development command. The exact command depends on your framework or SDK, but the important part is that it exposes an HTTP endpoint on localhost.
For this guide, assume:
Local server: http://localhost:3000
MCP endpoint: http://localhost:3000/mcp
Here is a minimal MCP server example in JavaScript using Express:
const express = require("express")

const app = express();
app.use(express.json());

app.post('/mcp', (req, res) => {
  if (req.method !== 'POST') {
    return res.status(405).json({
      jsonrpc: '2.0',
      error: { code: -32600, message: 'Method not allowed' },
    });
  }

  const { method } = req.body;

  if (method === 'initialize') {
    return res.json({
      jsonrpc: '2.0',
      id: req.body.id,
      result: {
        protocolVersion: '2025-11-25',
        capabilities: {},
        serverInfo: { name: 'minimal-mcp', version: '1.0.0' },
      },
    });
  }

  return res.status(400).json({
    jsonrpc: '2.0',
    error: { code: -32601, message: 'Method not found' },
  });
});

const port = process.env.PORT || 4001;

app.listen(port, () => console.log(`MCP server on http://localhost:${port}/mcp`));
Run it with node server.js, and replace this with your actual server implementation that handles tools, resources, and prompts.
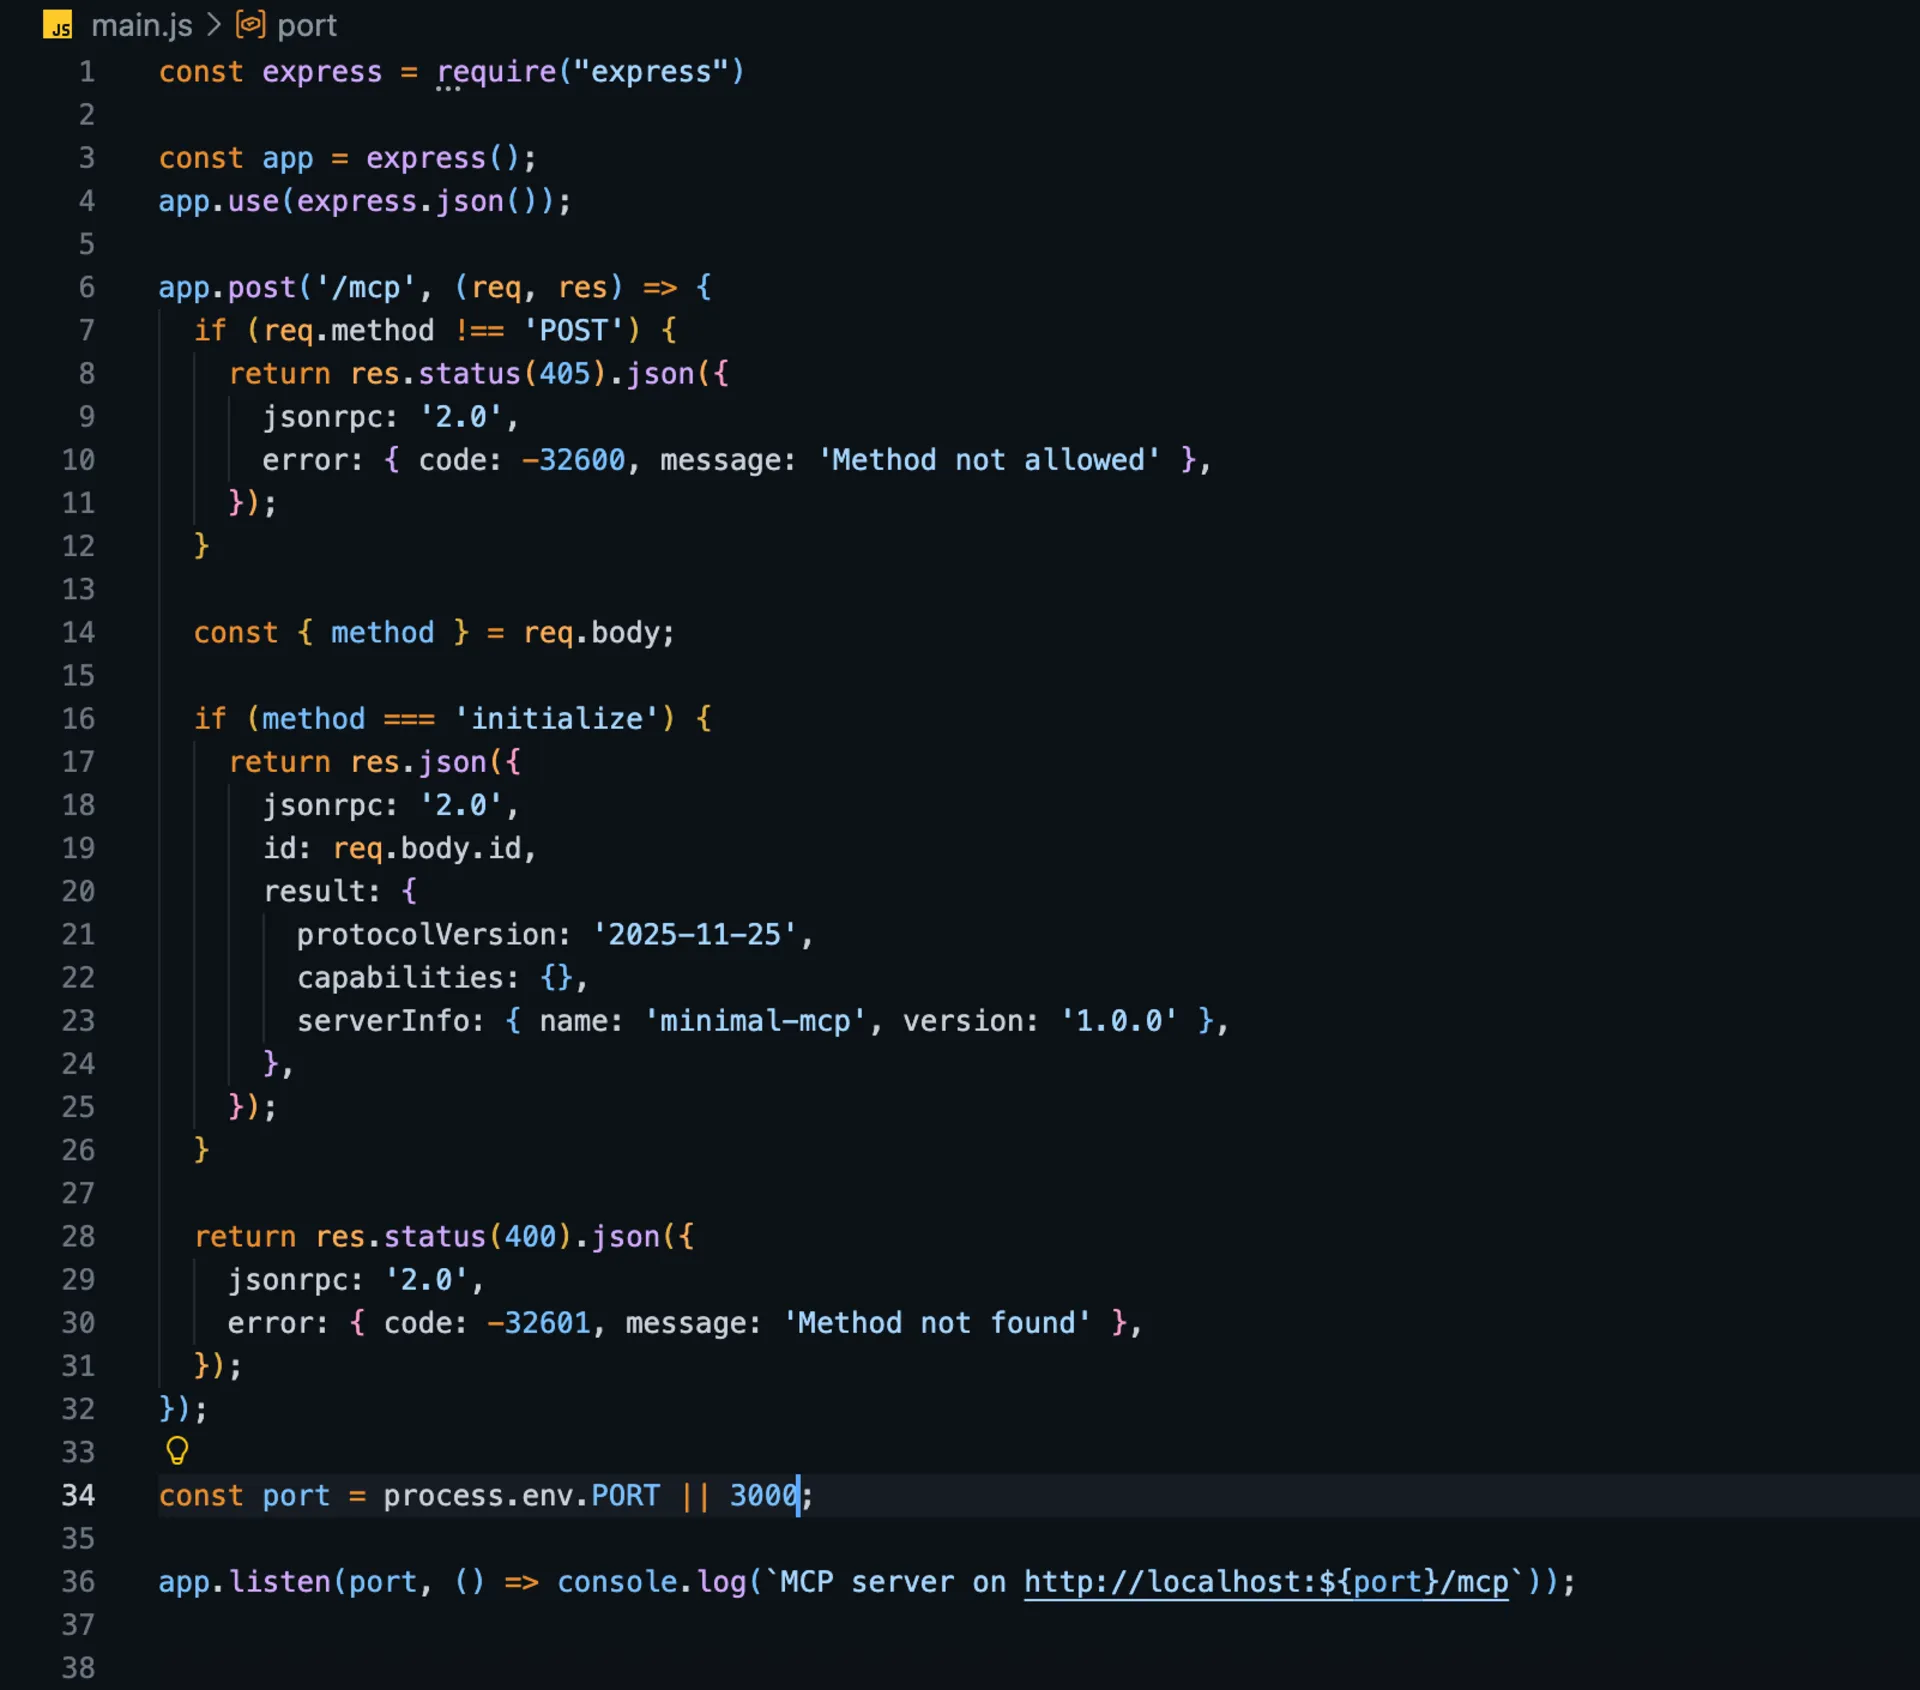
If your server exposes /sse, /messages, or another path, keep using that path when you build the public URL later. Pinggy forwards the whole HTTP request path to your local server.
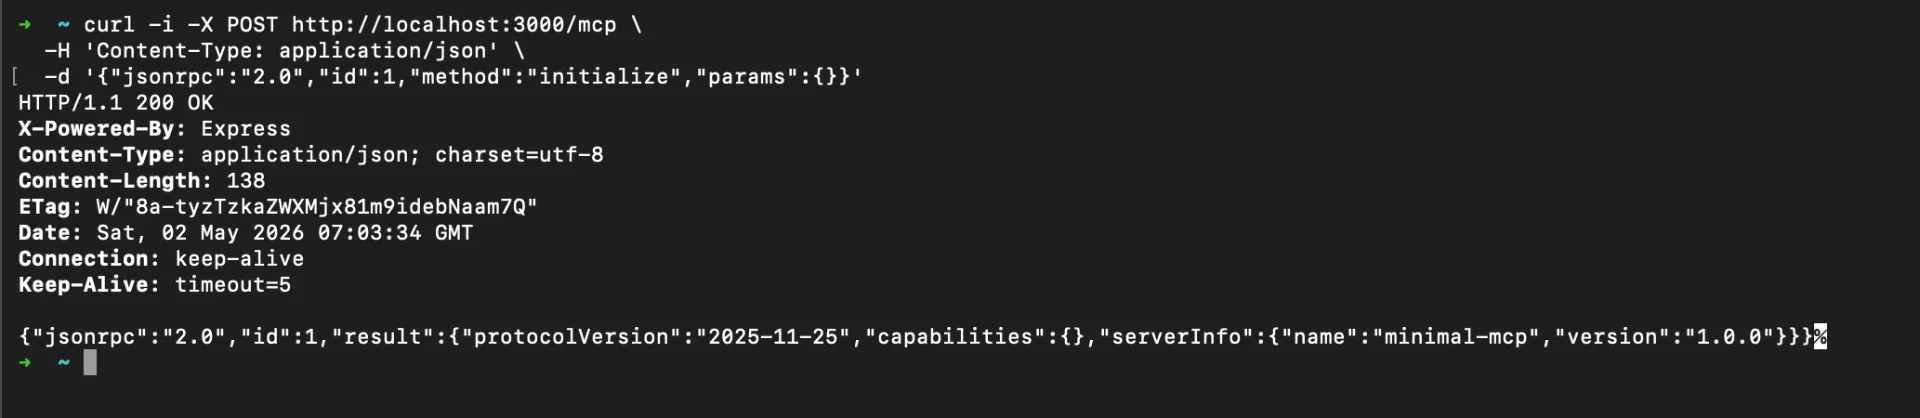
You can make a quick initialization request with curl once the server is running:
curl -i http://localhost:3000/mcp \
  -H "Content-Type: application/json" \
  -H "Accept: application/json, text/event-stream" \
  --data '{"jsonrpc":"2.0","id":1,"method":"initialize","params":{"protocolVersion":"2025-11-25","capabilities":{},"clientInfo":{"name":"curl-smoke-test","version":"1.0.0"}}}'
A real MCP server may return application/json or text/event-stream, depending on its implementation. A failure here usually means the local server is not running, the endpoint path is different, or the server requires headers that are not included in the request.
Step 2: Create a Public HTTPS Tunnel with Pinggy
Keep the MCP server running in one terminal. Open another terminal and run:

Pinggy will print public HTTP and HTTPS URLs. Use the HTTPS URL for MCP clients, then append the MCP endpoint path:
https://your-generated-subdomain.pinggy.link/mcpThe command has three important parts. -p 443 connects to Pinggy over port 443, which is commonly allowed on restricted networks. -R0:localhost:3000 creates a reverse tunnel from a generated public URL to your local MCP server. -L4300:localhost:4300 enables Pinggy’s web debugger at http://localhost:4300, which is useful for inspecting incoming HTTP requests while you test.
Step 3: Test the Public MCP Endpoint
After Pinggy prints your URL, test the public endpoint before adding it to an AI client. Replace the example hostname with the URL shown in your terminal:
curl -i https://your-generated-subdomain.pinggy.link/mcp \
  -H "Content-Type: application/json" \
  -H "Accept: application/json, text/event-stream" \
  --data '{"jsonrpc":"2.0","id":1,"method":"initialize","params":{"protocolVersion":"2025-11-25","capabilities":{},"clientInfo":{"name":"curl-smoke-test","version":"1.0.0"}}}'
Then open http://localhost:4300 to inspect the request in Pinggy’s web debugger. This is especially helpful when an MCP client reports a generic connection error. You can confirm whether the request reached your machine, whether the path was correct, and whether the server returned a JSON-RPC response or an HTTP error.

Step 4: Connect from an MCP Client
Remote MCP support varies by client, so the exact UI or configuration file may differ. In general, choose the option for a remote MCP server, custom connector, or Streamable HTTP server, then enter the full Pinggy HTTPS URL including the endpoint path.
For example:
https://your-generated-subdomain.pinggy.link/mcpHere is a simple JavaScript example to initialize a connection to your remote MCP server:
const mcpUrl = 'https://your-generated-subdomain.pinggy.link/mcp';
const token = 'replace-with-random-token';
async function initializeMcp() {
const response = await fetch(mcpUrl, {
method: 'POST',
headers: {
'Content-Type': 'application/json',
'Accept': 'application/json, text/event-stream',
'Authorization': `Bearer ${token}`,
},
body: JSON.stringify({
jsonrpc: '2.0',
id: 1,
method: 'initialize',
params: {
protocolVersion: '2025-11-25',
capabilities: {},
clientInfo: {
name: 'my-mcp-client',
version: '1.0.0',
},
},
}),
});
if (!response.ok) {
console.error('MCP init failed:', response.status, await response.text());
return;
}
const data = await response.json();
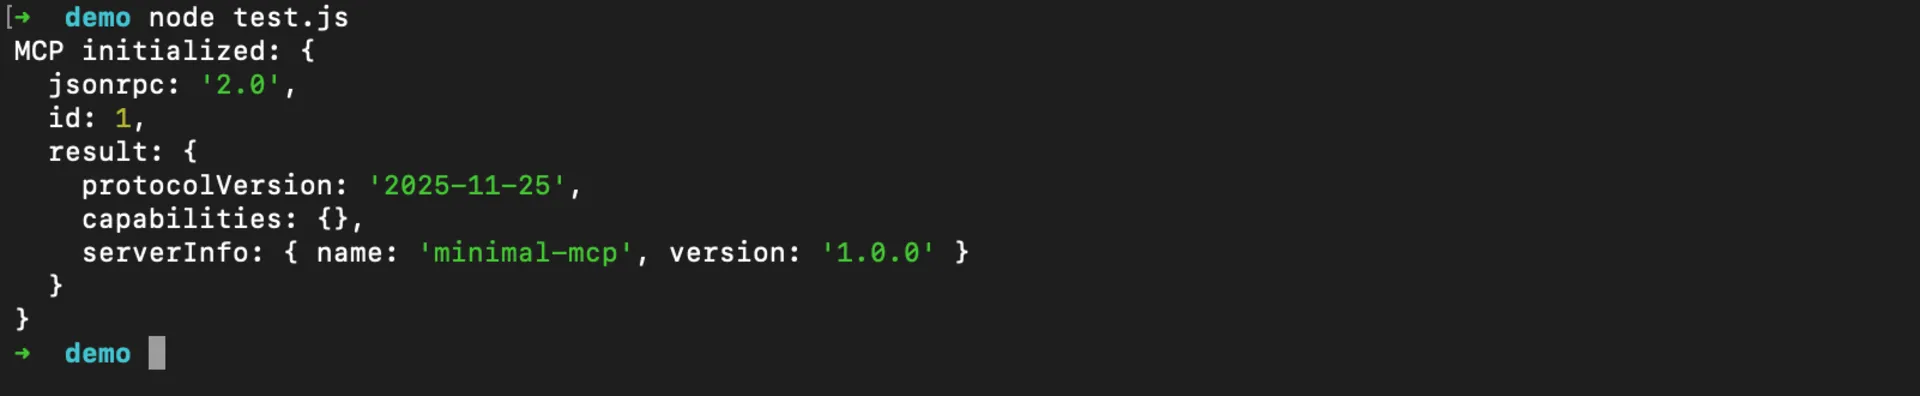
console.log('MCP initialized:', data);
}
initializeMcp();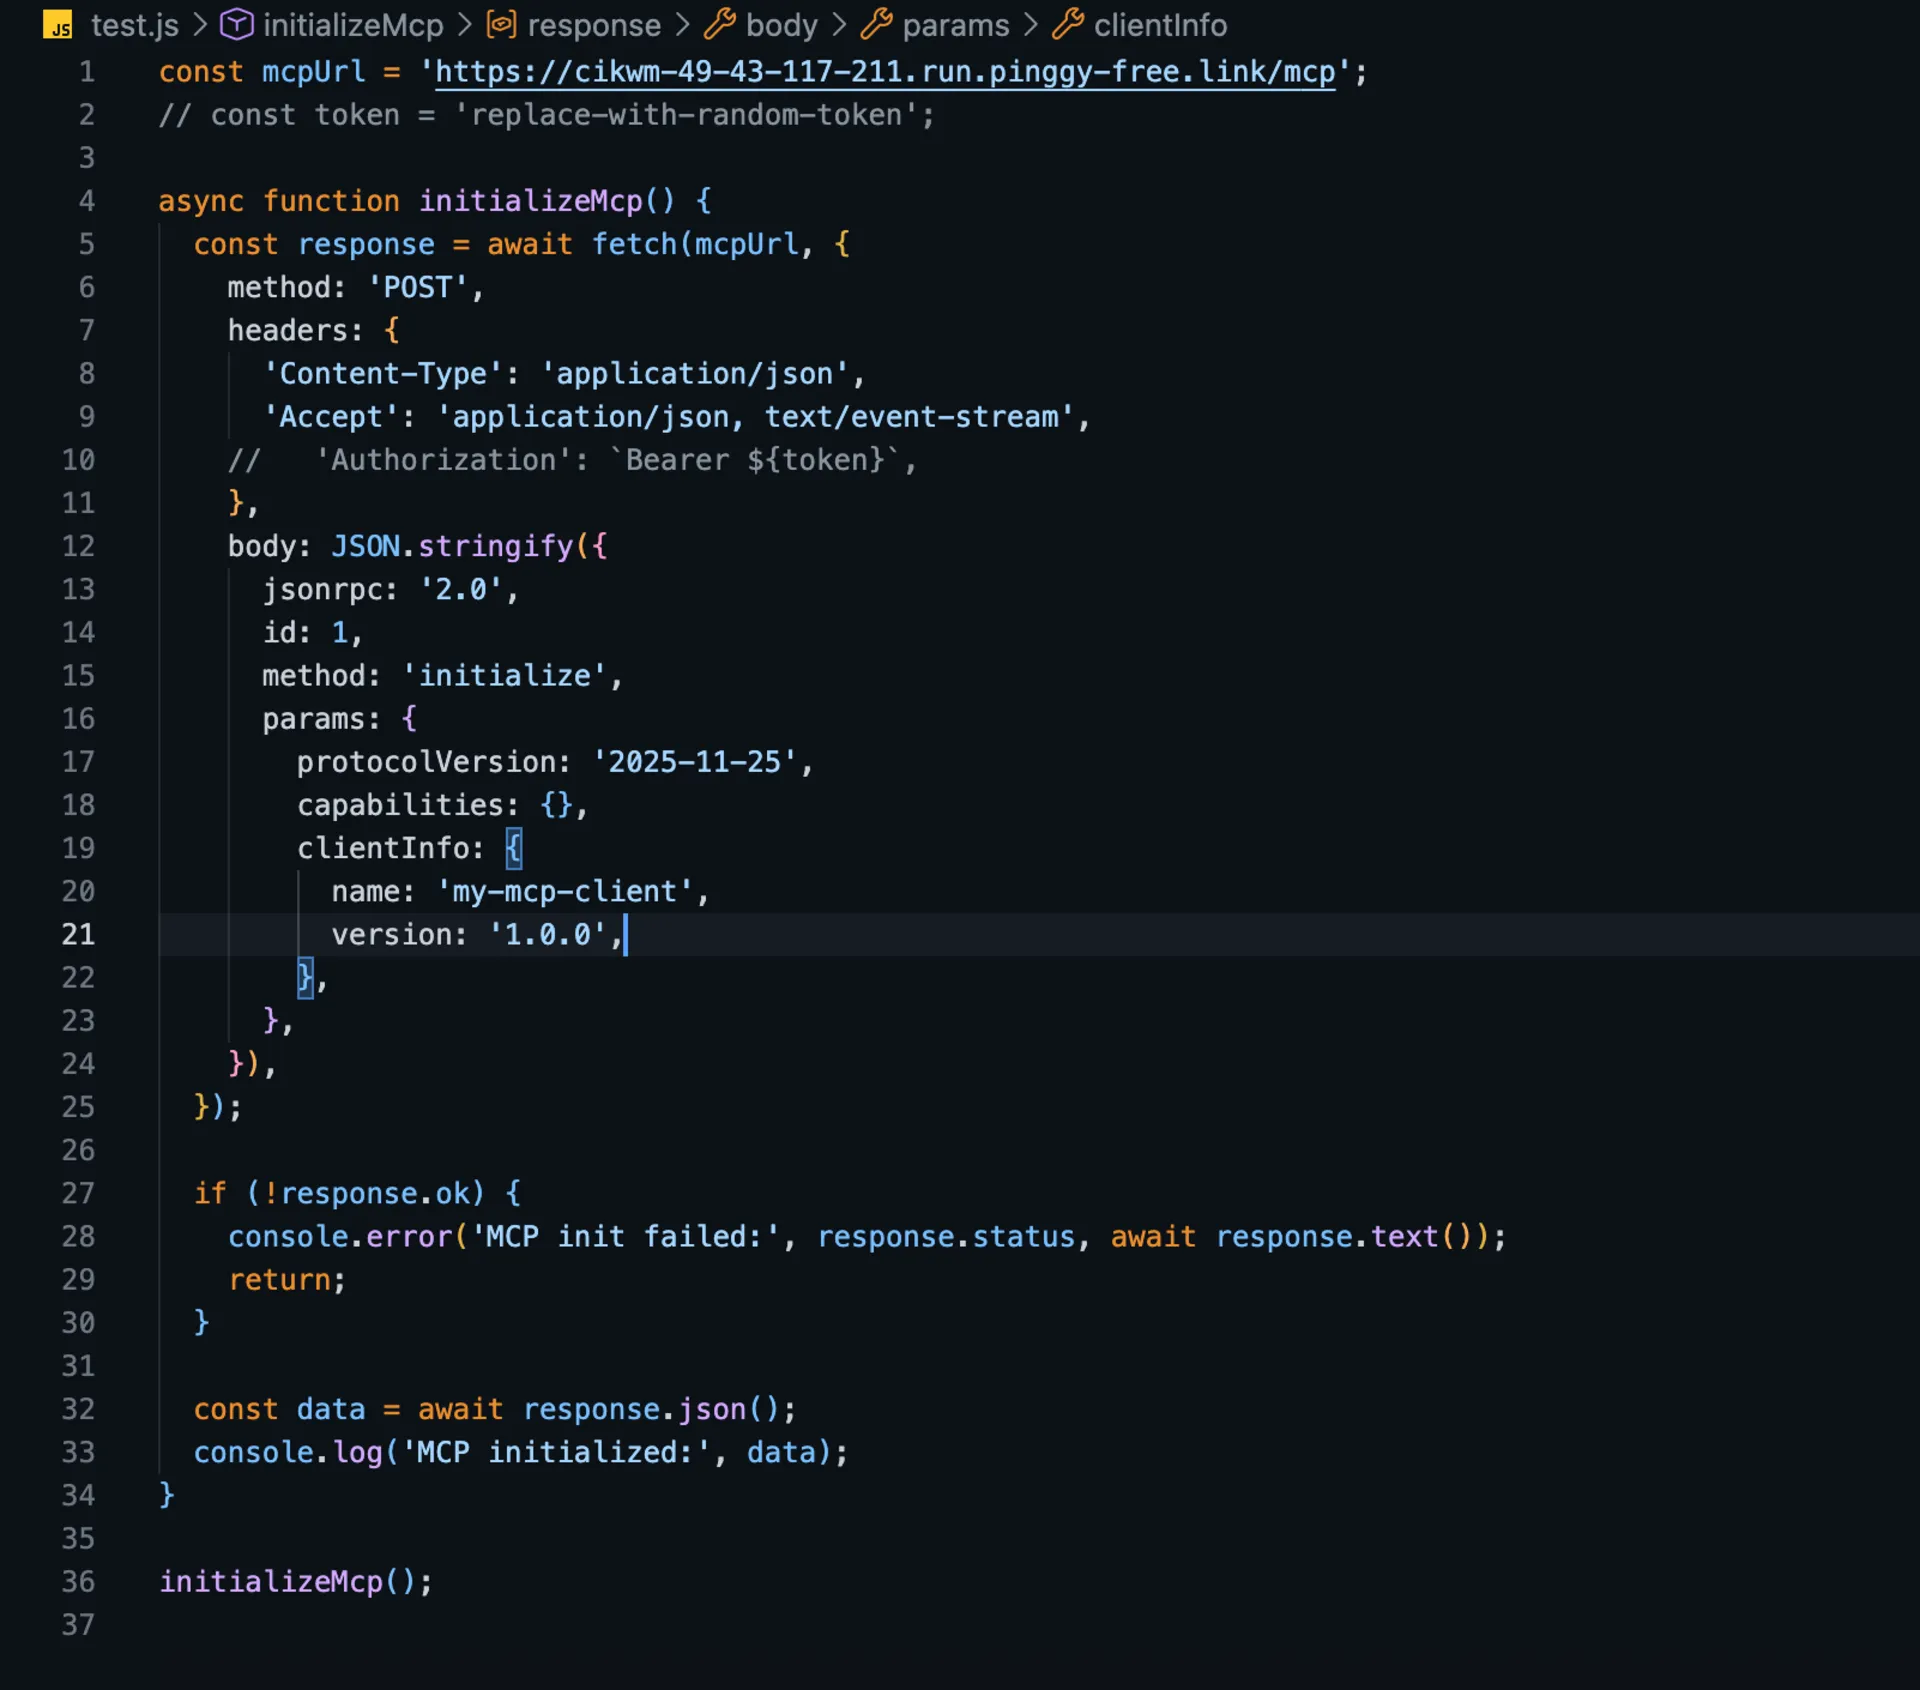

Replace your-generated-subdomain.pinggy.link with your actual Pinggy URL and replace-with-random-token with your bearer token if authentication is enabled.
If your client only supports local stdio servers, it cannot directly connect to a remote HTTP MCP URL. In that case, use a client that supports remote MCP servers, add an adapter that bridges remote HTTP to the client’s expected transport, or keep the server local for that client.
When to Use Persistent URLs or Custom Domains
Free Pinggy tunnel URLs are temporary and can change when the tunnel reconnects. That is fine for quick testing, but it becomes inconvenient if you are registering the MCP URL in a client, sharing it with a team, or testing OAuth callbacks.
For longer-running MCP development, use a persistent subdomain or a custom domain from the Pinggy dashboard. That gives your MCP server a stable URL while still forwarding traffic to your localhost environment. See the custom domain documentation if you want to map your own domain.
Conclusion
Sharing a localhost MCP server with Pinggy is a practical way to test AI tool integrations before deploying them. The key is to expose the right transport: use Streamable HTTP for remote access, keep stdio servers local unless you add a bridge, and secure the tunnel before connecting hosted AI clients.
For quick experiments, a temporary Pinggy URL is enough. For team workflows or repeated client testing, combine Pinggy authentication with a persistent subdomain or custom domain so your MCP endpoint behaves like a stable remote service while the implementation still runs locally.