Jupyter Notebook allows users to create and share documents containing live code, equations, visualizations, and explanatory text. However, by default, Jupyter Notebook is limited to local access, requiring users to be on the same machine or network to collaborate effectively. This guide shows how you can share Jupyter Notebook with your teammates, collaborators, and friends.
Through this guide you will be able to:
- Share Jupyter Notebooks with a URL
- Collaborate on your Jupyter Notebook with your teammates and friends
- Access Jupyter Notebooks remotely
- Get a public URL to your local Jupyter Notebook
Summary
Start Notebook:
jupyter notebook(orpython -m notebook)Observe the
tokenfrom the output of the above command such ashttp://localhost:8888/?token=4a0b8fdd640d8d3d14dbf5819ca865a8d4b4272aaf124xxxKeep the last terminal running. In a separate terminal, start Pinggy tunnel:
ssh -p 443 -R0:localhost:8888 -t free.pinggy.io "a:Host:localhost:8888" "u:Origin:http://localhost:8888"Replace 8888 with the port where your Jupyter notebook is running. Put a random password if asked.
Access the URL given by Pinggy. Enter the token in the browser when asked.
Note: Do not share Jupyter notebook token publicly, as it will grant remote execution capability to anyone who has it.
Installing Jupyter Notebook
Before we dive into sharing Jupyter Notebooks with Pinggy, let’s quickly go over the installation process for Jupyter Notebook. You can find detailed instructions on the official Jupyter website ( https://jupyter.org/install ). Typically, the installation can be done using a single command:
python -m pip install notebookOnce Jupyter Notebook is installed, you can start the notebook server by running the following command in your terminal or command prompt:
jupyter notebookOr python -m notebook
After starting the notebook we get an output like this:
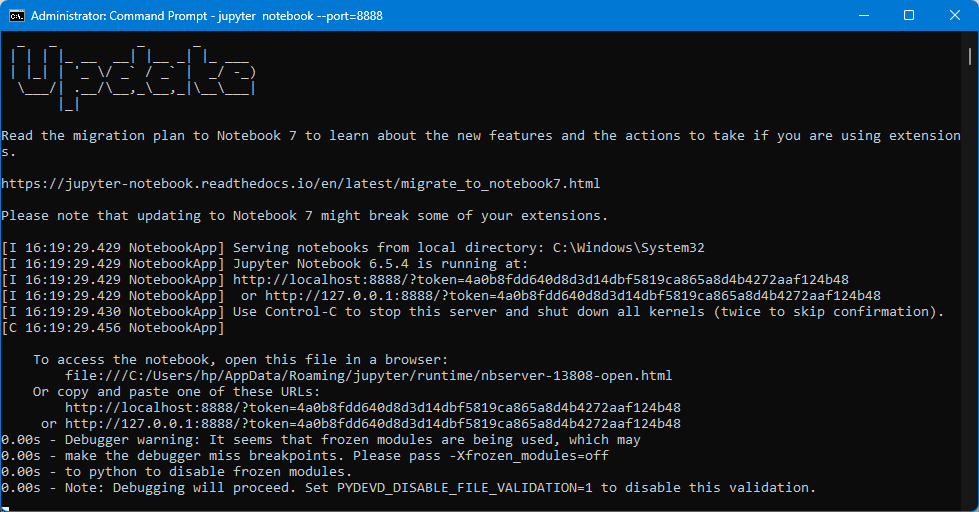
Get the token: The output will contain the URL to access it: http://localhost:8888/?token=4a0b8fdd640d8d3d14dbf5819ca865a8d4b4272aaf124xxx
The URL provided in the output (http://localhost:8888/?token=…) is the default address for accessing Jupyter Notebook in your browser locally. Note that a token is provided in the URL: 4a0b8fdd640d8d3d14dbf5819ca865a8d4b4272aaf124xxx
Share Jupyter Notebook with Pinggy
Pinggy simplifies the process of sharing your Jupyter Notebooks by providing a secure and accessible way to collaborate with others over the internet. With Pinggy, you can make your locally running Jupyter Notebook accessible through a public URL. Here’s how you can share your Jupyter Notebook using Pinggy:
By default, Jupyter Notebook runs on port
8888. You can ensure that your Jupyter Notebook runs on a specific port (e.g., port8888) by starting the server with the--portflag:jupyter notebook --port=8888Using pinggy you just need to add one live header modification to share it. Use this single command to share it:
ssh -p 443 -R0:localhost:8888 -t free.pinggy.io "a:Host:localhost:8888" "u:Origin:http://localhost:8888"In this command, replace
8888with your output port number on which your Jupyter Notebook server is running, if it differs.
After executing the command, you will receive a Pinggy URL that can be used to access your shared Jupyter Notebook. The URL will look similar to the following: https://ranlkfsbjkxry.a.pinggy.link

To access your Jupyter Notebook through the Pinggy URL, just open the url and input the token to access it.
Or you can append the token obtained from your locally running server to the URL as a query parameter. The token is included in the original URL provided when starting the Jupyter Notebook server. The final URL will look something like this:
https://ranlkfsbjkxry.a.pinggy.link?token=09f45d3196cfa14ff25ce2f4c60c23d7a7df2be3eb2xxxx
Security
It’s essential to exercise caution and avoid sharing the notebook token in public, as it grants access to your notebooks and allows execution of code on your system.
Conclusion
By following these simple steps, you can now securely share your Jupyter Notebooks with colleagues, clients, or collaborators located anywhere in the world. Pinggy eliminates the need for complex network configurations or exposing your local machine to the internet, providing a hassle-free solution for sharing your Jupyter Notebooks.