In the world of development, whether you’re a back-end engineer spinning up a local webserver, or a frontend engineer starting a React app dev server, localhost is where it all begins. But what exactly happens when you type “localhost” into your browser? This deep dive unpacks the magic behind this essential tool, explaining its significance, inner workings, and how you can leverage it to supercharge your development workflow.
Summary
- What is Localhost?
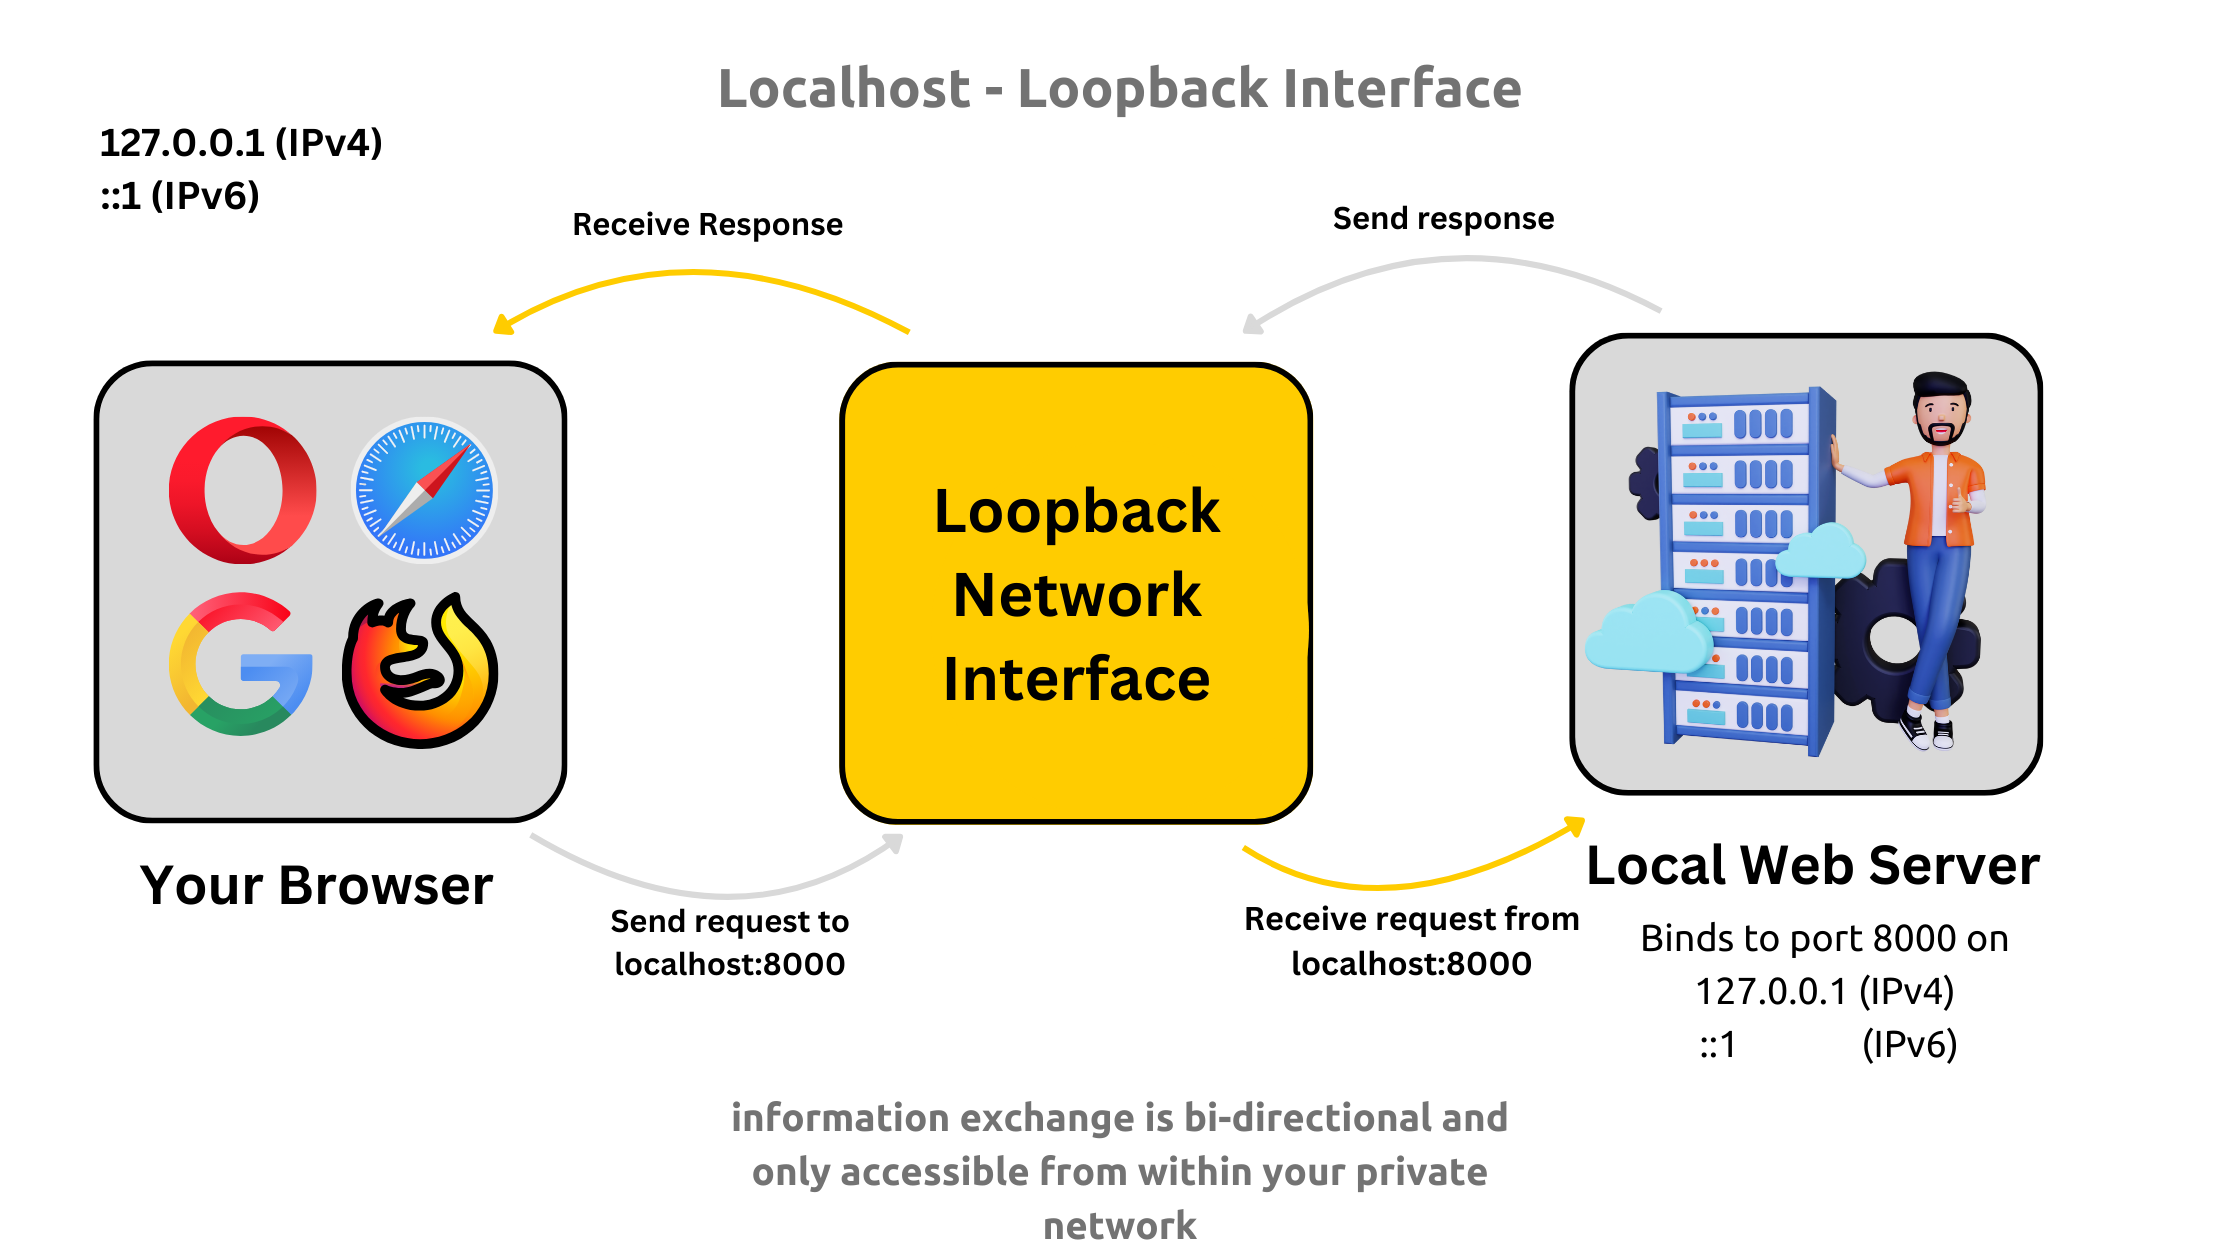
Localhost is a reserved domain name that always points back to your own computer (127.0.0.1 for IPv4, ::1 for IPv6). It allows developers to test and debug applications locally without an internet connection. - Why Is Localhost Important?
- Facilitates rapid development and testing
- Provides a secure and isolated environment
- Ensures high-speed local communication
- Allows custom domain mapping for better simulation
- How Does Localhost Work
- DNS Resolution Bypass: Localhost requests don’t go through external DNS
- Hosts File Mapping: Configured by default in OS files (
/etc/hosts or C:\Windows\System32\drivers\etc\hosts) - Loopback Interface: Redirects network traffic back to the originating device
- Public IP vs. Private IP vs. Localhost
- Public IP: Globally unique, assigned by ISPs (e.g., 8.8.8.8)
- Private IP: Used within local networks (e.g., 192.168.x.x)
- Localhost: Self-referential, used for local development and testing
What Is Localhost?
Localhost is far more than just a convenient term, - it’s a reserved domain name that always points back to your own computer. Think of it as your digital home address, a built-in alias your operating system uses to refer to itself. When you type “localhost” into your browser, you’re effectively sending a message to your own machine, instructing it to handle the request internally.
In-Depth Details:
- Self-Referencing Domain:
The term “localhost” is standardized in networking protocols. When your computer sees this name, it bypasses the usual external lookups and recognizes that the destination is itself. - Internal Communication:
In a development context, this means that your server, running on your computer, can be accessed directly by typing “localhost” into your browser, thereby facilitating rapid testing and debugging. - System Integration:
The mapping of “localhost” is built into every operating system’s configuration, ensuring that regardless of your device or platform, “localhost” always serves as a direct communication channel to the local machine.
Key Point:
Localhost is typically mapped to the IP address 127.0.0.1 for IPv4 or ::1 for IPv6. This mapping is hardcoded into your system’s hosts file-a simple text file that instructs the OS to resolve the name “localhost” without needing to consult external DNS servers.
Why Is Localhost Important?
Localhost is an indispensable tool in the toolkit of developers and network engineers, primarily due to its role in creating a secure, efficient, and flexible development environment.
Local instantiation of network protocols allows applications to communicate within a system without requiring an internet connection. Operating systems run the TCP/IP stack even when offline, enabling local applications to interact over the localhost (127.0.0.1) loopback interface. This setup facilitates secure testing, debugging, and inter-process communication without external network dependencies.
Instant Feedback for Developers:
- Rapid Development Cycles:
When you execute a command like npm run dev, your local development server spins up at an address such as http://localhost:3000. This immediate accessibility allows you to see real-time changes and debug issues without any delays. - Iterative Testing:
The self-contained nature of localhost enables you to test small changes on the fly, streamlining the development process and reducing downtime.
Safe Testing Environment:
- Isolation:
Since requests to localhost are contained within your own machine, your development activities remain isolated from the public internet. This provides a safe sandbox for experimenting with new features, testing security-sensitive applications, or running potentially unstable code. - Enhanced Security:
By keeping traffic local, you reduce the risk of accidental exposure of sensitive data or configurations to external networks.
Networking Efficiency:
- Speed and Performance:
The loopback interface, which localhost utilizes, operates entirely within your internal network stack. This means data packets don’t need to traverse physical network hardware, resulting in faster processing and lower latency. - Reduced Overhead:
Eliminating external routing simplifies the network communication process, making localhost an ideal environment for performance testing and debugging.
Flexibility:
- Custom Domain Mapping:
Developers can modify the hosts file to assign custom domain names to 127.0.0.1. For instance, mapping “myapp” to 127.0.0.1 lets you simulate multiple environments or subdomains without deploying to an external server. - Environment Simulation:
This flexibility is particularly useful when testing applications that rely on different domain contexts, such as multi-tenant platforms or microservices architectures.
How Does Localhost Work?
Understanding localhost requires delving into the inner workings of how your computer handles network requests. Here’s a detailed breakdown:
DNS Resolution Bypass:
- Standard DNS Flow:
Normally, when you type a domain like “google.com” into your browser, your computer performs a DNS lookup to convert the human-friendly name into an IP address. This involves querying external DNS servers. - Localhost Exception:
When “localhost” is entered, the operating system bypasses this entire process because it recognizes the name as a reserved domain. The request is immediately redirected to the local loopback interface.
Hosts File Mapping:
- Location and Role:
The hosts file is a critical component that resides in different locations based on your operating system:- Linux/macOS:
/etc/hosts - Windows:
C:\Windows\System32\drivers\etc\hosts
- Predefined Entry:
This file contains a default entry mapping “localhost” to 127.0.0.1 (or ::1 for IPv6). This preconfiguration ensures that any request to “localhost” is instantly looped back to your machine without needing an external DNS query.
Loopback Interface:
- What It Is:
The loopback interface is a virtual network interface specifically designed to redirect network traffic back to the originating device. You can think of it as a “mirror” that reflects data packets back to where they came from. - How It Works:
When a request is sent to 127.0.0.1, it travels through the same network stack that handles outgoing network traffic, but instead of leaving the machine, it is intercepted and routed back. This mechanism is akin to throwing a ball against a wall and having it bounce back immediately. - Reserved Address Range:
While the entire 127.x.x.x range is reserved for loopback, 127.0.0.1 is the standard and most commonly used address in everyday applications.
IPv4 and IPv6 Considerations:
- IPv4 (127.0.0.1):
This address has been the traditional staple for local networking. Its simplicity and long-standing use in numerous applications make it a reliable choice. - IPv6 (::1):
As modern operating systems adopt IPv6 for its vast addressing space and improved features, many systems now default to ::1 for local requests. However, compatibility remains high for IPv4, and many development tools explicitly check whether localhost resolves to either address format. - Dual-Stack Systems:
Some systems operate in a “dual-stack” mode, supporting both IPv4 and IPv6 simultaneously. In such cases, software may need to determine which protocol is preferred or available, ensuring that applications function seamlessly across different network configurations.
Modifying Your Hosts File for Custom Local Testing
One of the most powerful aspects of localhost is its flexibility in letting you simulate real-world scenarios without making changes on public DNS servers. By modifying your hosts file, you can create custom domain mappings that point to your local machine. This is especially useful for testing multiple development environments, previewing a site under its final domain name, or debugging issues that might arise due to domain-specific configurations.
What Is the Hosts File?
The hosts file is a simple text file used by your operating system to map hostnames to IP addresses. Before your computer even queries a DNS server, it checks this file for any custom mappings. This process makes the hosts file an essential tool for developers who want to bypass external DNS lookups for testing purposes.
How to Modify Your Hosts File
On Windows
Locate the File:
The hosts file on Windows is typically located at:
C:\Windows\System32\drivers\etc\hosts
Editing with Administrator Privileges:
- Open your preferred text editor (such as Notepad, Notepad++, or Visual Studio Code) as an administrator.
- To do this, right-click the editor’s shortcut and select “Run as administrator.”
Add Custom Domain Mapping:
Once the file is open, add a new line for your custom domain. For example:
127.0.0.1   mycustomdomain.local
::1         mycustomdomain.local
This tells your computer that any request for “mycustomdomain.local” should be redirected to 127.0.0.1 (IPv4) or ::1 (IPv6), both pointing to your own machine.
Save and Verify:
After saving the file, open your browser and type mycustomdomain.local into the address bar. It should behave the same as typing localhost, effectively directing the request to your local server.
Tip: It’s a good idea to back up the original hosts file before making any changes. This way, if something goes wrong, you can easily restore it.
On Linux/macOS
Locate the File:
The hosts file on Linux and macOS is found at:
/etc/hosts
Open the Terminal and Edit the File:
- Open your terminal application.
- Use a command-line text editor like
nano or vim. For example, to edit with nano, type: - You will be prompted for your administrator password.
Add Custom Domain Mapping:
Insert the following line into the file:
127.0.0.1 mycustomdomain.local
Save the file by pressing CTRL+O in nano, then exit using CTRL+X.
Testing the Changes:
Open your web browser and navigate to mycustomdomain.local. If everything is configured correctly, your browser will connect to your local server just as it would if you typed “localhost.”
Safety Note: Since the hosts file is a system-level file, ensure that you do not accidentally remove or modify any of the default entries. Incorrect changes might affect your system’s ability to resolve other critical hostnames.
Public IP vs. Private IP vs. Localhost
Understanding the different types of IP addresses is crucial for networking and development. Here’s a more in-depth look at each:
Public IP Addresses
- Definition and Assignment:
Public IP addresses are assigned by your Internet Service Provider (ISP) and are globally unique. They allow devices on the internet to communicate with each other. For example, Google’s public DNS server has the IP 8.8.8.8. - Usage:
These addresses are used when you need to access or provide services over the internet. Any server hosting a website for public access will have a public IP address. - Security Considerations:
Because public IPs are reachable from anywhere in the world, they are more exposed to potential security threats. Proper firewalls, secure configurations, and monitoring are essential.
Private IP Addresses
These ranges are reserved by RFC 1918 for private network use.
- Usage:
Devices on your local network, such as computers, smartphones, and printers, are assigned private IP addresses. These addresses facilitate internal communication without direct exposure to the internet. - Advantages:
They provide a layer of security by isolating internal network traffic from external access. NAT (Network Address Translation) is often used to allow multiple devices to share a single public IP.
Localhost (Loopback IP)
- What It Is:
Localhost refers to the loopback network interface on your computer, typically mapped to the IP address 127.0.0.1 (IPv4) or ::1 (IPv6). It is a reserved IP range (the 127.x.x.x series) that never leaves your machine. - Usage in Development:
When you use localhost, your computer directs network requests back to itself. This is invaluable for testing web servers, APIs, and other network applications in a secure and isolated environment. - Security and Performance:
Since traffic on localhost does not traverse any external networks, it is both faster and inherently secure, making it ideal for development and testing purposes.
Practical Code Examples
Testing and verifying your localhost setup is a fundamental step in ensuring that your custom configurations work as expected. Here’s a more detailed look at some practical examples:
Verifying with ping
The ping command sends small packets of data to a target address to check if it is reachable.
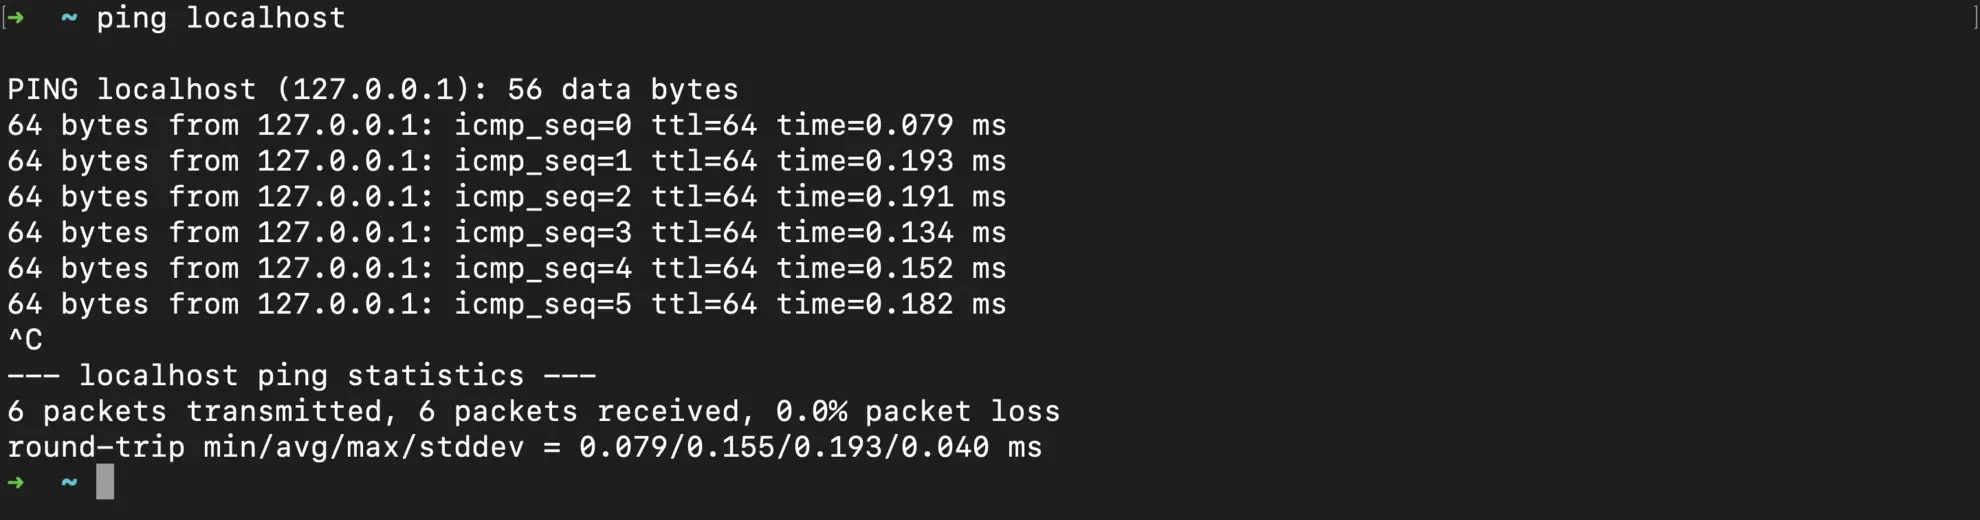
- Expected Output:
You should see replies from 127.0.0.1 (or ::1 if using IPv6), indicating that your loopback interface is active. The output includes statistics like packet loss and time delays, which can help diagnose network issues.
Python Example
Using
Python to resolve the IP address for localhost can be a quick check for your configuration.
import socket

# Get the IP address of localhost
ip_address = socket.gethostbyname('localhost')
print("Localhost IP:", ip_address)
# Expected output: 127.0.0.1 or ::1 depending on your system settings
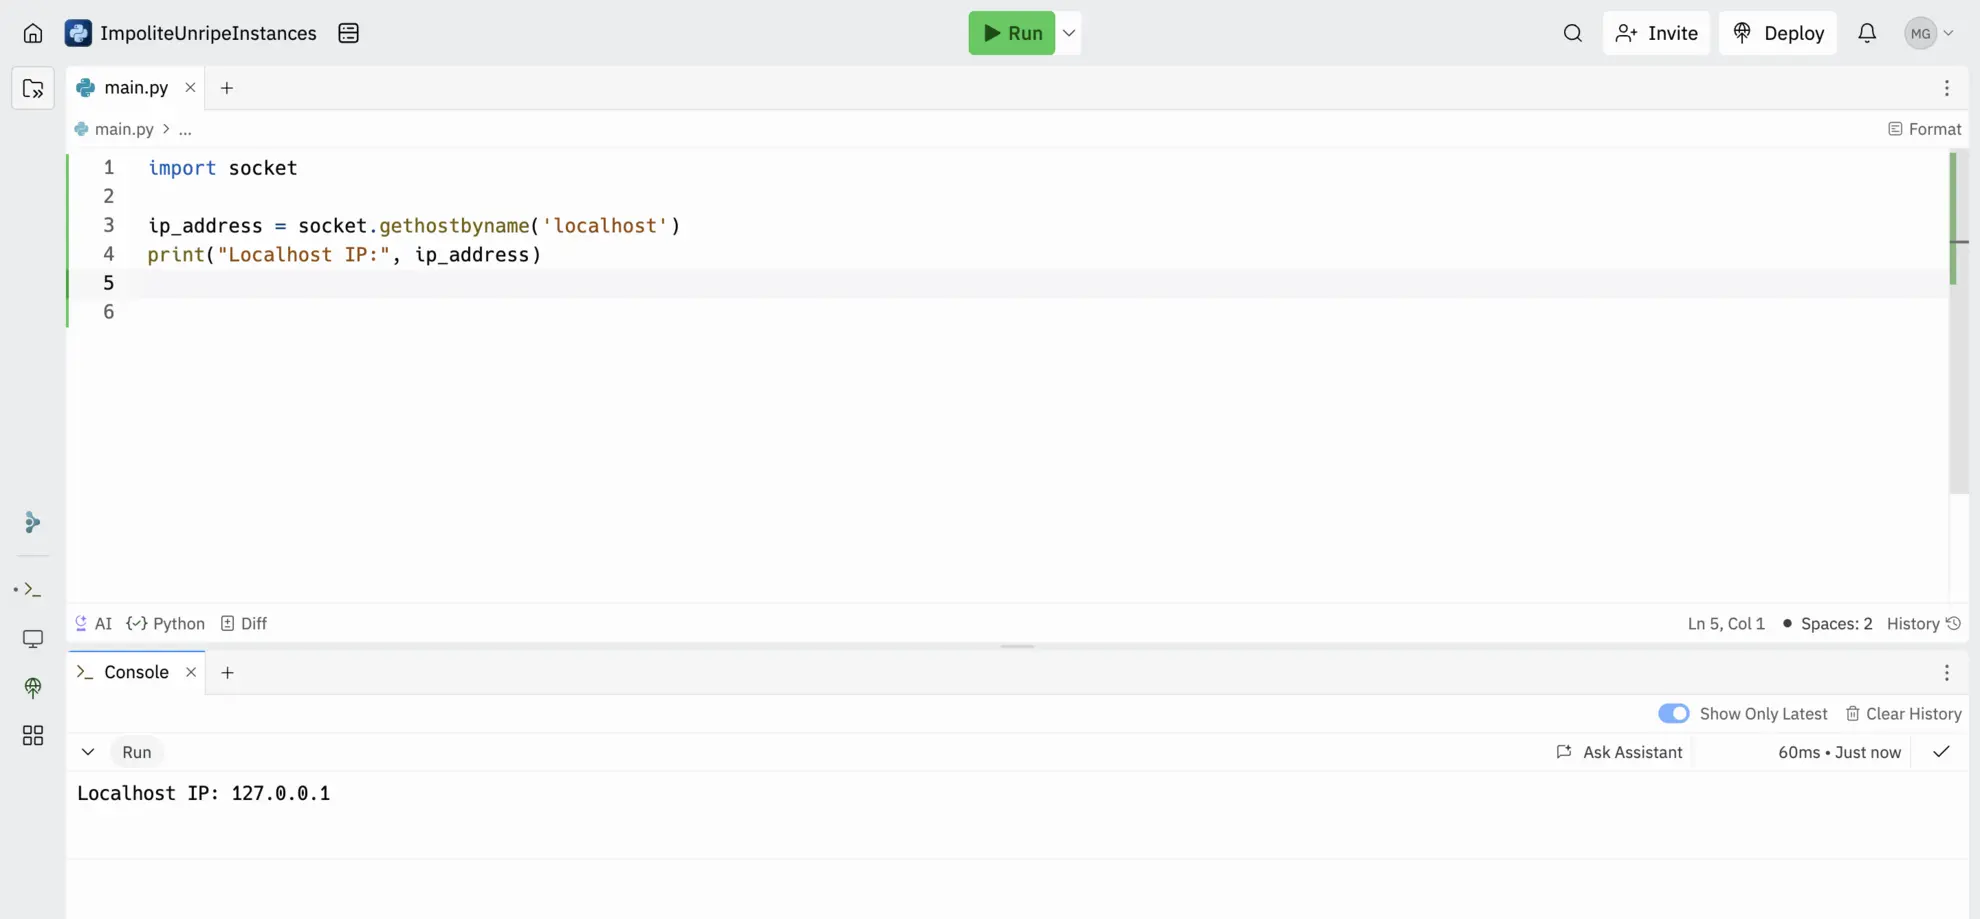
- Explanation:
This script uses the socket library to convert the hostname “localhost” into its corresponding IP address. It’s a straightforward way to verify that your system is correctly resolving localhost.
Sharing Localhost Applications
While localhost is great for local development, sharing your work with teammates or testing webhooks from external services can be tricky. Pinggy solves this by providing an easy way to expose your localhost to the internet using a secure tunnel. Whether you’re showcasing a front-end app, testing APIs on a mobile device, or debugging webhooks, Pinggy offers a lightweight and reliable solution.
Most ISPs do not provide a public IP address to individual users; instead, they assign private IPs due to Carrier-Grade NAT (CGNAT). CGNAT allows multiple users to share a single public IP, making direct inbound connections impossible. This is why tools like Pinggy are essential for exposing local services over the internet.
Start Tunnel with One Command
No installation is required! You can start a tunnel instantly using the following command:
Replace the port 8000 with the localhost port where your service is running.Key Features of Pinggy:
- Instant Public URLs – Generate a public link to your local server in seconds.
- Custom Domains & Subdomains – Use your own domain for a professional setup.
- Low Latency & Secure Tunnels – Ensure fast and secure connections.
By leveraging Pinggy, developers can seamlessly share and test their local projects without deploying them to a live server.
For more details, check out the official Pinggy Documentation.
Conclusion
Localhost is more than just a buzzword, - it is the cornerstone of safe, efficient, and flexible development and testing. By understanding how to modify your hosts file, you can simulate real-world domain scenarios without the need for external DNS changes. Additionally, differentiating between public IPs, private IPs, and the special loopback address of localhost gives you a deeper insight into network architecture and security.
Experimenting with custom domain mappings and testing these configurations using tools like ping, Python, or Java not only enhances your debugging capabilities but also prepares you for more complex network setups. Whether you’re debugging a React app or building robust back-end APIs, mastering localhost is essential to streamline your development workflow.