Minecraft Port Forwarding
Updated on Mar 5, 2026 · 8 mins read
 Port forwarding is a crucial step for Minecraft players who want to host their own servers and share them with friends. While Minecraft is one of the world’s most popular games with over 170 million monthly active players, many players struggle with setting up port forwarding correctly. This guide will walk you through the process of setting up port forwarding for your Minecraft server in 2026, troubleshooting common issues, and exploring alternative solutions that don’t require port forwarding at all.
Summary
Port Forwarding Overview
- Port forwarding redirects traffic from port 25565 (Minecraft’s default) on your router to your local computer.
- Enables players outside your network to connect to your Minecraft server.
- Required when hosting your own server that friends can join from different locations.
Setting Up Port Forwarding
- Find Local IP: Use
ipconfig(Windows),ip addr(Linux), or Network settings (macOS). - Access Router: Enter router’s IP in browser (typically 192.168.0.1 or 192.168.1.1).
- Create Forwarding Rule: Set up port 25565 (TCP) to point to your computer’s local IP.
- Share Public IP: Find your public IP to share with friends so they can connect.
Alternative: Using Pinggy
- No Port Forwarding Required: Bypasses router configuration completely.
- Works with CGNAT: Solution for ISPs that block traditional port forwarding.
- Simple Setup: Just run a single command to create a secure tunnel.
- Instant Access: Friends connect using the Pinggy-provided hostname and port.
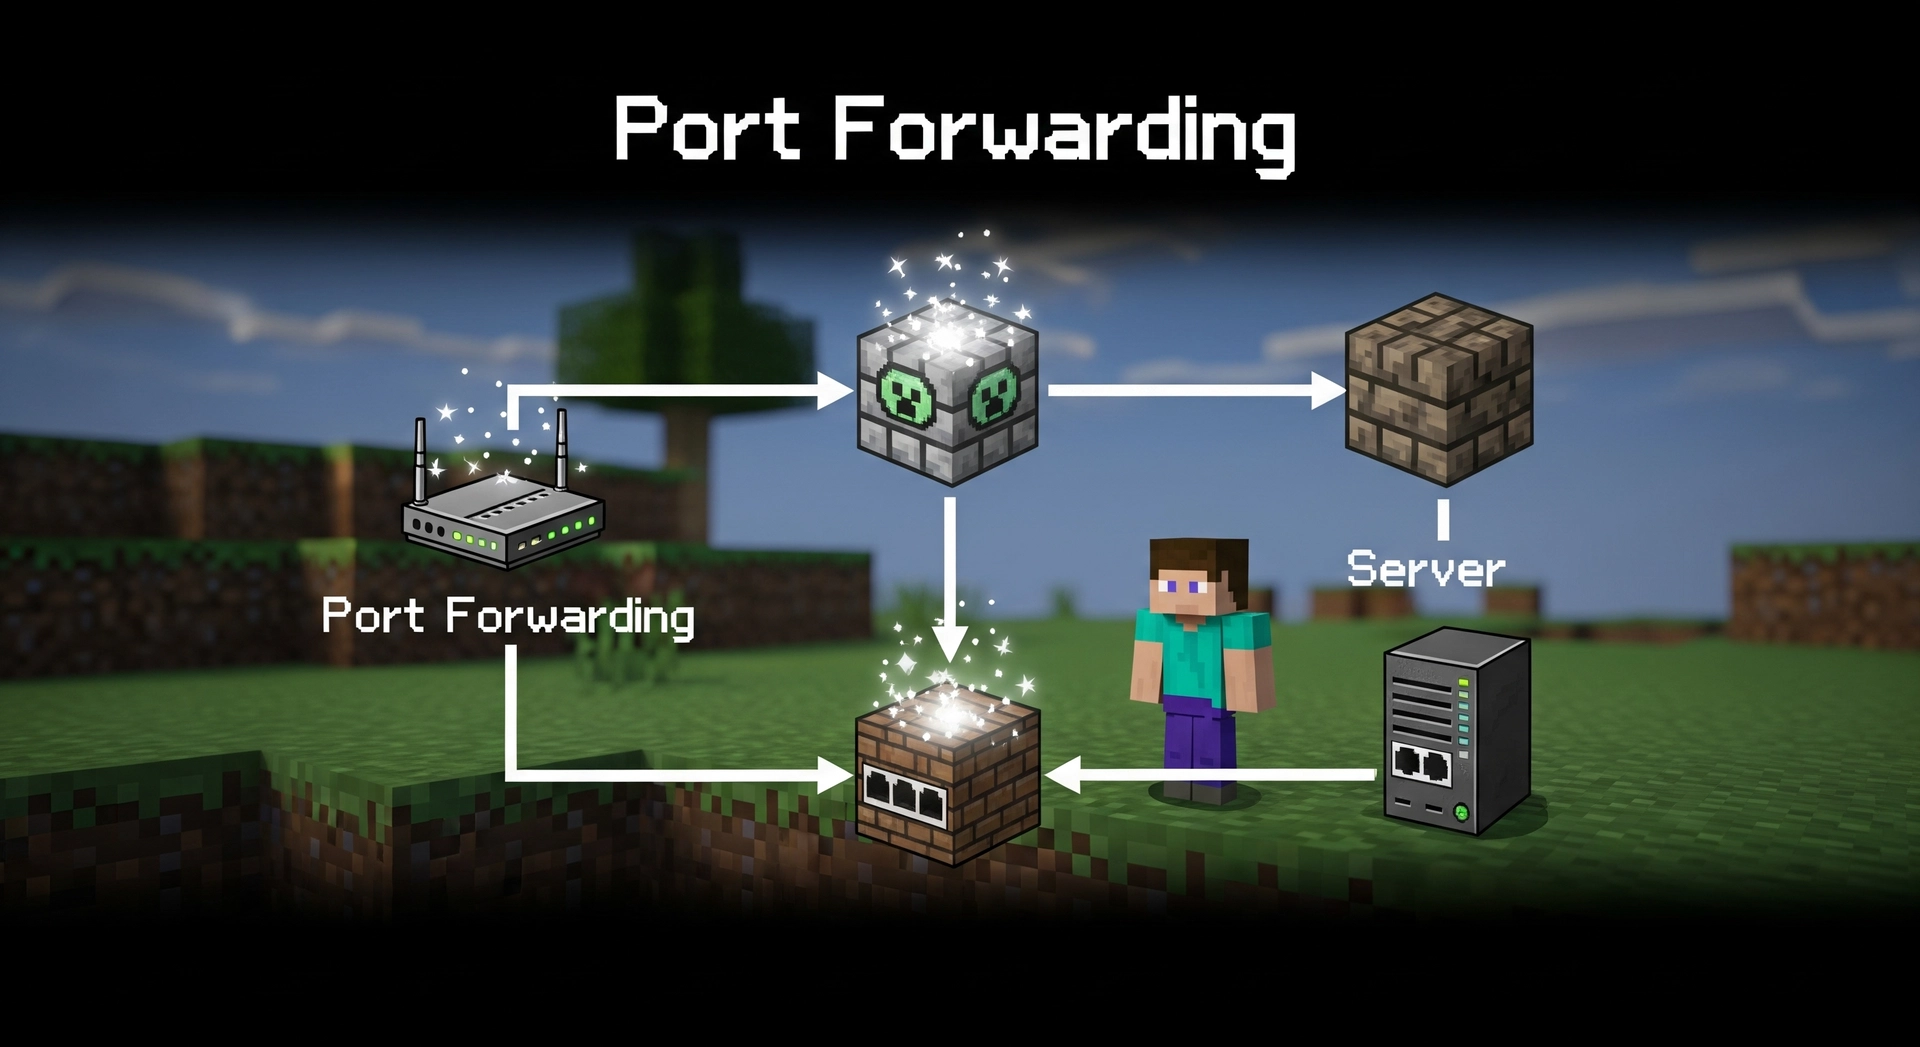
What is Port Forwarding for Minecraft?
When you run a Minecraft server on your computer, it listens for incoming connections on port 25565 by default. However, your home router acts as a barrier it blocks unsolicited traffic from the internet to protect your network. Port forwarding tells your router to take any incoming traffic on a specific port (25565) and route it directly to your computer’s local IP address.
Think of it as giving your friends a direct path through your router’s firewall to reach your Minecraft server. Without this configuration, only devices connected to your home Wi-Fi or LAN can join. With port forwarding enabled, anyone with your public IP address can connect from anywhere in the world.
Why You Need Port Forwarding for Minecraft
Hosting your own Minecraft server is far more flexible than relying on Minecraft Realms or third-party hosting providers. But to let friends outside your local network join, your router needs to know how to forward their connection requests to your machine. Here’s what makes port forwarding worth the effort:
- Global access: Players from anywhere in the world can connect to your server not just people on your Wi-Fi
- Direct connection: Friends join using your public IP address, no middleman services required
- Full control: You decide the server settings, mods, plugins, world seed, and player limits
- Zero hosting fees: Running a server on your own hardware costs nothing beyond your electricity and internet bill
How to Set Up Port Forwarding for Minecraft
Follow these steps to set up port forwarding for your Minecraft server:
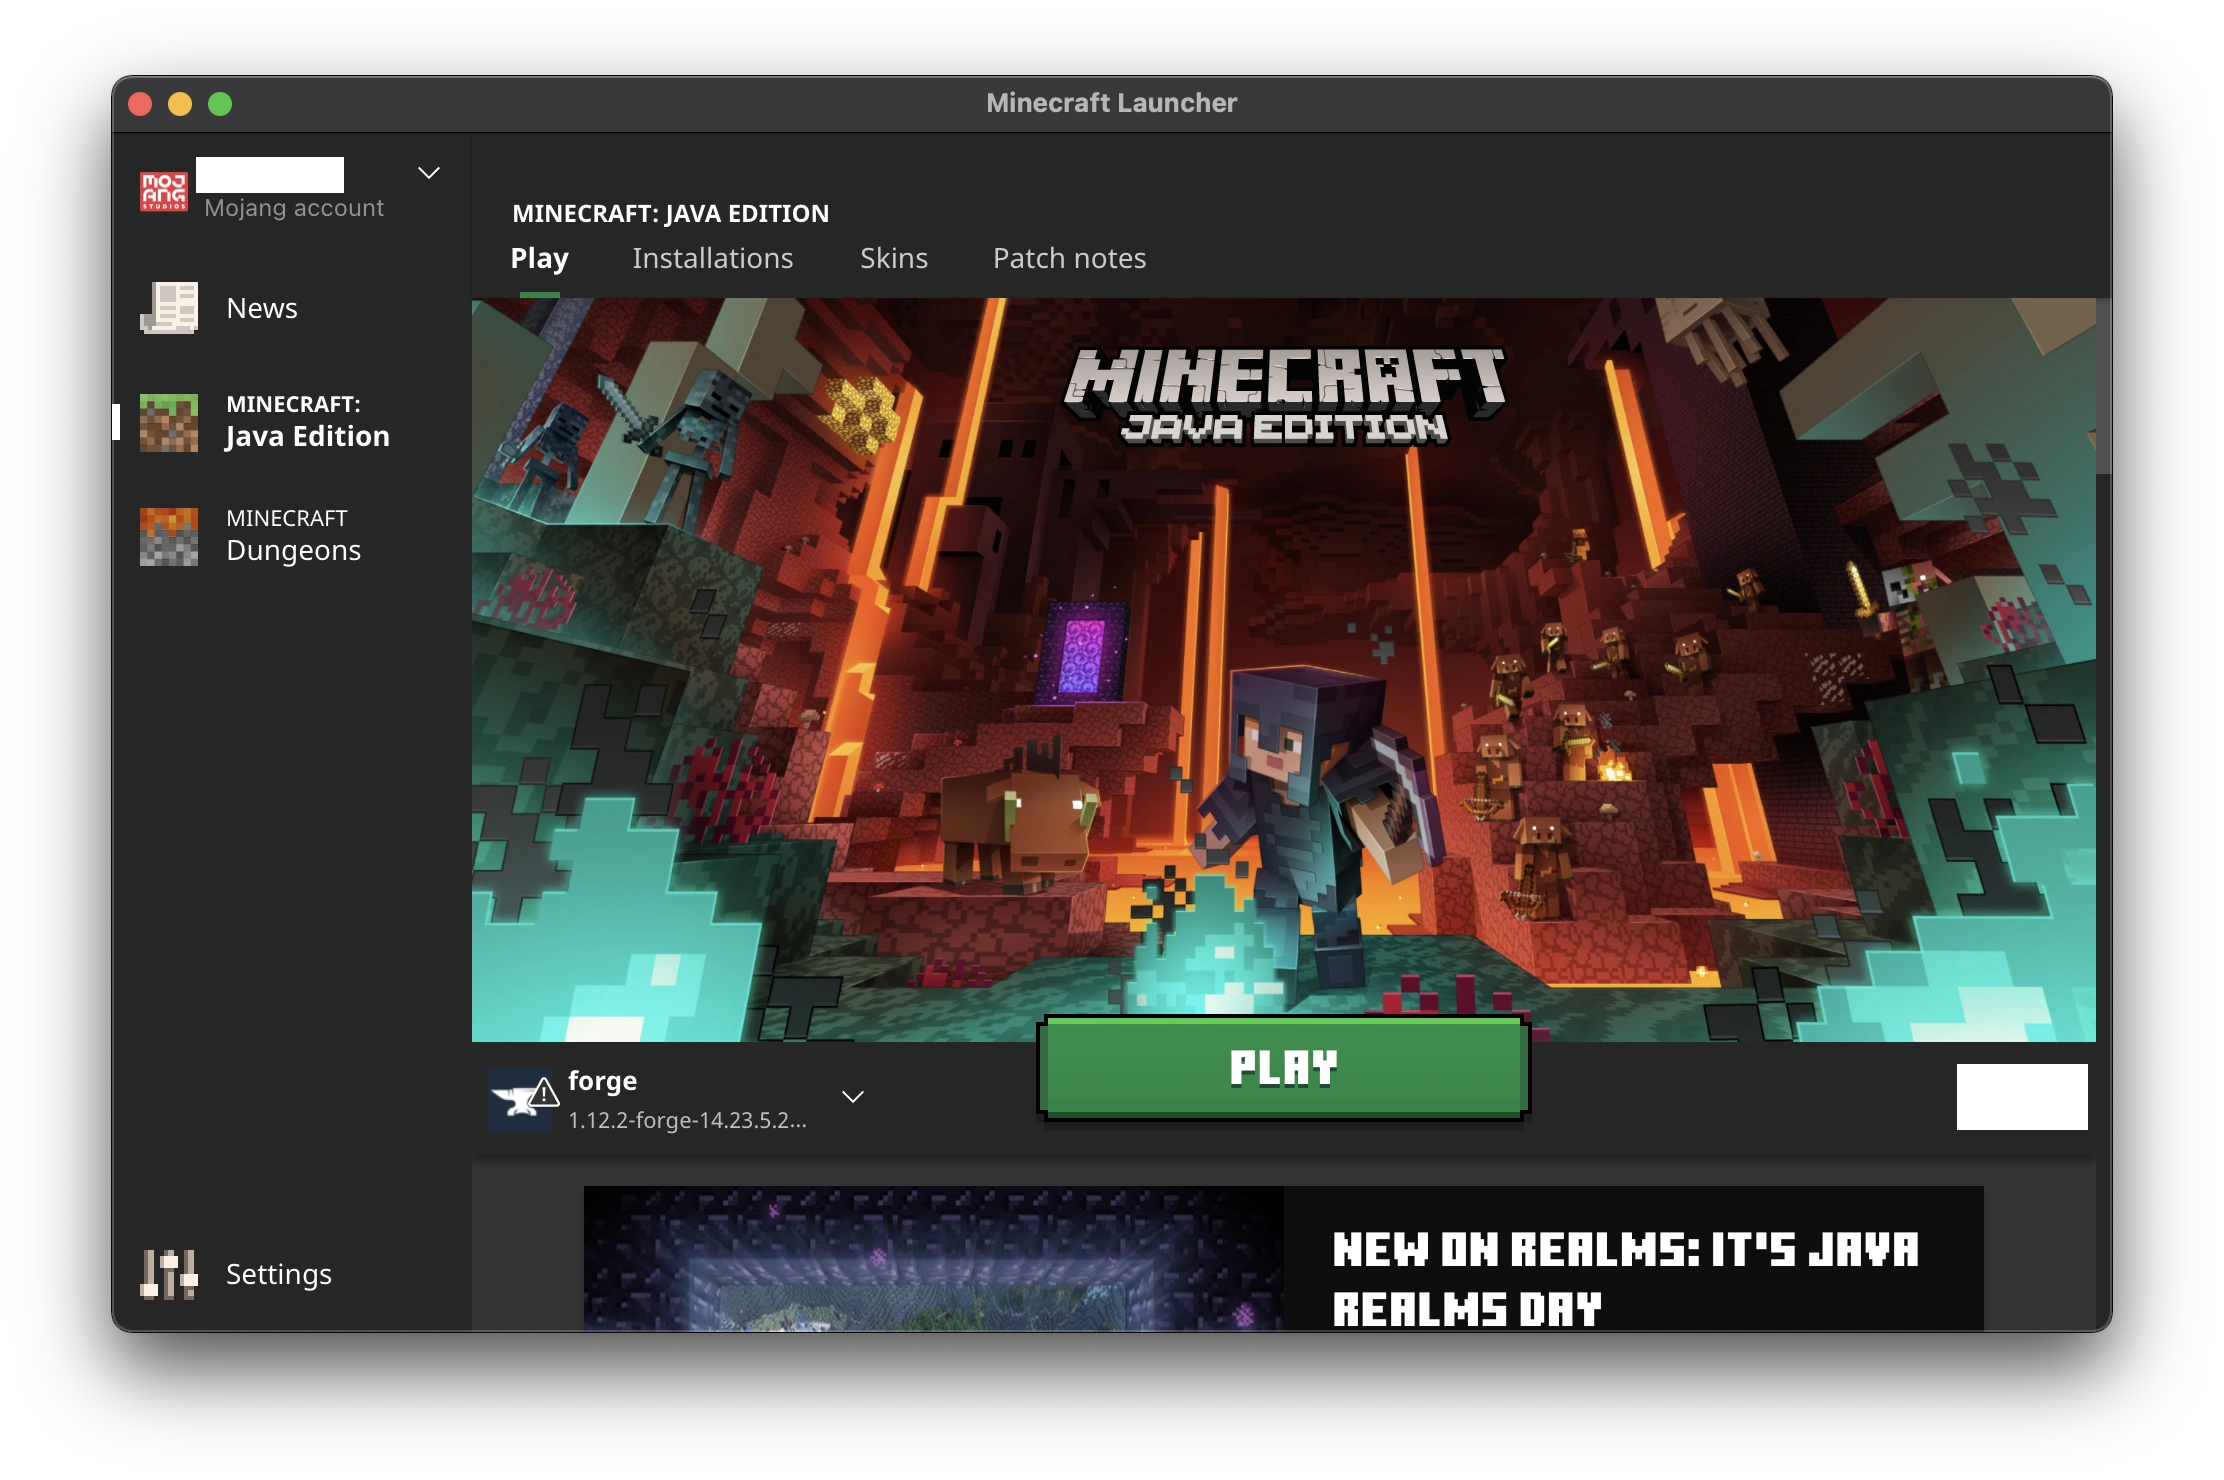
1. Set Up Your Minecraft Server
Before you begin port forwarding, make sure you have a working Minecraft server running on your computer. You can download the official Minecraft server software from the Minecraft website.
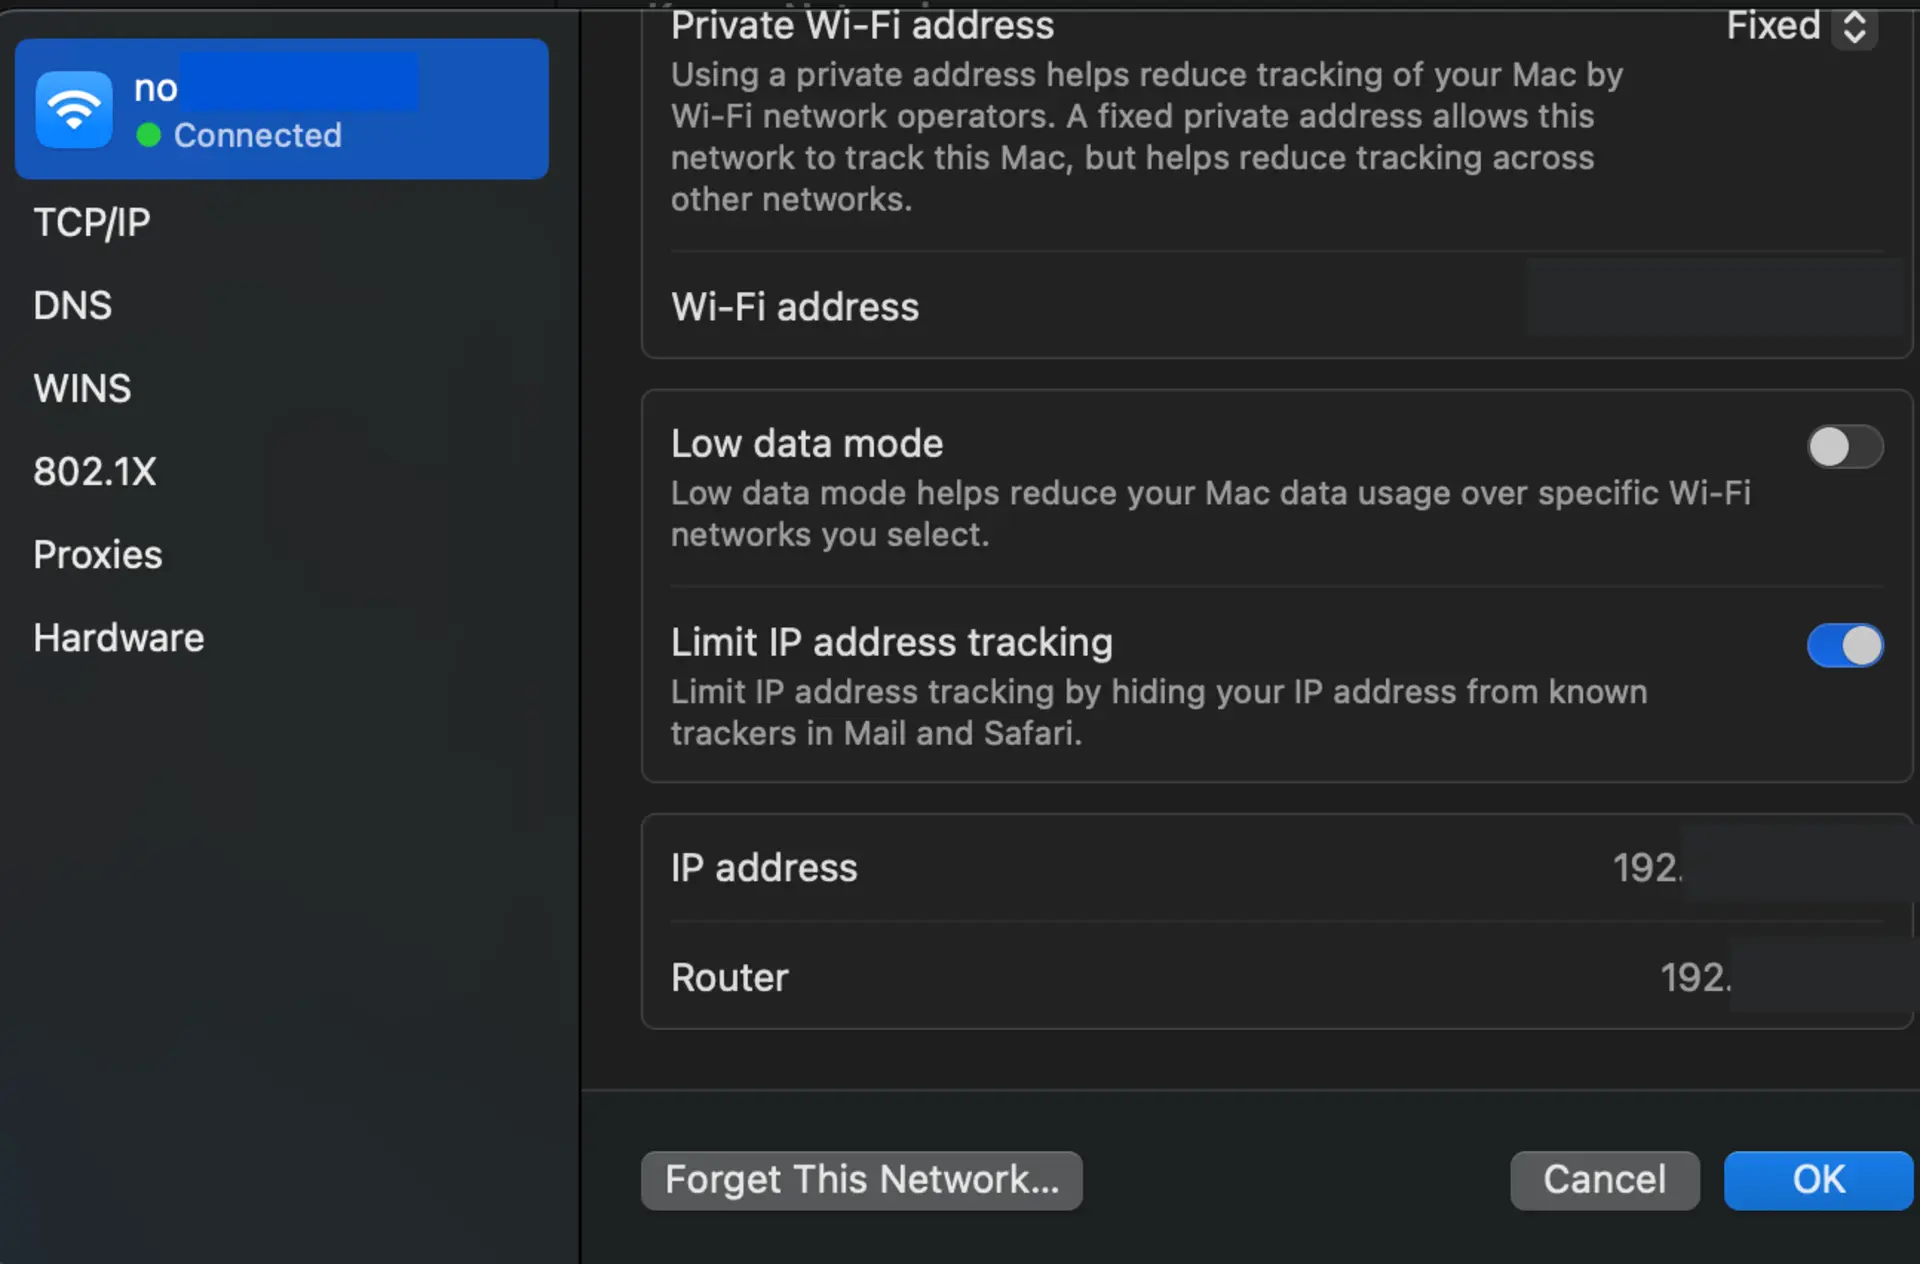
2. Find Your Local IP Address
You’ll need to know your computer’s local IP address on your network.
On Windows:
- Open Command Prompt
- Type
ipconfigand press Enter - Look for “IPv4 Address” under your active connection
On Linux:
- Open Terminal
- Type
ip addrorifconfigand press Enter - Look for “inet” followed by your IP address
On macOS:
- Go to System Preferences > Network
- Select your active connection
- Your IP address will be displayed on the right
3. Access Your Router
Most routers can be accessed through a web browser:
- Open your web browser
- Enter your router’s IP address in the address bar (common addresses are
192.168.0.1or192.168.1.1) - Log in with your router’s username and password (if you haven’t changed these, check the router’s documentation for default credentials)
4. Navigate to Port Forwarding Settings
The exact location of port forwarding settings varies by router brand:
- Linksys: Security > Apps and Gaming > Port Range Forward
- Netgear: Advanced > Advanced Setup > Port Forwarding / Port Triggering
- TP-Link: Advanced > NAT Forwarding > Virtual Servers
- ASUS: WAN > Virtual Server / Port Forwarding
- D-Link: Advanced > Port Forwarding
5. Create a New Port Forwarding Rule
Add a new port forwarding rule with these settings:
- Service Name/Description: Minecraft Server
- Port Range/External Port: 25565
- Internal Port: 25565
- Protocol: TCP (or Both TCP/UDP)
- Internal IP Address: Your computer’s local IP address (from step 2)
- Enabled/Status: On/Enabled
Save your settings, and your router will apply the changes.
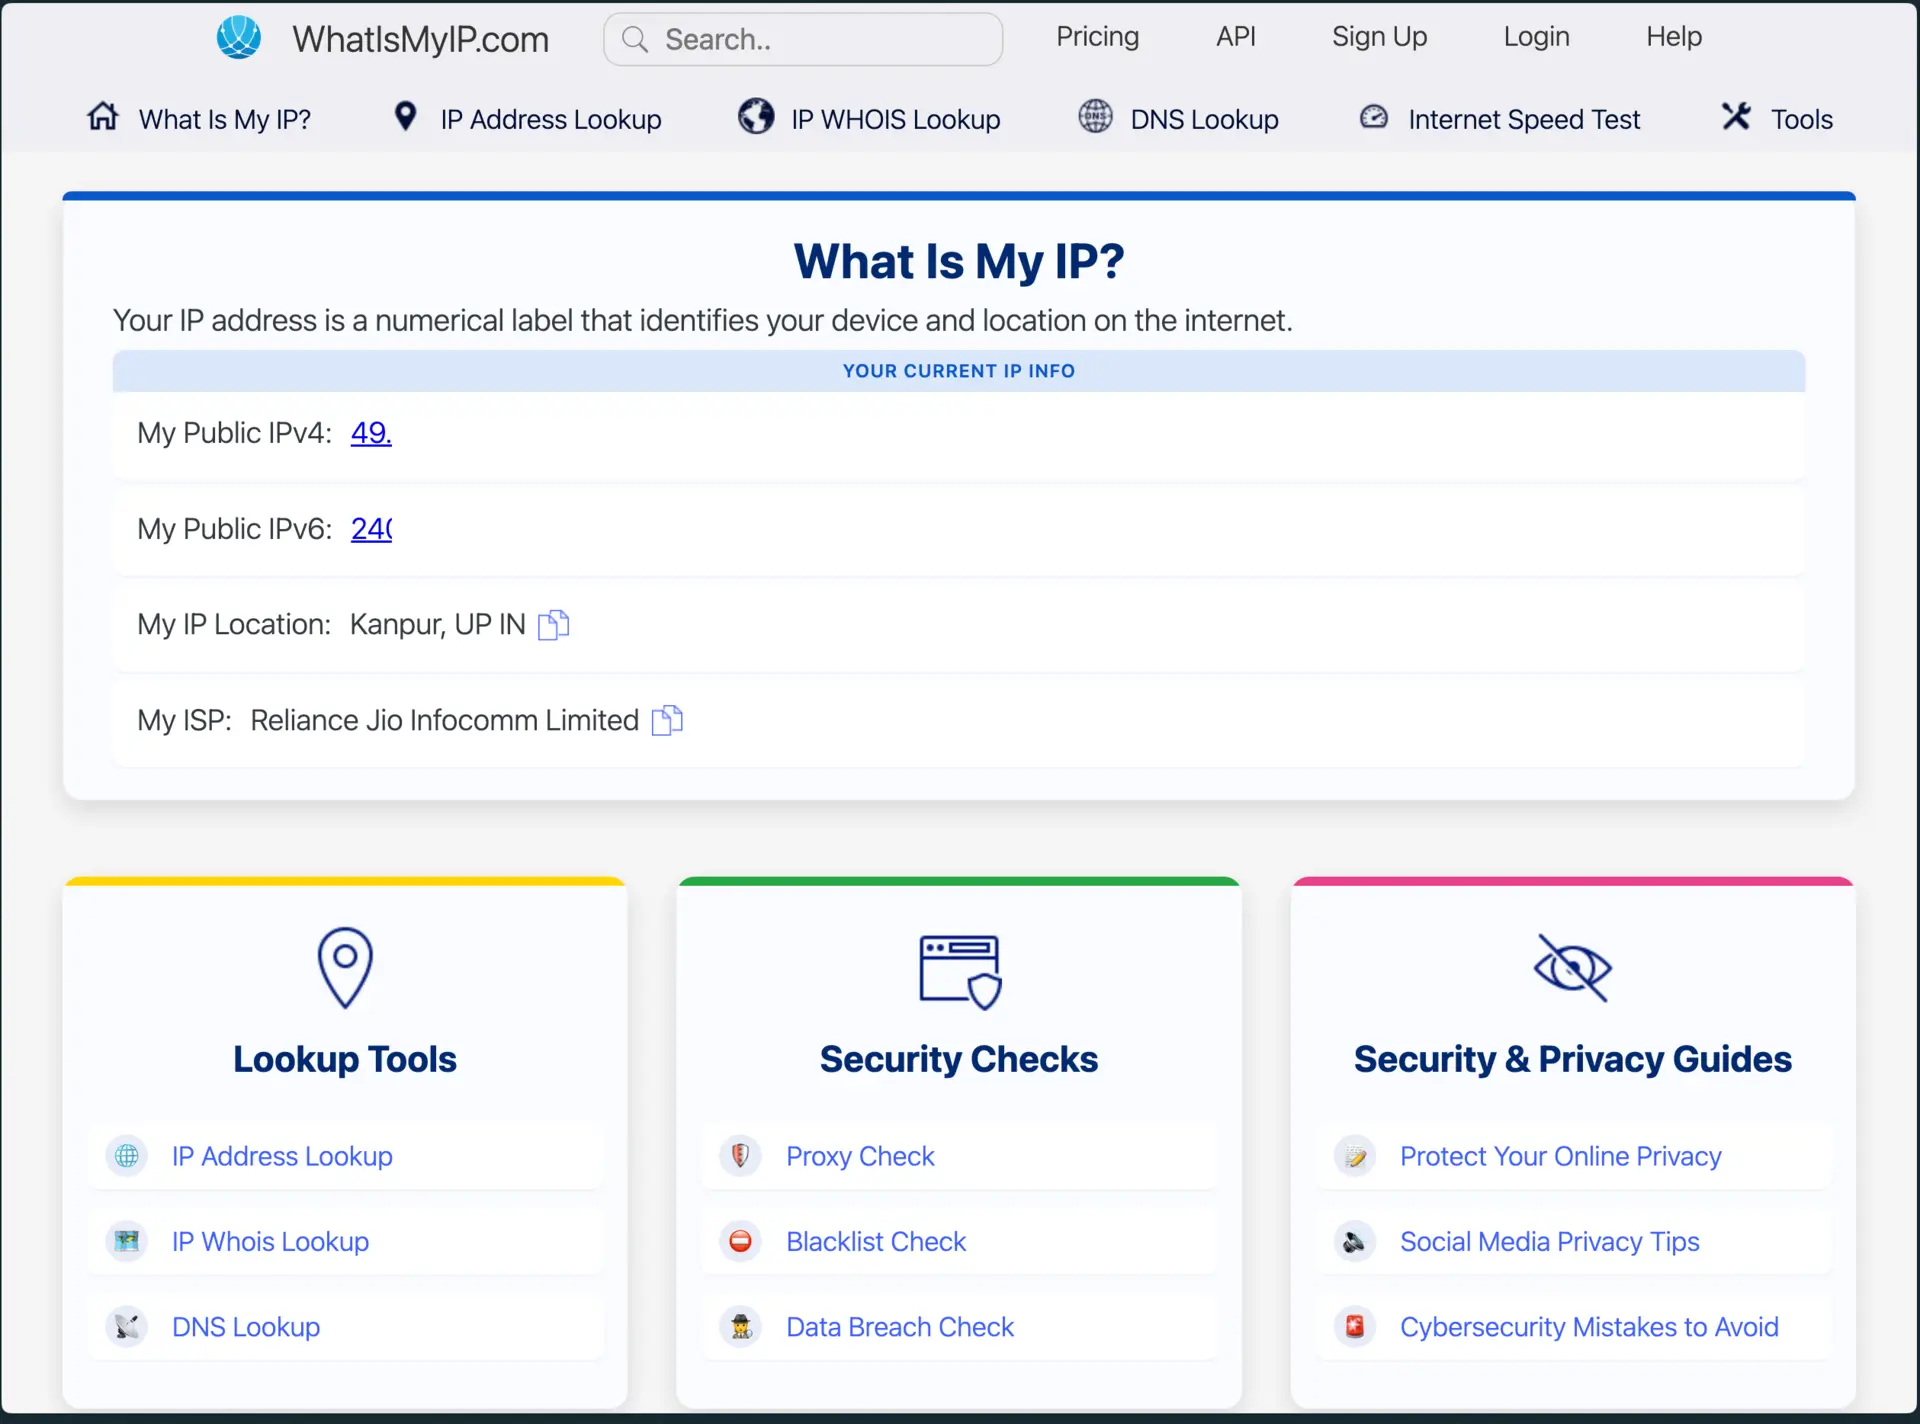
6. Find Your Public IP Address
Now you need to find your public IP address to share with friends. Simply visit whatismyip.com or search “what is my IP” in Google.
7. Test Your Connection
To test the connection, have a friend try connecting to your server. They should open Minecraft, click “Multiplayer,” then “Add Server,” and enter your public IP address followed by the port (for example, 203.0.113.42:25565, or just your IP if using the default port 25565).
Port Forwarding for Different ISPs
Some Internet Service Providers (ISPs) handle port forwarding differently:
1. T-Mobile Home Internet
T-Mobile Home Internet uses CGNAT (Carrier-Grade NAT), which prevents traditional port forwarding. You’ll need to use alternative methods like Pinggy (see below).
2. AT&T
AT&T routers often require you to create a DMZ (Demilitarized Zone) or use their “Firewall Advanced” settings.
3. Xfinity/Comcast
Xfinity users can access their router settings at 10.0.0.1 and navigate to Advanced > Port Forwarding.
4. Verizon Fios
Fios users should access their router at 192.168.1.1 and look for “Port Forwarding” under Firewall settings.
Common Port Forwarding Issues and Fixes
Connection Timed Out
If you’re experiencing a “Connection Timed Out” error, there are several possible causes. Your port forwarding might not be set up correctly, your firewall could be blocking connections, or your server might not be running properly. To resolve this issue, double-check your port forwarding settings, create firewall exceptions for Java and Minecraft, and verify that your server is running correctly.
Can’t Access Router Settings
When you can’t access your router settings, you might be using an incorrect router IP address or wrong login credentials. Check your router’s documentation to find the correct IP address, and if necessary, reset your router credentials (though this may require a complete router reset).
UPnP Not Working
If UPnP (Universal Plug and Play) isn’t working, it may be disabled on your router or blocked by your ISP. Try enabling UPnP in your router settings if possible, or switch to manual port forwarding as described in this guide.
CGNAT Issues
CGNAT (Carrier-Grade NAT) is common with mobile ISPs and prevents traditional port forwarding from working. If your ISP uses CGNAT, you can either contact them to request a public IP (which may cost extra) or use a tunneling service like Pinggy as described below.
Alternatives to Port Forwarding: Using Pinggy
Port forwarding doesn’t work for everyone. If your ISP uses CGNAT, your router doesn’t support it, or you simply don’t want to expose your home IP address, Pinggy is the easiest workaround. It creates a secure TCP tunnel from Pinggy’s servers directly to your Minecraft server no router configuration, no static IP, and no firewall rules needed.
Here’s how to set it up:
- Make sure SSH is available on your system (it’s pre-installed on Windows 10+, macOS, and Linux)
- With your Minecraft server running, execute this command:
This creates a TCP tunnel from Pinggy’s servers to your Minecraft server. Pinggy will provide you with a hostname and port that your friends can use to connect to your server.
Advantages of Using Pinggy for Minecraft
There are several reasons why Pinggy has become a popular choice for Minecraft server hosting in 2026:
- Bypasses CGNAT and restrictive ISPs: Works even when your ISP blocks traditional port forwarding
- Encrypted connection: All traffic between your server and players passes through a secure tunnel
- One-command setup: No router login, no firewall rules just run the SSH command and you’re live
- Dynamic IP friendly: Your Pinggy hostname stays the same even if your ISP rotates your IP address
- No software to install: Uses SSH, which is already built into every modern operating system
For a detailed guide on using Pinggy specifically for Minecraft, check out our dedicated article on exposing a localhost Minecraft server.
Securing Your Minecraft Server
Making your server publicly accessible means you need to think about security. A few essential steps will keep griefers and bad actors out:
- Enable the whitelist: Only allow approved player usernames to join this is the single most effective protection
- Keep your server updated: Always run the latest Minecraft server version to patch known vulnerabilities
- Use strong RCON passwords: If you’ve enabled remote console access, make sure the password is long and unique
- Back up your world regularly: Automate daily backups so you can recover from griefing or corruption
- Monitor server logs: Check logs periodically for unfamiliar player names or suspicious connection patterns
Conclusion
Port forwarding remains the classic approach to making your Minecraft server reachable from the internet, and for most home networks with a standard router, the steps above will get you up and running. That said, the networking landscape has changed more ISPs now use CGNAT, and many players prefer not to expose their home IP address publicly. That’s where tunneling tools like Pinggy offer a modern, hassle-free alternative.
Whichever method you choose, self-hosting a Minecraft server puts you in full control of your world, your rules, and your player community. With Minecraft still thriving in 2026, setting up your own server is one of the best ways to play with friends on your own terms. Happy crafting!