Localtunnel - Easiest way to create a local tunnel
Updated on Sep 19, 2025 · 6 mins read
Starting a local tunnel is as simple as pasting the following command into your Terminal / Command Prompt:
ssh -p 443 -R0:localhost:8000 qr@free.pinggy.ioSimply replace 8000 with your desired port number. For additional features and customization options, visit https://pinggy.io.
This browser does not support the video element.
Local tunnels are simple using Pinggy
Summary
Local Tunnel - Quick Overview
- Exposes local services to the internet via a secure, generated URL (HTTP/TCP/UDP).
- Bypasses NAT/CGNAT and firewalls using SSH-no extra downloads.
Why use it
- One-command setup for quick demos and debugging.
- Easy collaboration and remote testing (web, mobile, APIs, IoT).
- Cost-effective; supports custom domains and persistent URLs via Pinggy.
Security (short)
- Risks: data leaks, unauthorized access, MITM.
- Mitigations: TLS/HTTPS, access tokens, IP whitelisting, monitor traffic.
Pinggy setup
- HTTP tunnel:
ssh -p 443 -R0:localhost:<your-port> qr@free.pinggy.io - TCP tunnel:
ssh -p 443 -R0:localhost:<your-port> tcp@free.pinggy.io - Use the Pinggy Dashboard for tokens and custom domains: https://dashboard.pinggy.io/
Create Local Tunnels with a Single Command
Local tunnels establish secure pathways between your localhost and the internet, making it possible to expose websites, web applications, files, and enable remote access from anywhere. They become indispensable when traditional port forwarding fails, particularly in environments with CGNAT or restrictive firewalls. With Pinggy, a single command creates a secure tunnel to your localhost server directly from your terminal. There’s no need for complex installations or platform-specific software – Pinggy’s HTTP, TCP, and TLS tunnels deliver seamless server exposure that developers around the world rely on.
A local tunnel is created and you get an HTTP link to your localhost in seconds.
Understanding Local Tunnels
A local tunnel is a secure connection that allows external access to a device connected to a private local network from the internet. Local tunnels can handle different protocols such as HTTP, TCP, UDP, etc., which enables tunneling traffic of that specific protocol. For example, an HTTP local tunnel allows you to host a website on your localhost (your local computer) and make it accessible from the internet through a public URL.
Usually, localhost ports aren’t reachable from the internet because of NAT, CGNAT, and firewalls. Local tunnels solve this problem by tunneling traffic in a secure manner. This is similar to port forwarding but with the added advantages of a public address and the ability to circumvent CGNAT restrictions.
Setting Up Your Local Tunnel
Pinggy offers the quickest path to local tunnel creation. A single command transforms any local server into an internet-accessible service. This proves invaluable for development workflows, testing phases, live demonstrations, and collaborative remote work.
HTTP Local Tunnel Setup:
Launch your command prompt or terminal. Copy and paste this command, then press enter to initialize your local tunnel. Substitute
8000with your target port:Once executed, Pinggy generates a public URL that provides immediate access to your local tunnel.
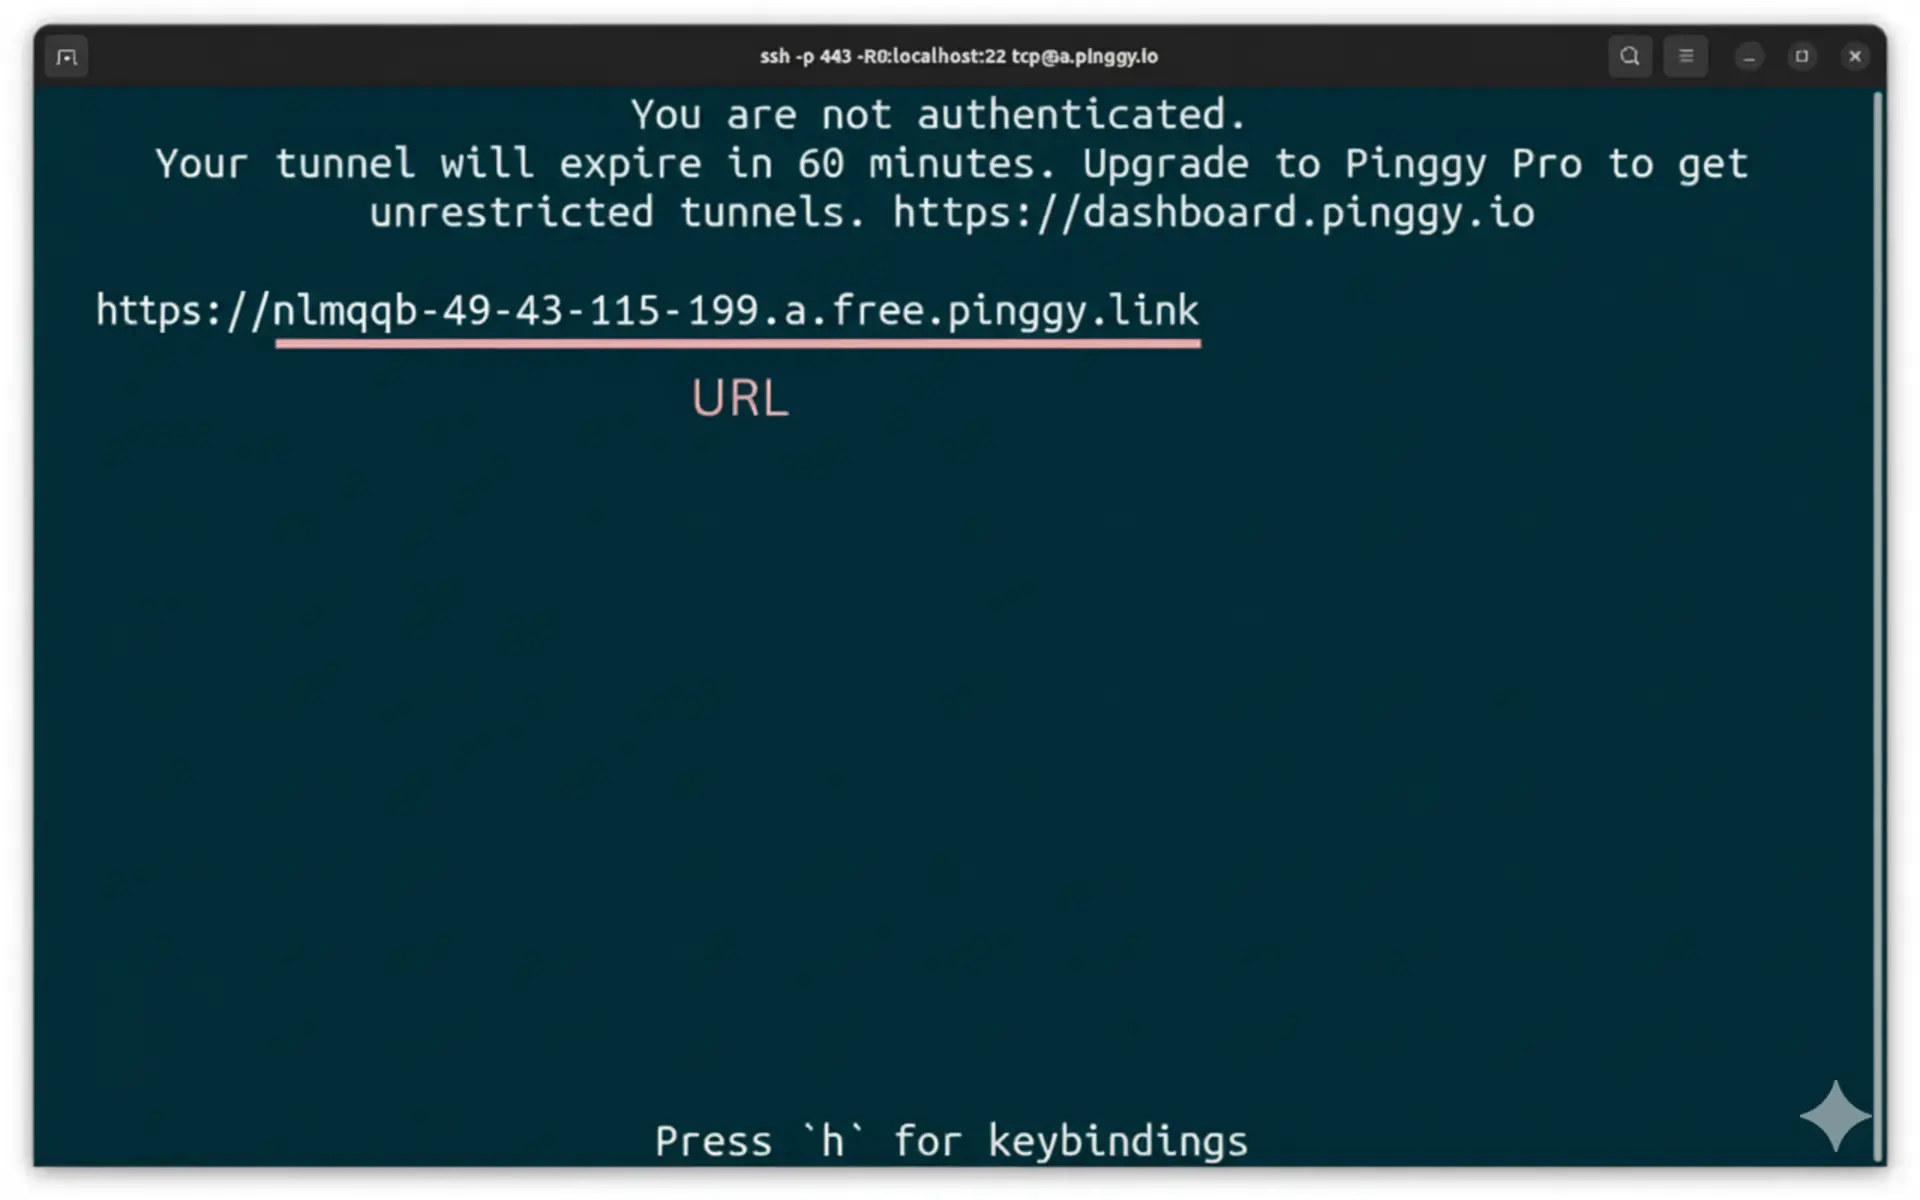
By default, Pinggy assigns a random URL to your tunnel. For more control, sign into https://dashboard.pinggy.io to obtain an access token. With your token, you can track active tunnel URLs through the dashboard and upgrade to Pro for persistent subdomains.
You can link a custom domain to your Pinggy tunnel to have a permanent URL to localhost.
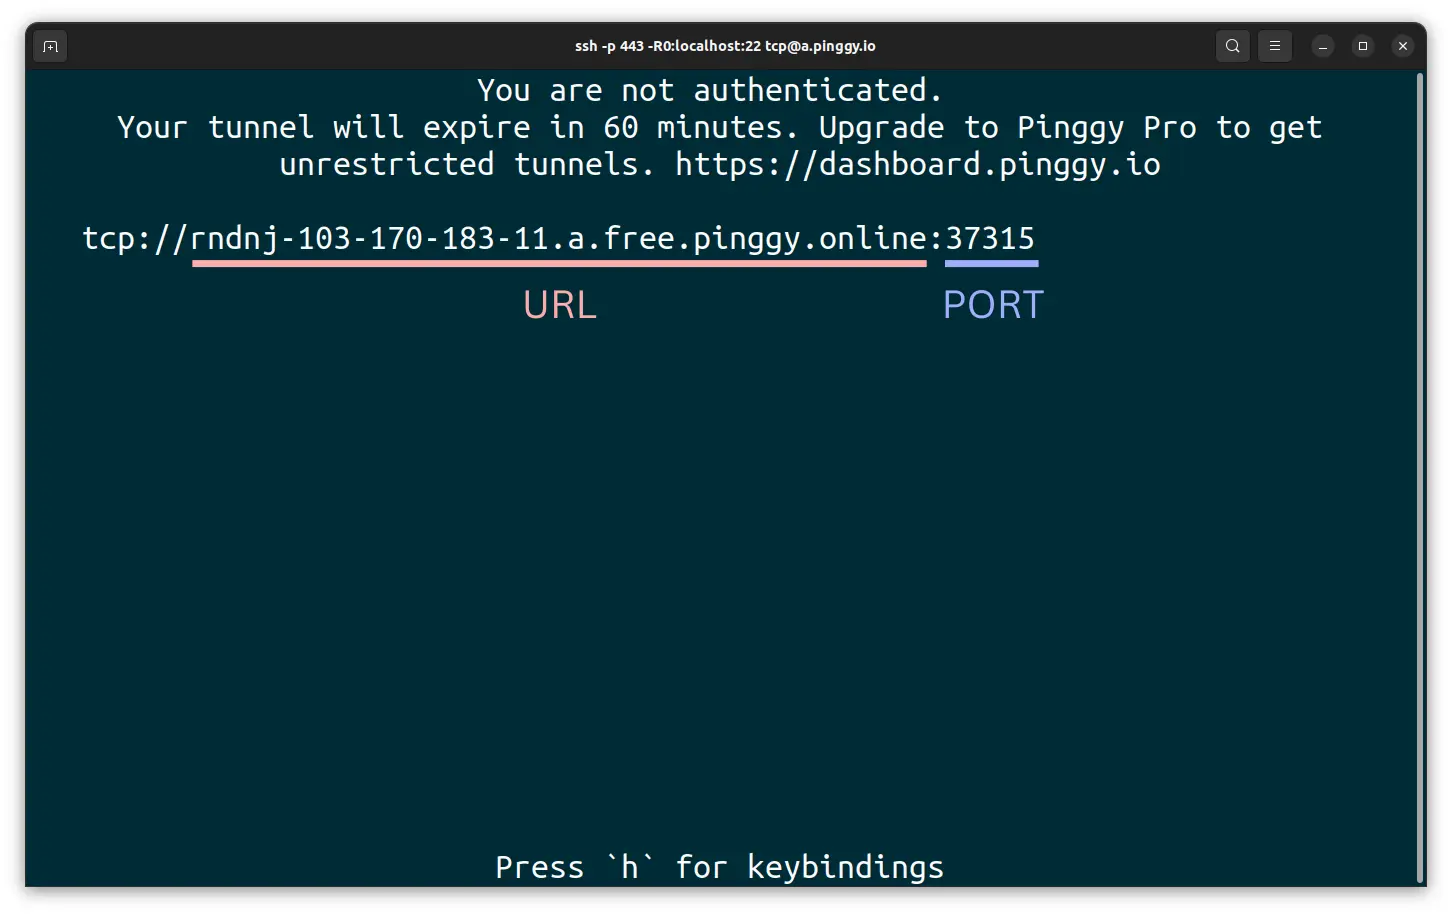
TCP Local Tunnel Setup:
Create a TCP local tunnel by executing this command in your command prompt or terminal (substitute
22with your specific port):Upon executing the tunneling command, you’ll receive a public URL formatted like this: tcp://tljocjkijs.a.pinggy.link:40527
Use this address and port combination to establish connections to your local port from any external network location.
Alternative: VPS with SSH Port Forwarding
For those preferring a DIY approach, you can establish local tunnels by renting a VPS and implementing SSH port forwarding to expose local services. This method requires creating SSH connections to your VPS and manually configuring port forwarding rules. Although this approach grants greater control over your setup, it demands significantly more configuration effort and ongoing management of VPS resources, firewall settings, and SSH key authentication. For the majority of users, streamlined solutions like Pinggy deliver superior convenience and speed.
Why Local Tunnels Are Game-Changers
Local tunnels deliver compelling advantages that transform how developers work. With instant deployment capabilities, a single command exposes your local service while completely bypassing complex network configuration headaches. This enables effortless collaboration by allowing you to share work-in-progress with remote team members or clients immediately, without the overhead of server deployments.
These tools excel at eliminating network barriers, seamlessly overcoming NAT, CGNAT, and firewall restrictions that typically block inbound connections to local development environments. From a budget perspective, they replace expensive server provisioning for testing and demos with cost-effective, on-demand tunnel solutions. You can even customize endpoints with personal subdomains or integrate your own domain for professional, memorable public URLs.
The universal protocol compatibility means you can expose HTTP, TCP, or UDP services with minimal configuration changes to match your specific requirements. Best of all, the zero-friction setup leverages SSH that’s already installed on virtually every operating system, eliminating the need for additional software downloads.
Real-World Applications for Local Tunnels
Local tunnels excel across diverse scenarios, making them indispensable tools for modern development. In web development and testing, they allow you to instantly showcase local web applications for live demos, gather client feedback, or conduct collaborative debugging sessions. Mobile app developers benefit by testing applications against backend services running on their development machine without complex deployment steps.
For API integration and webhooks, local tunnels expose local APIs to external services for comprehensive callback testing, webhook validation, and integration verification. They’re equally valuable for IoT device administration, enabling remote monitoring and management of devices operating within private networks from anywhere in the world.
System administrators can securely access and administer servers or desktop systems from external networks without establishing complex VPN infrastructures. When it comes to client presentations, local tunnels deliver seamless demonstrations of prototypes or beta software to remote stakeholders, eliminating the need for premature production deployments.
Security Considerations and Protection Strategies
Local tunnels streamline connectivity but require careful attention to security implications. Publishing local services creates potential access points to development tools and sensitive endpoints, so it’s crucial to implement robust authentication mechanisms, configure IP whitelisting for restricted access, and maintain strict separation between development and production data.
Improperly secured tunnels may inadvertently leak confidential or proprietary information. To prevent unintended data disclosure, mandate encrypted tunnels (TLS/HTTPS) for all connections, avoid production data in development environments, and implement basic authentication or bearer token security layers.
Public tunnel endpoints can attract unwanted attention, including automated attacks and exploitation attempts. Protect against malicious access by deploying strong access tokens, leveraging persistent subdomains through trusted platforms (such as Pinggy’s dashboard), and establishing continuous traffic monitoring for suspicious patterns. Additionally, unencrypted tunnel traffic remains susceptible to man-in-the-middle attacks and data interception, so always enforce data encryption in transit through TLS protocols and verify tunnel security configurations regularly.
Understanding these risks and implementing comprehensive protection measures ensures you can harness local tunnel benefits while maintaining robust security standards.
Conclusion
Local tunnels empower developers and IT professionals to expose local environments quickly and securely, whether for development, testing, demos, or remote administration. They offer a practical solution to bypass common networking hurdles and support multiple protocols to fit a variety of use cases. With Pinggy’s simple one-command approach, you can get started without any installation or complex setup. Just remember to implement security best practices to mitigate potential risks associated with exposing internal services to the public internet.